
Seared and Seasoned Duck Breast

Duck is one of my favorite dishes to order at a restaurant, probably because I shy away from cooking it most of the time. Waterfowl season is in full swing and most hunters I know in Oregon save the meat to put in pepperoni, not a bad option because it turns out pretty good and gets ate fairly fast by coworkers and friends. Although be forewarned every time I am in a duck blind eating duck pepperoni I never shoot any ducks. I am going to make this recipe real easy. I have researched recipes and I could easily break this down to be complicated but there is a spice blend out there that has most of what you need. Go to the store and purchase Emeril Lagassi Essence spice, you know the famous chef. What I do is take a breast with the fat on, try to pick a really fat mallard with lots of fat on the breast. Probably a local duck that is not flying from Canada to Mexico. Liberally apply the Essence spice on both sides of the breast and set in the fridge for a couple of hours. Use sea salt and pepper liberally as well.

Apply seasoning on both sides before putting it back into the fridge.

When you are getting ready to cook the duck, take out of fridge and let it sit covered for at least thirty minutes. I was making Sunday Gravy all day, a famous Sunday dish that I make once or twice a year.

Add a couple of tablespoons of olive oil after the pan is hot. Once the meat begins to sizzle fat side down, turn to medium high heat. Once the fat side is browned, turn the breast over.

You are going to have to keep turning this breast several times until the breast is medium rare. I can tell to the touch like a steak, you can use a meat temp probe if you need too. Once the meat is medium rare pull from the skillet and let sit for three to five minutes before slicing.

Once both sides are completed and the meat is medium rare I remove from the skillet.

Slice the meat about 1/4 inch thick and plate.

The breast is perfect medium rare. Remember it is better to error on the side of under cooked with duck than over cooked. You can always take an undercooked rare breast slice and finish off in the same skillet in seconds if you need too.

Plate your dish and serve. I practiced this before serving to my clients. I think they enjoyed it, though I did not make the Sunday Gravy for them.

Here is a little trick. Deglaze the cast iron skillet and then drizzle over the duck. You can deglaze with a little bit of wine, Marsala, or Sherry. Basically get your skillet hot and pour in a 1/4 cup of wine or less and then take your spatula and scrub the bottom of the pan to get all the tidbits on the bottom of the pan. Boil until it reduces.
Enjoy folks.
Hunting Chef
Cucumber cups with Smoked Salmon Cream Cheese

I was supposed to go to some friends house this evening for a Christmas party. As I cooked appetizers during the day I began to get very tired. I took a nap for two hours, and as I woke I knew I was coming down with something bad. Just so you know, I can count on one hand how many times I have taken a nap on in 42 years. So, needless to say, I was unable to attend and never brought these appetizers to the party. Instead, I am here blogging about it.
- 8 oz of smoked salmon, which I smoked on the blog and canned a few weeks ago
- 4 oz of cream cheese
- 1 tablespoon of prepared horseradish
- 1/2 teaspoon of lemon juice
- dried garlic, pepper, salt to taste

Then I take my trusty cuisnart mini mixer and I get busy with it.

Now, if you can get mini cucumbers, that is what I suggest. However, I am in the heart of
winter up here so the only product I can get is full size cucumbers. Cut them one inch thick, and then we are going to take a melon ball maker or a 1/2 spoon measure and ball out the cucumber leaving the bottom intact.

Then you core about 24 of them and get the proper plate for your party.

Remove the salmon spread from the mixer and put into your pastry gun, or pastry bag. However, if you do not have that you can use a zip lock bag and cut the corner out of it, I have used that in the field many of times.

The appetizers are starting to come together.

You cannot just plate this and serve! You have to put some cut chives or green onions!

Here is my suggestion on this recipe. If you are in the winter and are going to serve in less than two hours and have the fridge space. Peel the cucumber, it would give a better texture. If you are in the summer and use mini cucumbers leave the skin on.
Enjoy Folks,
Hunting Chef
Shrimp and Gorgonzola Cream Sauce Pasta
I was down in Cabo San Lucas Mexico a few weeks ago and I had this dish at one of my favorite restaurants in all of the world for Sushi. If you want the worlds best sushi go to Nik Sans in Cabo, it will blow your mind. That being said, we told them to bring the best five dishes and one of the great dishes they brought was gorgonzola shrimp on this rice paper. The next day I was floating around fishing (we caught 22 yellow tail tuna) and all I could think about was the Gorgonzola Shrimp dish. I had to figure it out. The first meal I made when I got home I put it together on pasta and it turned out great. It is pretty simple.

- 4 cups of heavy cream
- 6 ounces of Oregon Blue Cheese
- 4 tablespoons of grated parmesan
- 3/4 teaspoon of sea salt
- 3/4 teaspoon of fresh cracked pepper
- 3 tablespoon of chopped flat parsley
- 1/8 teaspoon of nutmeg
Take heavy cream and bring to boil and reduce to simmer in a pan until it is reduced by half. Remove from heat and add parmesan and Oregon blue cheese, parmesan, salt and pepper and nutmeg. Taste it, does it need more salt and pepper? Add some.
Take your medium deveined shrimp and add to a hot skillet with 2 tablespoon of butter and 2 tablespoon of olive oil, dash of salt and pepper and cayenne while searing shrimp. Cook your pasta. I use the freshest pasta available so it only takes 3-5 minutes.


Antelope tenderloin with Rosemary Balsamic Reduction
You probably remember a few months ago when I harvested my antelope at my friends ranch in Thermopolis, Wyoming.

- The Tick Tock Buck

Well now it is time to put it on the plate. I thought a nice rosemary balsamic reduction would be nice with a glass of Oregon Pinot.

- Antelope tenderloin with marinade


Take the same skillet and add to the uncleaned pan, because we are going to deglaze it with the following.
-
tablespoon of olive oil
-
2 tablespoons of chopped shallots
-
1 tablespoon of chopped garlic
add the shallots and cook until translucent, about one minute then add garlic. Then add 1 cup of balsamic vinegar, and 1 large Rosemary sprig and bring to boil. Reduce the vinegar until only 1/4 cup remains. Remove from heat and add 2 tablespoons of butter.

- Remove rosemary sprig and put sauce on loins


Cast Iron Beef Tenderloin wrapped in Bacon
The Thanksgiving holiday we spent with some family friends at the beach, they made a traditional fantastic turkey dinner with all the trimmings. Turkey makes me tired, not like just a little sleepy. It is like some one hit me with a Rhino tranquilizer dart. They say that it has DNA that affects us that way, but for me it is like a train hit me. The next three days we spent on the different part of the coast with my buddy Wayne and Sherry. This is where we first made the bone in pork loin. The next day, we decided to take a 20 pound beef tenderloin that I brought and make it for dinner because we had a large group of friends were visiting for dinner. Wayne said to me in his okey voice “Lets wrap that son of a gun in bacon”. I replied “Bacon??” He then looked at me with this strange look on his face and said “What the hell doesn’t taste good wrapped in bacon?” He is correct about that so off we went looking for some good bacon.

- Season the meat with salt and pepper and a little cayenne


After it is sliced, then it is put back into the pot and juices to be served family style.


Burnt Tomato, Goat Cheese, and Anchovy Bruschetta
One of my favorite cook books of all times is called Seven Fires by Francis Mallmann. I bought it because we will be spending some time down in Patagonia this year on two separate trips and I am excited about the food! Look at me, the fat kid who gets excited about food. I swear the only reason I hunt is to eat. This appetizer I have made on several occasions and it is a home run! Thank Francis for making this world a better place via a good recipe and a great cooking book. Please do not let the Anchovy scare you away, I have served this on several different occasions, and unlike Francis I hide the anchovy under the tomato and they get mowed over by friends, clients, and family and nobody ever even notices.

Add 1/2 cup of Oregano leaves, 1/4 cup of virgin olive oil, course salt and fresh ground pepper to taste and blend.
Take 36 cherry tomatoes and cut them in half.

Then put the tomato in a bowl and toss and combine.

Check to make sure you seasoned with salt and pepperHeat up a large cast-iron skillet or what they call Chapa’s in Argentina. When it is very hot place the cherry tomatoes halves cut side down and about 1 inch apart on the hot surface. Work in batches if necessary. Do not move the tomatoes, do not even touch them until they cook and burn because if you do they will fall apart and lose their shape. I use tongs to remove them and put them onto a plate, be careful and it is okay if they are blackened, that is what you are looking for.I then cut some bruschetta and I take about 8 ounces of goat cheese or bucheron. I have used both, and I think I prefer a good aged goat cheese. I spread a little on each piece and put on a cookie sheet to broil. While the oven heats up. I make the Parsley, olive oil and Garlic Sauce. This is pretty easy, 1/2 cup packed minced fresh flat-leaf parsley, 4 garlic cloves, 1/2 cup virgin olive oil, salt and pepper to taste. Put it in your food processor. As the tomatoes burn, I add the bread and cheese to the oven under the broiler. As the cheese softens I pull off and add anchovy fillets. Okay here is the important part, DO NOT BUY THE CHEAP STUFF. BUY a 3.5 oz of the ITALIAN ANCHOVY. Take them out of the jar and cut the lengthwise anchovy in half. Add them to the top of the cheese. Then add the burned tomatoes about 3 halfs a piece of bread, black side up. Use your tongs. Then take a spoon and spoon a dollop on each bruschetta and quickly serve. Then think to yourself that you should go buy Seven Fires because your friends will think you are a real a super star and possible a demi God. Burnt Tomato, Goat Cheese, and Anchovy Bruschetta.
These are just amazing people. Make them over the holidays.Happy Thanksgiving,The Hunting Chef
How to Can Fish in a Pressure Cooker
Here is the step by step instructions for canning salmon or tuna. I do both and trust me once you can your own tuna, you will never again eat regular tuna in the can at the grocery store.

Each step is very important, so to make sure you do not get sick or blow your kitchen up follow the instructions exactly.
- Wash 24 jars in warm water or in dishwasher
- Pack fish in jars and leave about 1/2 inch of head space
- Add to top tuna or salmon 1/4 tea spoon canning salt and 1 teaspoon of lemon juice (do not add salt to any smoked fish, it has plenty from the brine)
- Wipe the rim of the jar clean with a towel. My wife keeps the towels with the pressure cooker because the towels will stink even after you wash them.
-

I add one slice of Jalepeno and Garlic to the jars for Tuna - Add 2 quarts of warm water into the pressure cooker and put a metal spacer that came with the pressure cooker on the bottom.
-

Leave 1/4 inch of head spacing when putting fish into jars - Place 8 lids into seperate pot of boiling water, not the rings just the lids. This softens the rubber seal of the lid. Only boil for about 2 minutes.
- Put the lid onto the jar and hand tighten (not too tight just snug) the ring.
-

Put the hot lids on each piece, three at a time and screw the top on nice and snug, do not over tighten. - Put 8 jars in the bottom of the pressure cooker and layer with another metal spacer
- Repeat up too three layers
- Close lid and turn burner on high
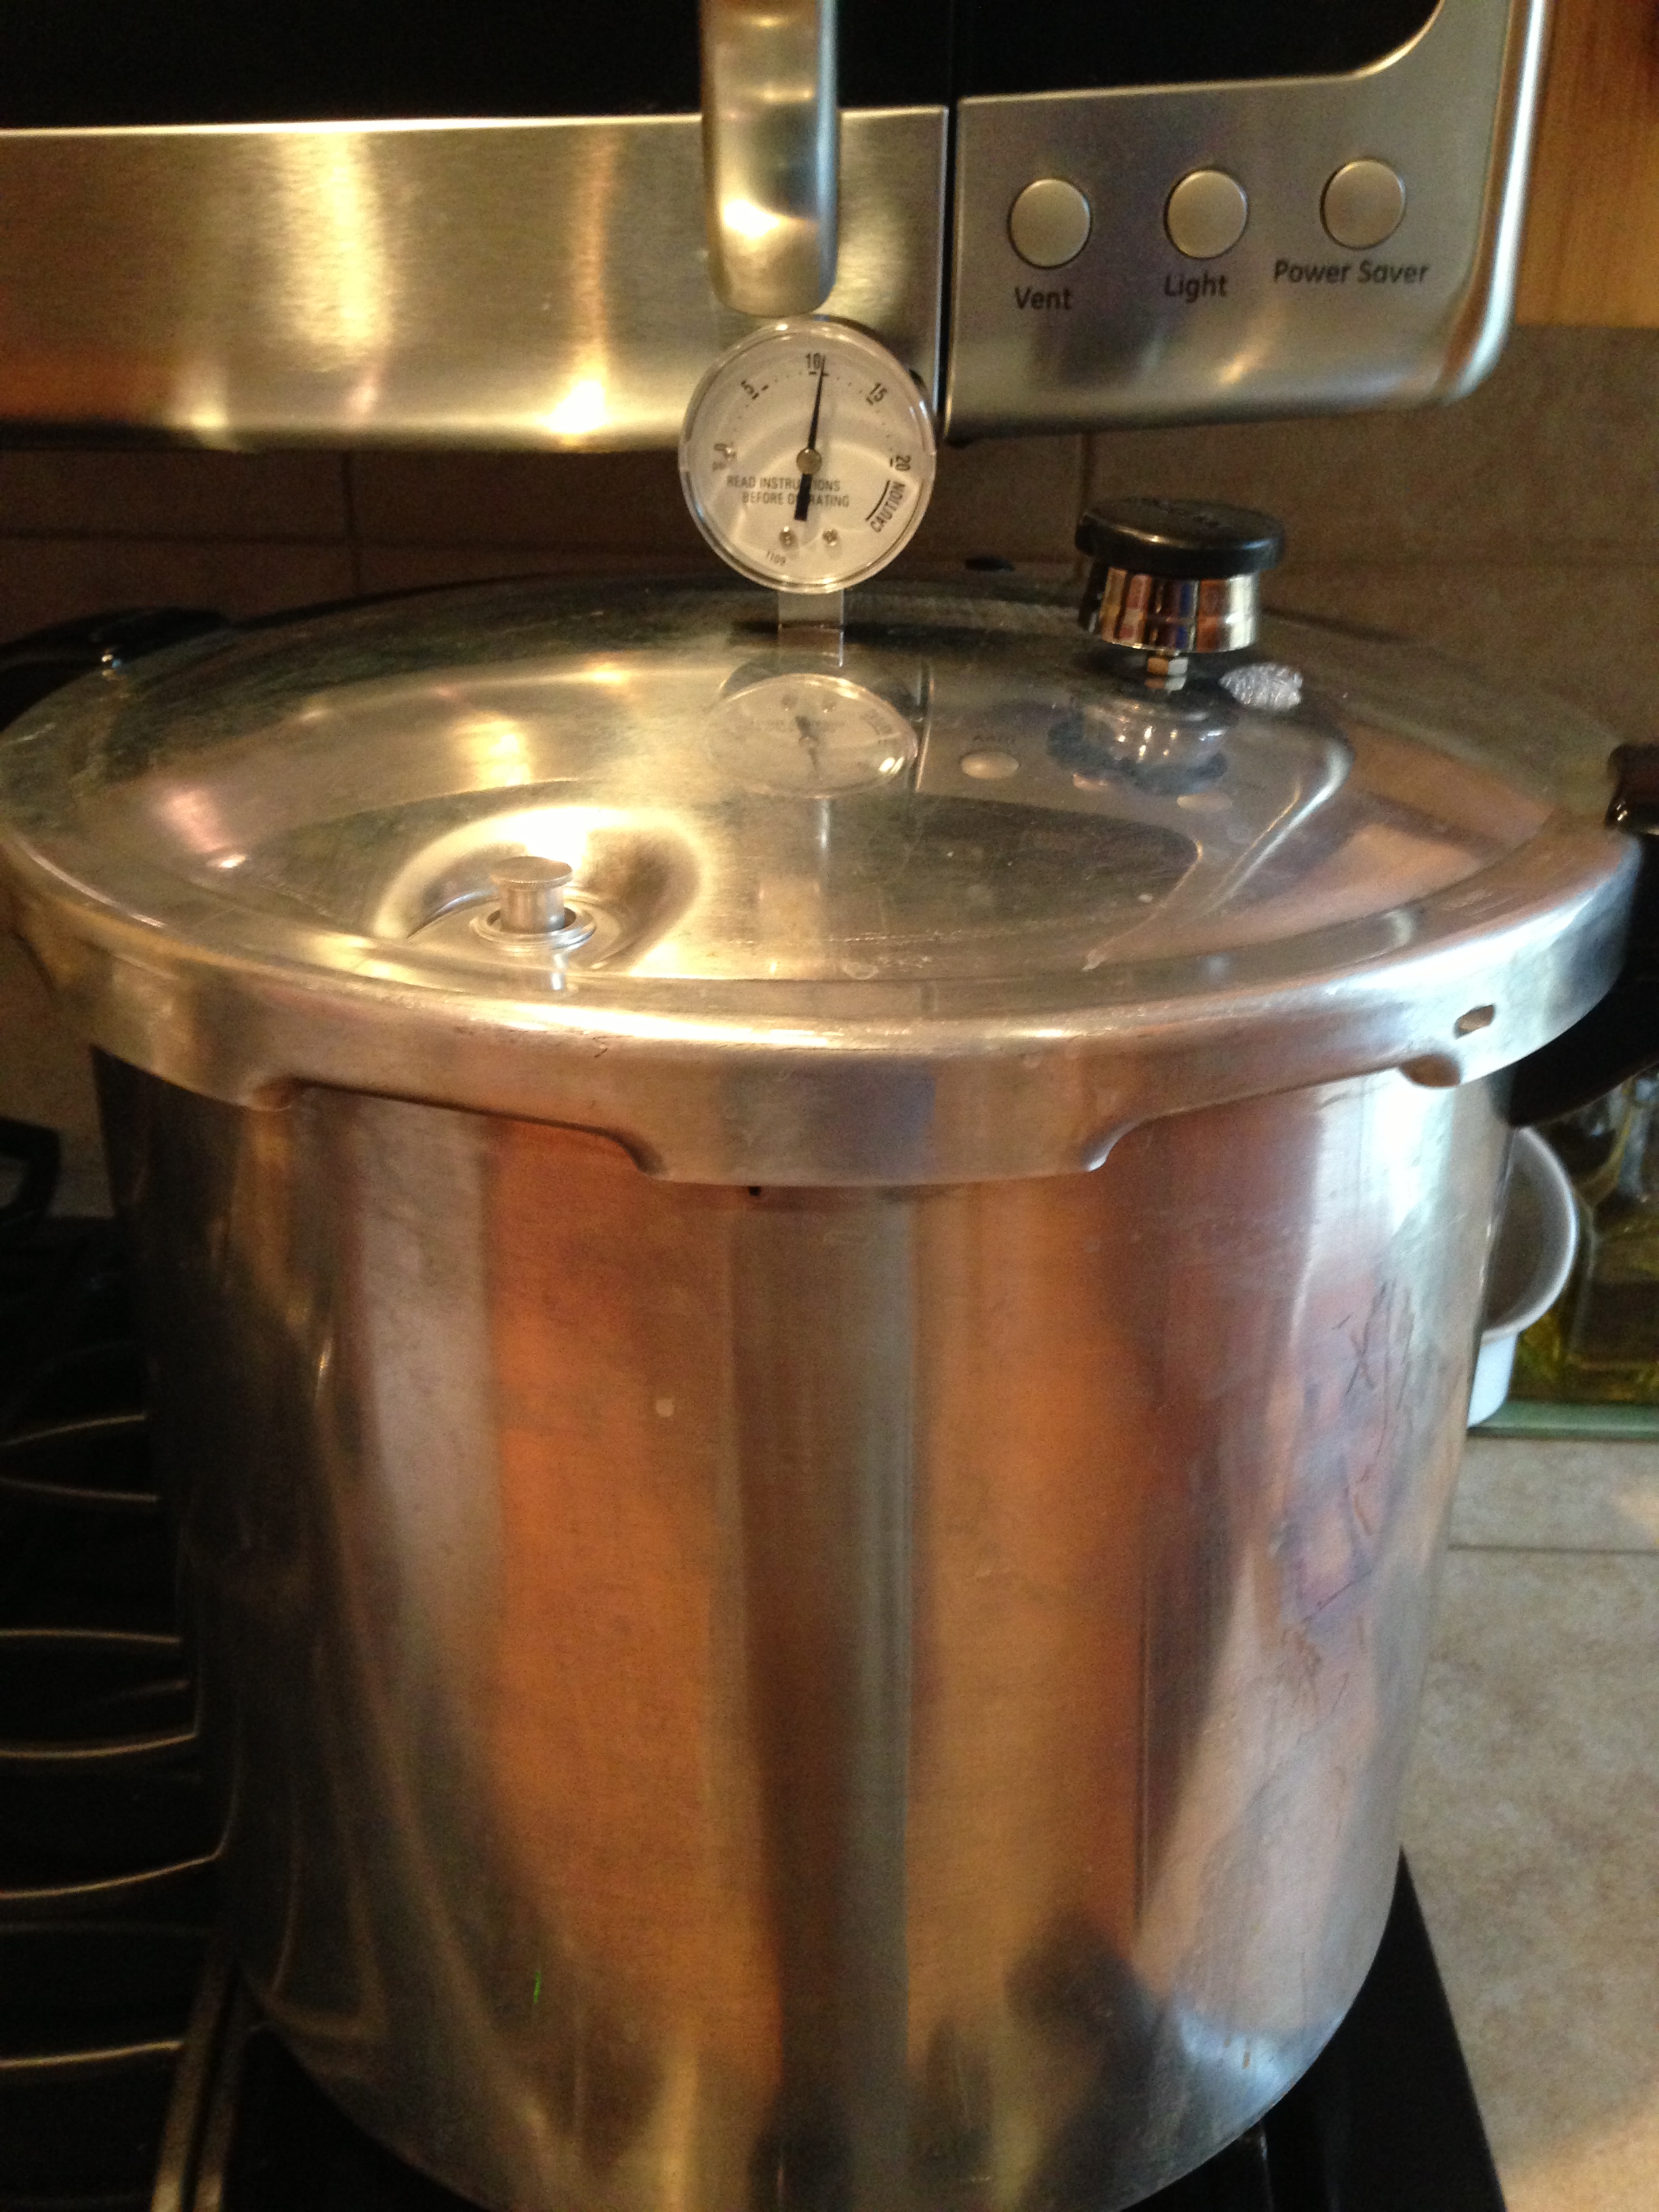
- Allow to cook on high with the steam cap off and bring to hard boil. Watch the steam vent tube when it begins steaming hard set timer for 10 minutes so it steams hard for 10 minutes
- Place steam cap on vent tube and reduce heat a little. Watch for pressure to rise to 10 lbs.. Reduce heat to low and hold 10 lbs for 1 hour and 40 minutes (100 minutes). Try and hold pressure at 10 lbs and keep checking it because it will go up and down and will need adjusting.

- After you reach the end of cooke time, turn off burner. DO NOT REMOVE THE HEAT VENT CAP OR LID. Allow the big vent tab to fall and pressure to go down to 0. This is very important!
- Allow to cool down until little vent cap in front falls form the lack of pressure in the cooker. DO NOT REMOVE THE LID EARLY. YOU WILL BE BURNED SEVERELY IF YOU DO.
- Remove lid but lift away as steam will be released into your face if you tilt it towards you.
- Remove the jars to an old towel on counter top.
- During and after cooling the jar lids will pop as they seal. When the jars are cool take a warm soapy washcloth and wipe the jars as they will be oily. The fish has a lot of oil in naturally. You can remove the rings to wipe the jars down.
- Check the jars to make sure they have good seal by pressing on the lid, if it pops go ahead and eat it but do not store it! You must refrigerate and it will keep for a week.
-

I use personal stickers, with my logo to let the people know I love them when I give them for gifts


Smoked Salmon and Canned
My father loves smoked salmon. He also loves spending the winters with my mom in Arizona. So every year I smoke him a batch of Salmon for his yearly trip South. I decided this year I would can it for him instead of freezing it because it will last longer and take up less freezer space. It is a longer process and a labor of love, so Dad I love you and I hope you enjoy it. The first thing you want to do is brine the fish. I like to make mine a with a complexed flavor that begins sweet and ends with a little heat or kick. So the brine I use is a little sweet but as you follow along you will see where the kick comes in.
The Brine
- 1 cup sugar
- 1 cup salt
- 1 cup of pineapple juice
- 1/2 cup of brown sugar
- 1/2 cup of soy sauce
- 1/2 cup water
Put the fish down face down with skin up in a plastic container. Then the remaining fish skin down flesh up so the fillets have their skin touching. Put in fridge and turn it upside down every so often so all the filets get exposed to the brine. I brine it for 8 hours, then take out and wash off with water and put on a wire rack on top of a cookie sheet.

The salmon is very red because they were Silver Salmon caught on the infamous Russian River in Alaska. Stephanie caught these with her fly rod. Let the fish air dry for about an hour, then get them ready for the smoker. I keep the fish on the wire rack on top of cookie sheet in my smoker to keep the fish from drying out.

I smoke the fish for about 2.5 hours at 180-190 degrees. I am going to can these so I do not want to completely smoke the fish, just to taste. If you smoke it too long the fish will go black when you can it and be over done.

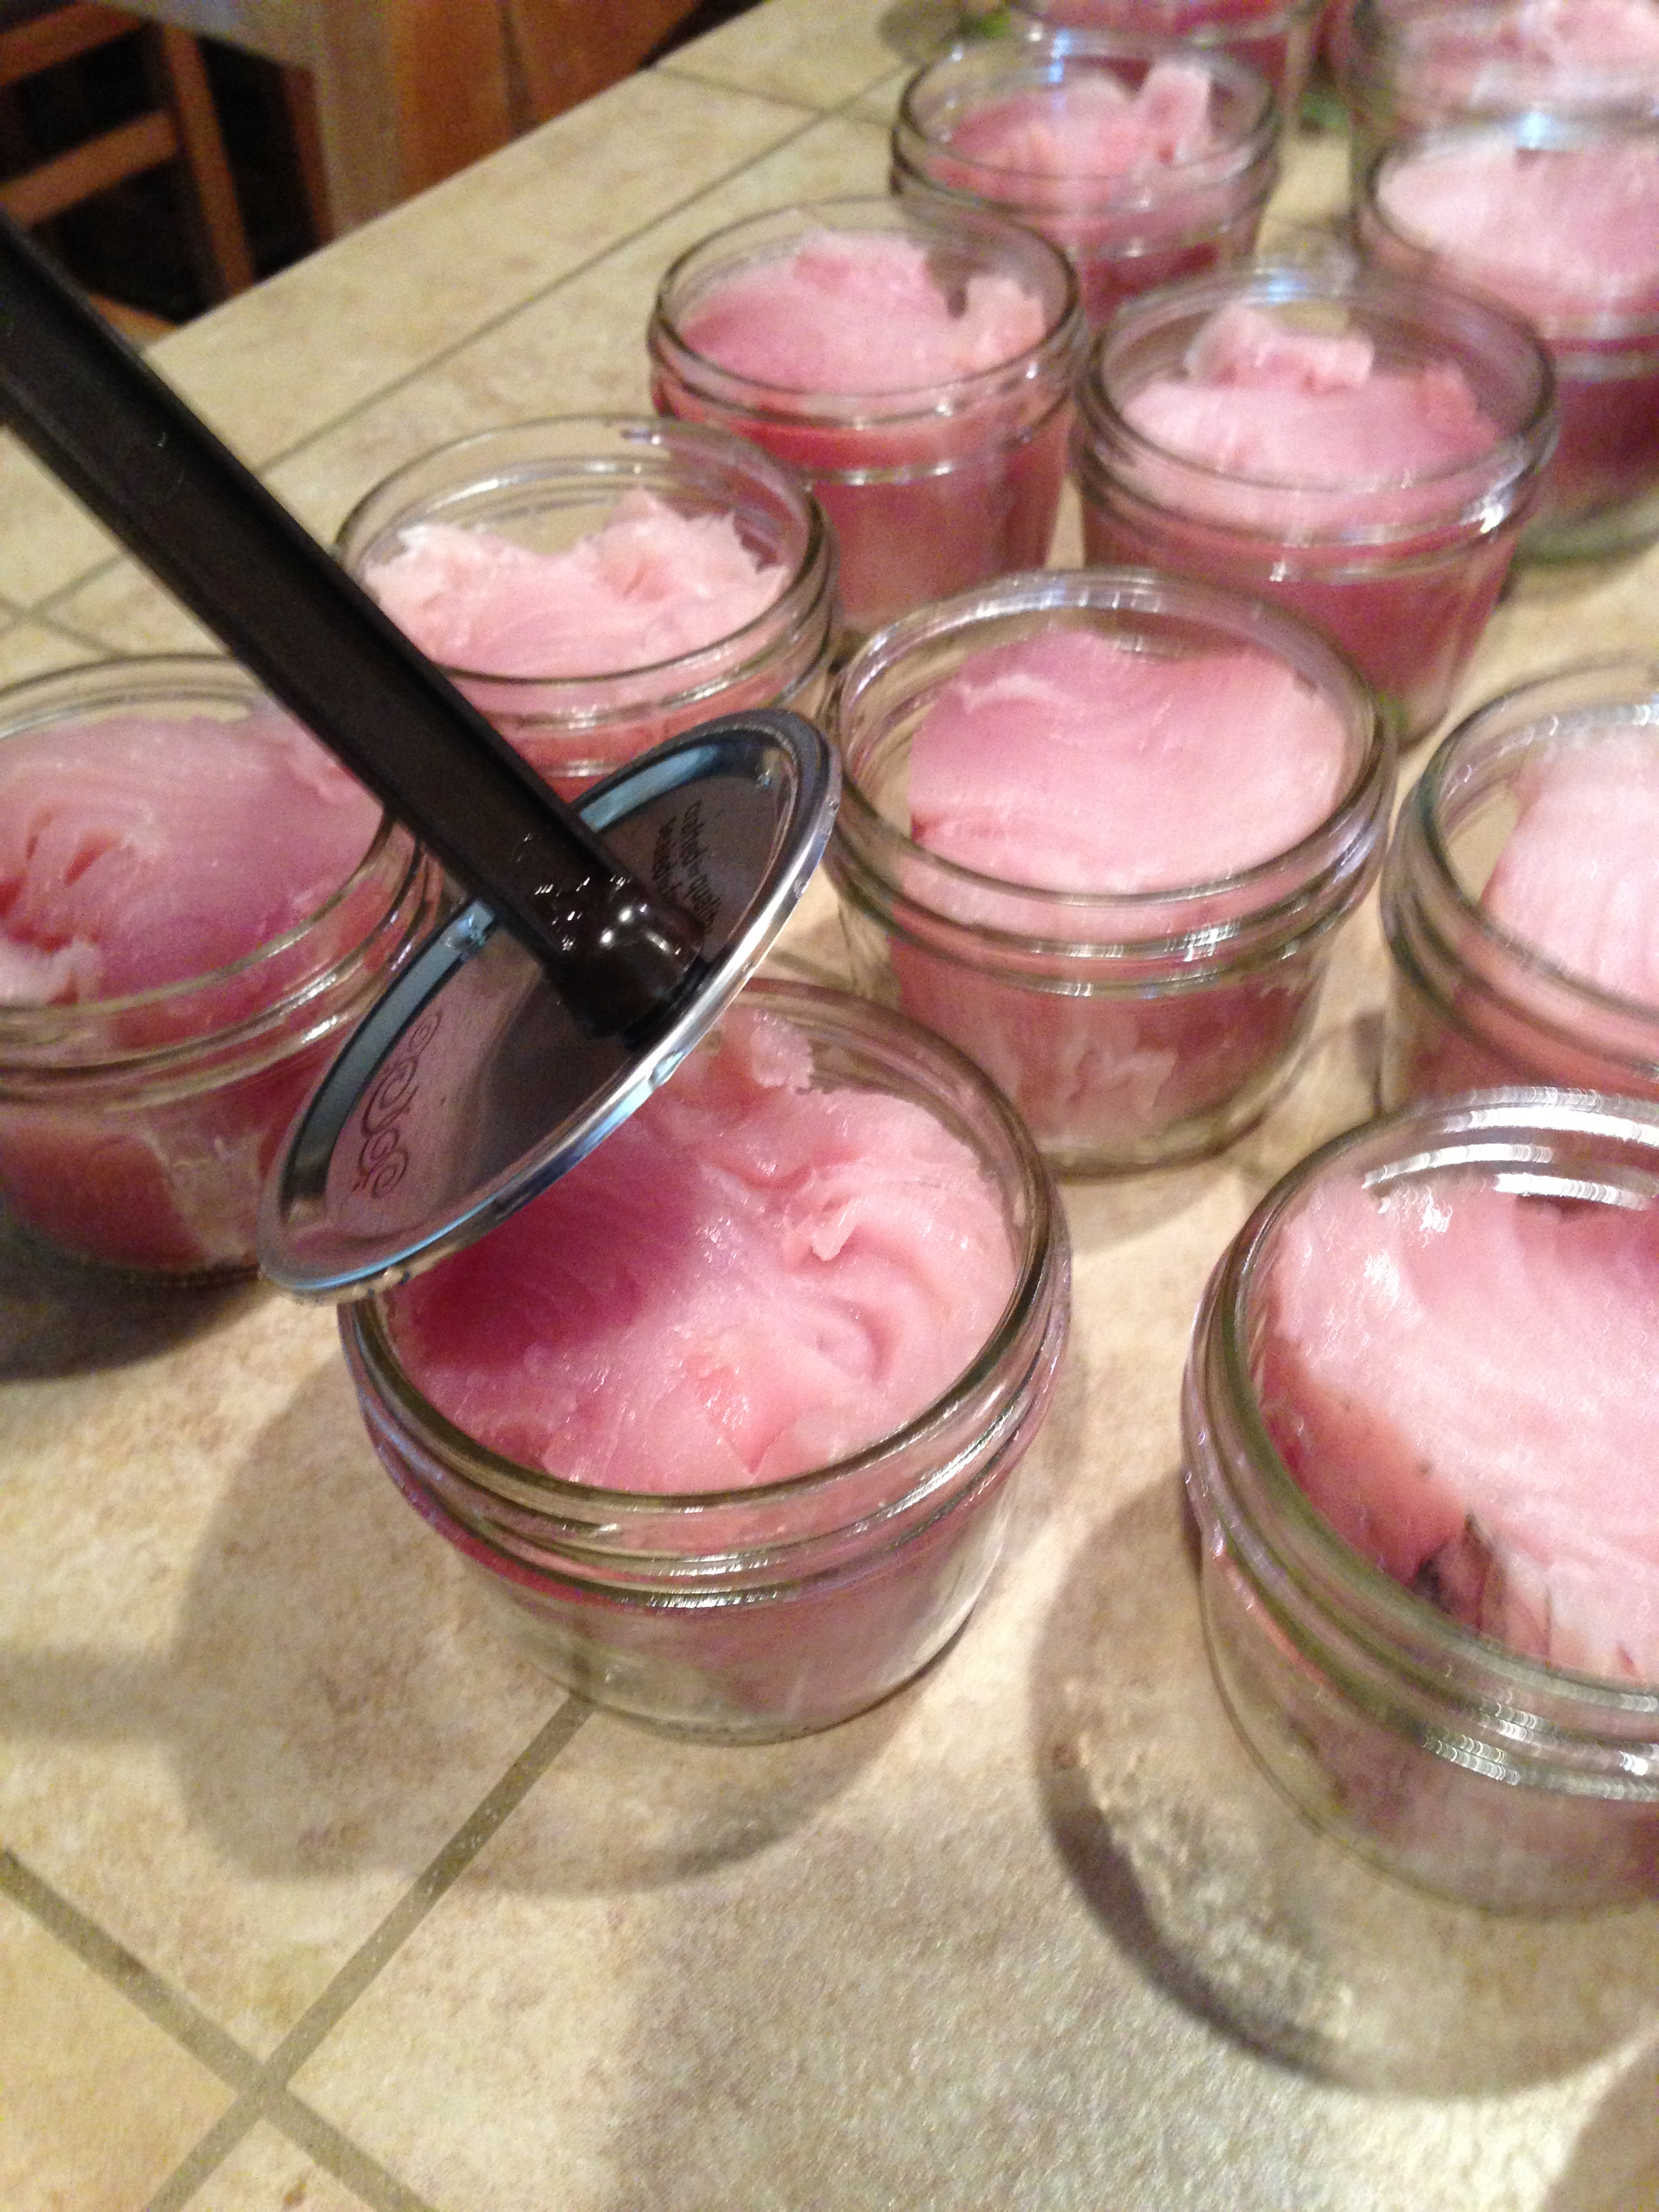
I pull the fish and let it sit for about 20 minutes, and why I do this I get my cans ready. I will give you the canning instructions later, but after I get the jars cleaned. I add 1 teaspoon of olive oil in each jar, one slice of jalapeno and one slice of garlic. Remember the little kick I was talking about? Do not think that the fish is going to be too hot and spicy. It just gives it a little flavor and a little pop. Trust me, you will like it!


Time to add the smoke fish. Add the fish to the jar, but make sure you leave about 1/2 inch of spacing to the top of the jar. This is important.

Add the lids and get them ready for the pressure cooker. Check the blog for how to can fish and it will give you the step by step instructions. I will add that as a separate blog.

Then you can them in the pressure cooker. Remove and clean the jars.

I always mark them with a sharpie pen what it is and the date. Then you can put them in storage for a rainy day. It was raining today, so I opened one to check the flavor. It is awesome and has all the flavors of a good smoked fish. Great for crackers, great for fettucine, salad, or even pizza. A great way to store it and it turns out great.

I hope you enjoy it as much as I did. It is a winner!
Hunting Chef
Elk Lasagna-The Classic
Sometimes you just have to have a classic dish that you can go too in your recipe collection in a flash. Something that is fast, but darn good and definitely a step above what everyone else makes. So my people of the hunting chef blog, I present to you Elk lasagna Shay Nanna style. I am going to do this step by step so you understand exactly how to do this, so it turns out perfect.
First thing I do is let my elk burger thaw out correctly. This means naturally, no microwave or other odd techniques. Take it out of the freezer and let it come to room temperature on the counter. You can use elk or bison sausage if you choose. Then I toss it in and cook it over medium heat.

Brown the meat, do not over cook it. Then strain it. Notice that the meat is lumpy, well that there is what I call a texture deal killer. Lasagna is about texture and taste, nobody likes to bite into a big lump of meat. So I put my meat after I strain it into a processor.

- Get yourself a mini food processor from Costco for 28 bucks

This is what it should look like after pulsing it for 15 seconds

Now I take a 28 oz. can of San Marzano roasted tomatoes, it has to be San Marzano they are simply the best. If you do not believe me do your own taste test.
- 28 oz can of San Marzano roasted tomatoes from Italy.
- One small onion
- Four peeled garlic cloves
- 7 fresh basil leaves
- teaspoon of red chili flakes, add more if you want more kick to taste.
- Salt and Pepper to taste
Chop your onion and add it to the pan with olive oil with the garlic and brown them both, and then add the San Marzano tomatoes. Tear the basil into small pieces and add it to the sauce with the red chili flakes, salt and pepper to taste (don’t be afraid of it). Then simmer for 15 minutes. Keep a cup and half for later of the sauce. Remove the sauce and add into the mini food processor or blender until smooth, then put back into the pan and add meat.

I like to use dried morels that I dehydrated from last spring so I add warm water and about a cup of dried morels for about 20 minutes. Do not throw the water away.

I then take my morels and add them into cast iron pan with butter. I take about 1/4 cup of the water and add that to the pan as well and cook them until they are soft and all the juices are gone.

Then add them to the sauce meat mixture that is simmering on low heat.

- These little morels are the kicker to seal the deal in flavor

Let the pan simmer for after you mix it all up for about 3 minutes more and then turn off the burner and let it sit.
-
1 16 oz. container of ricotta
-
1 egg
-
1 cup of good quality grated mozzarella. I use fresh
-
1/2 cup of good quality parmesan Reggiano.
-
3 tablespoons of chopped parsley
-
salt and pepper to taste
Take a bowl and mix all of the above to taste, do not be afraid of the salt and pepper.

Take a casserole dish and spray it with pam and take about 1/2 cup of the red sauce and spread it at the bottom of the dish and take your lasagna pasta and lay over the top.

Then take a spatula and layer the ricotta over the pasta, do not go crazy because you are going to have to repeat this step. Remember you can push with the pasta down to evenly distribute the sauce and mixture so do not put too much down.

Repeat this three times, four if you have enough ingredients to pull it off. You definitely have to make it at least three times!

- Ready for the oven

I finish off the top with the remainder red sauce I kept before the meat was added and little pieces of the left over mozzarella I did not grate. Toss it in your oven covered with aluminum foil for 25 minutes at 350 degrees. Then remove the foil and bake until brown on top for 20 more minutes. Once finished take it out and let cool for 10-15 minutes and cut yourself a slab. I usually dust it with some grated parmesan when I serve it.

Then plate it with your salad of choice and some garlic bread and pour your friends a good bottle of Chianti. The flavors are pretty intense, the morels bring it together and your friends will love it. I like to serve this to people who hate wild game and then not tell them that they ate it until after dinner. They are always surprised, and I am always surprised that they would not like wild game in the first place.
Try the recipe, thank me later.
Hunting Chef

Recent Comments