
Wild boar Sausage, Tomatoes, Purple Cauliflower, Garlic and Orecchiette Pasta

This is a simple Italian dish, that is relatively easy to make. It is light, but packs a good punch full of flavors. It is a great dish when you have a beautiful bounty from the summer garden and some sausage in the freezer from the hunt season before. You can use basically any game sausage, or basic sausage from the store. I would recommend Mild Italian, and if you do not have that exact blend in the freezer. Use some salt, red crushed pepper, and black pepper to taste as you cook the sausage.
Serves 4:
- 1/4 cup of good Olive oil, plus 3 tablespoons.
- 3 Meyer lemons for juice
- 12 oz of purple cauliflower, trimmed
- 12-15 oz of Orecchiete pasta
- 1 lb. mild or hot Italian wild boar sausage (or any sausage you prefer).
- 1 lb of grape tomatoes
- 3 garlic gloves chopped
- 1/2 cup of white wine
- 1/2 cup of good quality ricotta cheese-Whole Milk
- 1/2 medium red onion, sliced.
- 1/4 cup of fresh basil thinly sliced

In a small bowl, whisk together 2 TBS of olive oil, the juice of two lemons, 1/4 teaspoon of salt and pepper. Set aside and get the oven going to 425 degrees. Take another bowl and cut the cauliflower in to 1 inch pieces, then add 3 Tbs of olive oil, and sprinkle with salt and pepper.
 Line a sheet pan with parchment paper. I added my zucchini and Patty Pan squash to the pan and seasoned with olive oil, salt and pepper as well.

Bring a nice pot of water to boil, the vegetables will take about 15 minutes so add the pasta at the same time.
 Bring large skillet to medium high heat and add the sausage and cook until brown breaking into 1/4 bites. Usually cooks 5-7 minutes but get it nice and brown.

Transfer the sausage to a plate and add garlic, tomatoes and onions to the same skillet using the any juices left behind from the sausage. If you need add olive oil to help them caramelize. After 3 minutes, add the white wine and scrape the bottom to deglaze the pan. Allow the alcohol to burn off the skillet. Then transfer to a big bowl and stir in cooked pasta, the purple cauliflower, and small bowl of whisked ingredients that you set aside to use later. Toss together, add sausage. Then plate. Then take a small spoon and add dollops of ricotta, sprinkle with basil. Squeeze your left over lemon over the top with a few sprinkles of olive oil and serve.
 I love this dish. My advice to you is to taste it before serving to make sure you have enough lemon before squeezing the finale on top. I added Jacobsen salt with a quick sprinkle. There is nothing better with wild game than fresh veggies from the garden. I can hardly wait for my tomatoes to come in.
I hope you enjoyed cooking it as much as you enjoyed eating it with family and friends.
The Hunting Chef

A Beet Salad that will Beat your A$$

About a year ago some friends and I were having dinner at a place in Cabo, and my wife and friend Ryan Jaffe ordered a beet salad. My first response was “Yuck”.
He replied “What? I love beet salads.”
I looked at him for a few minutes then said “You are disgusting.”
When they brought it out, he made me try it. It was either I try it or I was going to get red beets all over my face. So I did what I would have if I was two years old and I opened my trap up. I couldn’t believe how good it was. I tried picking the salad apart to visually inspect what they did, but it was so dark none of us could see anything. We had one candle 15 feet away, so we could barely see our own forks. I had to reconstruct this dish by taste and memory from 6 months ago. I spent some time at the Hunting Chef Laboratory on research and design and I think we have a better dish than I had in Cabo.
Ingredients for 4:
- 2 12 oz. can of beets
- 1 12 oz can of jellied cranberry
- 3 oz Capricho De Cabra goat cheese
- 8 oz, whipped cream cheese
- 1 tablespoon of chopped mint
- 1 tablespoon of fresh lemon juice
- Lemon zest from the lemon peel
- 3/4 cup of chopped pistachio nuts
- 6 radishes finely sliced
- 1/4 cup of olive oil
- salt and pepper to taste
First thing you are going to need is a good mixer, mandolin, “stuffing gun”, circular form, and some patience. It takes some time, but not as much as you would think. Your efforts will be well worth it.

Take 1/4 cup of pistachios and 1/4 cup of virgin oil, and roast the nuts in the oil in a pan over medium heat until lightly brown. Then remove them to your mixer/blender and finely mix until smooth. Congratulations, you have successfully made pistachio oil. Set aside, you will use this later on your final step.
Chop the beats into nice little tidbits. 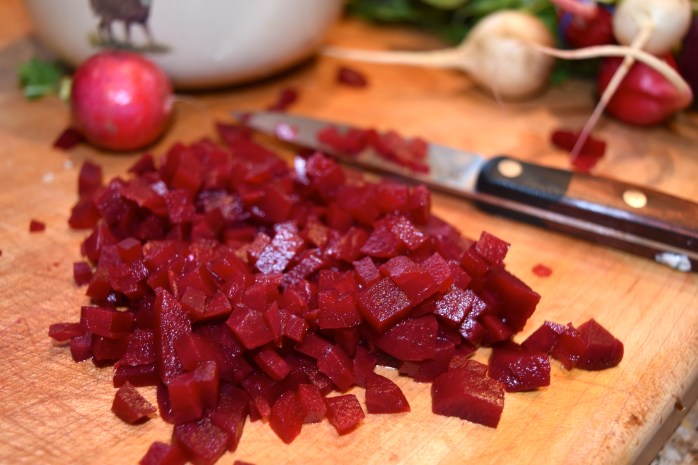
Get the Mandolin out from closet your mom bought you for Christmas a few years ago when you told her you were taking up cooking. If you do not have a mom or the mandolin she bought you use the a knife.
Finely slice the radishes. Be careful of your fingers.

Take the jelly cranberry out, and gently shake until the entire contents comes out on the plate. Then take a knife and gently slide it cutting 1/8 inch slabs.

Set the small slabs of cranberry aside and prepare the cheese mixture.

I use a mixer for this part, because I really want to whip and mix the ingredients as best I can. Add the whipped cream cheese, the goat cheese, and take your lemon and grate some lemon zest into the mixture. I would suggest about 2 teaspoons. Once you have it mixed, add the mint leaves and 2 tablespoons of olive oil and hit that mixer with a vengeance. Hit with a little sea salt and pepper, like a dash at best.

I found two ways of doing this technique. One is using what I call a “Stuffing gun” and squirt the cheese mixture into the form when needed. The other is spoon it and gently push with a plastic sandwich bag that I have sprayed non stick Pam on so it pushes down into the form.
The sequence is important here, simply because it allows you to use the ingredients to push into the form allowing the ingredients to set correctly.
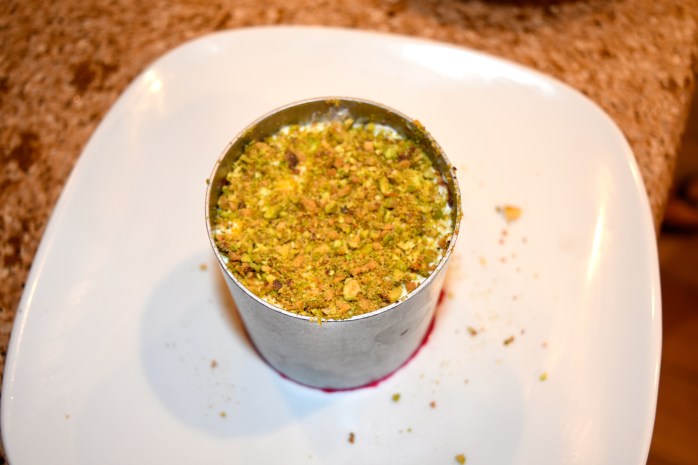
Spray your form with Pam. Start with the beets, then the cheese mixture, sprinkle with chopped nuts. One layer completed. See below, you really want to use a sandwich bag or back of a spoon to push the cheese mixture so it is touching the form.

Then add a slice of cranberry, cheese mixture, sliced radishes.

Beets, slice of cranberry, radishes, cheese mixture and finish with the pistachios.
You can refrigerate in the form, I would suggest doing this for a minimum of 30 minutes that will allow the ingredients to “set” better. You do not want your masterpiece to fall apart as you serve. Take a spoon and click on the form as you gently pull the form up. If it is not moving, gently push the top and it will start to move.

I usually put into the fridge until I am ready to start service. When you are ready to plate, take the form off and drizzle the pistachio oil on top and around the plate.
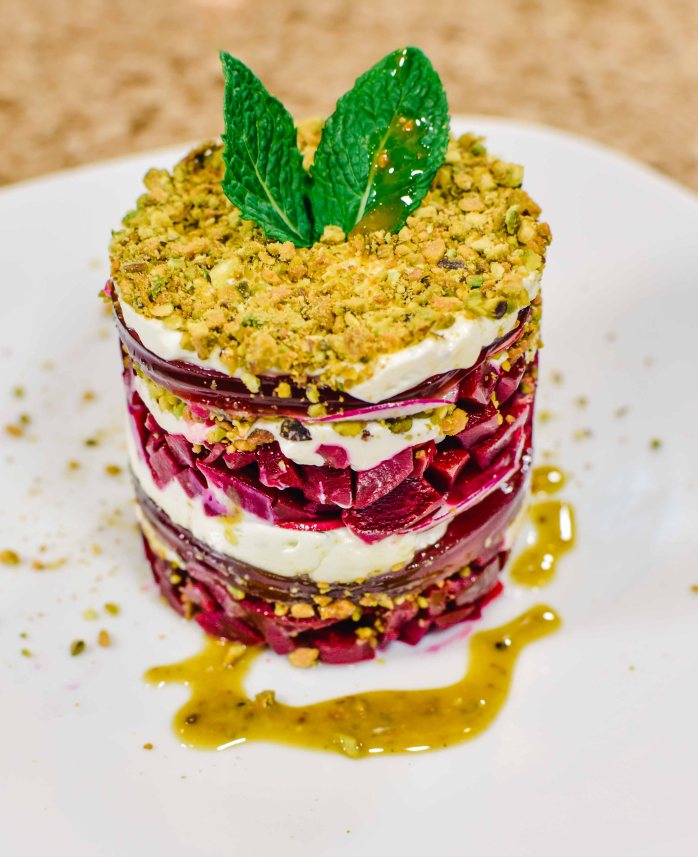
This is a dish that I think Emeril himself would say “BAM”.
One of the things I love most about doing this blog is eating with my family and friends, but shooting in the kitchen with my oldest daughter Megan. We are always tasting, talking, laughing, and then getting focused again. She is a talent to be reckoned with a camera. I love to watch her work. One of our projects we will be working on is the Hunting Chef Cookbook when we both get time. When we do, this recipe will definitely make the cut. Just for the record, her photos are the ones that look really good. I take the ones when I am working on building the product and I am always in a hurry and hands are always dirty.

I hope you enjoy the recipe and you had fun making smiles at the kitchen table.
The Hunting Chef


Hunting Coues Bucks in Sonora, Mexico

If you have never read Jack O’Conner, the father of the .270 Winchester, famed hunter, and one of the best outdoor writers of the 20th Century. Then I highly suggest you buy a few of his books and read them. I think every hunter should experience his wonderful, descriptive stories that enrich you with outdoorsman knowledge. It was because of Jack’s writing that I chose to chase the white ghost of Sonora.
“If I had to pick the American big game animal that has given me more real pleasure than any other, I think I’d choose the Arizona whitetail,” he wrote. “I like the big mule deer, the majestic elk, the great, brown mountain sheep, the gaudy antelope; but for real, deep-seated thrills, little Odocoileus coues is my favorite. The flash of his big, white fan, the sight of his small, compact antlers, his sleek, gray body scurrying through the brush — well, they give me, more than any other animal, those moments of high ecstasy which make a man a sportsman.”
Jack O’Conner 1972
I was like a lot of hunters that gets hung up with large massive horns. The Coues buck is 100 lbs smaller than the Northern White tail, and the Muley. However, it is because of his smaller size and statue that makes this critter very, very wiley. I have often thought of Jack’s writings when hunting Coues bucks in Sonora. I cannot tell you how many times I have been glassing an area on top of a ridge, turn to glass something 30 degrees to the right that caught my attention, then turn to find a nice buck that miraculously appears exactly right where I was just glassing for the past 20 minutes. You can spend five hours on water in a blind and count over a hundred deer and twenty nice bucks….waiting for the muy grande burro that is probably standing two feet behind you. This is why I love Coues deer hunting. I also love it because its sunny in January, and where I am from it is snowing and raining that time of year.
So a group of us went down to Sonora to hunt with a friend of mine, Erwin Ronquillo. He has an outfitting place down there called Erwin Outdoors. He has excellent coues buck hunts with private ranches and good water. He does it right, and let me tell you I have been to Mexico many times hunting and been on some real bad ones. Erwin has a nice ranch house, excellent chef, great guides and equipment and most importantly a very good area to hunt Coues bucks. He also speaks English and sends me Donald Trump jokes about building the wall which we both find hilarious. The boys that I was taking had never been to Mexico hunting so I was excited to take them down for the experience. We landed in Hermisillo, Mexico and headed to Costco for water, big ass steaks, and some beer (not exactly in that order). We are 3 hours from a store and of course they didn’t want to run out of beer. Erwin provides excellent meals, but one thing I love to do is buy a huge rib eye roast for steaks for not only us, but all the guides and ranchers working. It is important to me that we all have one big dinner together and it is rare that they get to enjoy a steak of great quality because it is very expensive in Mexico.

Erwin picks us up a the airport with my old buddy Luis and off we go to the ranch. Erwin just got done remodeling the little ranch house with three bedrooms and two bathrooms, and a new bar for the boys beer.
It is very comfortable, most nights we find ourselves out by the fire that Luis builds with Mexican mesquite wood that burns forever. While we are hunting he is looking for good pieces to put on the fire. I must have ran into him 100 times while he was looking for wood and me looking the other direction for a big buck.
All four of us have our own personal guide, and in the morning we break up to go our blinds to hunt water. Luis and I like to walk and glass, working up over hills a few miles to the blind. I like where Erwin has property because you do not have a ton of cactus and NO SNAKES, at least at the time we hunt.

When it is hot, the deer will go to water. It is a little different in Mexico, they go to water from 9 am to 1pm. I would count over 100 deer a day on some days coming to water. We are looking for 100 plus inch bucks on this hunt, that would be the minimum B&C score we are looking for.

This Coues buck was taken on the ranch and scores well over 110, the eye guards is what you look for and a good main frame with the main beam that comes curled back in. I always look for the main beam going out and curling back in towards each other, then the eye guards. I start counting points last.

I always come across Javelinas out on his ranch. There is a lot of them. I never engage them because I do not taxidermy little pigs, and I never want to scare off bucks with firing my weapon. They are fun to look at though.

This is Matt’s buck, a nice buck to say the least. I have to teach him that he needs to hold the buck next time and allow the guide to take the photo. We will chalk this one up to “lost in translation”.

This is another beautiful coues buck that scores well over 110. Luis capes the animals here, salts the hide, and prepares the horns for transports. Here is what you need to know about buck hunting in Mexico. When you take the cape back into the United States the cape will be inspected. So you DO NOT WANT TO HAVE IT FROZEN SOLID, AND NO TICKS. They see one tick, they take the cape. The guides always brushes the cape and closely inspect it before packaging it up for home.
Erwin has nice blinds with comfortable chairs in the blinds. As you can see, the bucks can come from any direction and they usually do. Greg found that there was a lemon tree that must have been over a hundred years old. It had to produce the world record size lemons.


It took them about 4 seconds to come up with something creative to do with them. So they started drinking beer out of them. Matt and Greg harvested their bucks first, so they got to drink beer and go bass fishing at this world class bass lake that Erwin guides fishermen. They have all the equipment and a real bass boat. I guess they catch some serious whoppers out there!
Rudy, the chef always prepares great meals. He is a chef in San Carlos, so he comes up for the week to prepare us meals. I always enjoy seeing him at camp.

The Ranchers wife, however, sets up shop outside the house to make tortillas. They are excellent! I never thought I would say that about a tortilla but they are damn good.


We enjoyed the evenings outside telling the day hunting stories and the funny events that occurred during the day. I think that is what I truly love about hunting, is the comradery and belly laughs later.

We finished our hunt, and had a few days to kill so we decided to pack up and head for San Carlos. We said good bye to our Mexican friends and headed to the beach. We had to find a beach and a bar to watch the Super bowl.

It didn’t take us long at all to find the beach and food in San Carlos. They had a nice hotel right there on the beach and we made it Base Camp Alpha 2.

This is a nice place for us old hunters to put our feet up and enjoy the sunset. We later would watch Tom Brady fight his way back from a huge deficit to defeat the Atlanta Falcons. We will never watch such a Gladiator like Tom pull off a miracle like that again.

We found a wonderful restaurant on the beach that served the best skirt steak I have ever had in my life. It was far better than the rib eye and I never thought I would ever say that in my life. I felt a little dirty when I said it.

The boys and I finished off a great trip. We finished the week pulling off the trifecta. Great Hunt, shared an awesome memory, and enjoyed our friendship along the way. Then I made them take this corny picture in front of all the tourist.

We had the plastic on the horns to make them look HUGE in front of all the tourist. I’m joking, that is for packaging to send them home.
I’m glad these guys had the opportunity to share the experience with me. I think they went home smiling with a long lasting memory and the fact that they now can say they hunted the Sonoran Ghost.
If you ever get the chance to go, book with Erwin at http://www.erwinsoutdoors.com/ He will take care of you.
The Hunting Chef

Skirt Elk Steak Tacos with Roasted Tomato Serrano Salsa

My lovely wife loves Mexican food, especially tacos. She is a connoisseur of tacos to say the least. If you are ever traveling and want to know where go eat them on the West coast or in Mexico, call her she will give you the details. When it comes to food this is one area she gets EXCITED about. I think one of the reasons we moved to this little farm is because one of her favorite taco stands is in this town, and it is good. One dollar tacos and she is very happy. Needless to say, when it comes to tacos I am a little nervous because I know she is very critical when it comes to her passion.
- 1-2 lbs of skirt beef steak, or any cut of elk steak you prefer. As we say in Oregon, enough meat for how many people your cooking for, then double it. Use your favorite way to cook steak. Salt, pepper, or any marinade you prefer. I always like changing up marinades and how I prepare the meat.
The salsa sauce is going to cover what ever flavor of the meat you choose, so it really does not have a huge factor in this recipe.
Roasted Tomato Serrano Salsa:
- 2 tablespoons canola oil
- 1 medium red onion roughed sliced
- 5 garlic cloves
- 2 serrano chiles
- 6 plum tomatoes halved and seeded
- sea salt and black pepper
- 2 limes, juiced
- 1/4 cup chopped fresh parsley (you can use cilantro, but I find I prefer parsley better).

Heat grill to high, I use my green egg on coals. Brush tomatoes with oil, and a touch of sea salt. Grill on both sides until you get a little char to it.
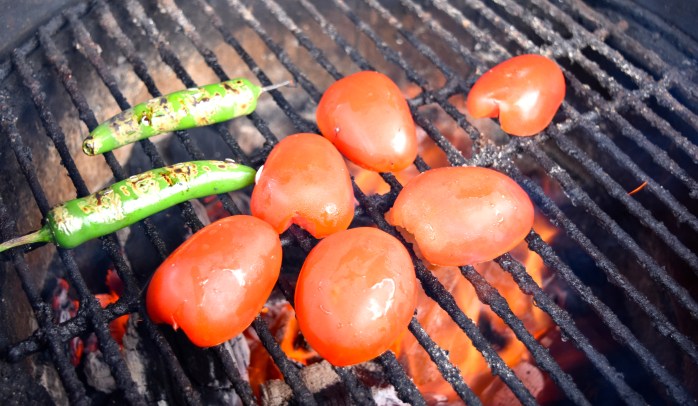
Removed from BBQ. They should look like this.

The char will give the salsa the smokey taste you are looking for.
In a pan, add oil, garlic, onions. Cook on high heat for 4 minutes.
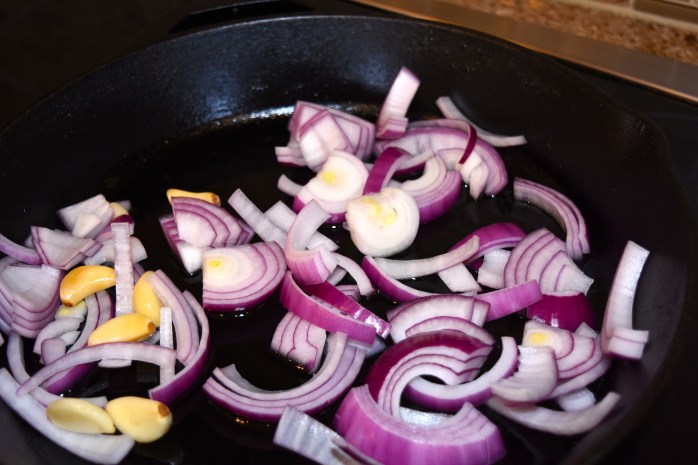
Then add the tomatoes and serranos, and cook until onions are soft and garlic brown.

Then remove and put into your food processor or blender.
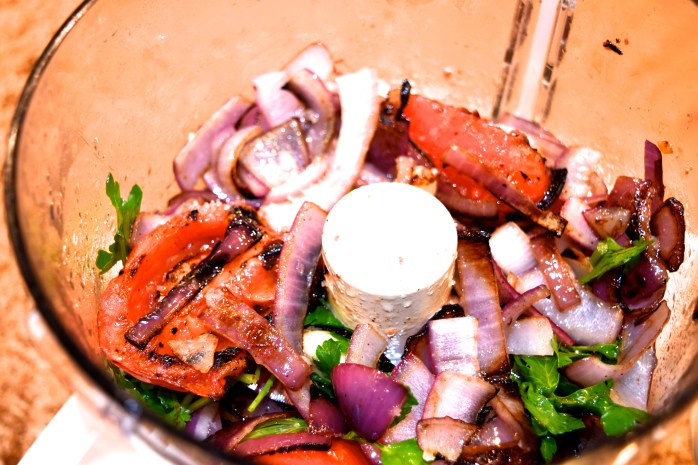
Remove the stems of the peppers and add some lime juice, parsley, and a couple dashes salt and pepper. Then process until smooth.

Taste the sauce and add salt and pepper until you love it. The heat is slow and easy.
Throw your meat on the bbq and cook until medium rare. You need to pay attention to your meat, do this process on hot coals so you need to watch and make sure you do not over cook the meat. Game has a huge swing shift in it, so it doesn’t take long to over cook your steaks. Remember your going to let your meat sit or rest for 5 minutes before you cut it.
You need to have the people that want to eat your tacos slicing and dicing in the kitchen. Dice some tomatoes, avocados, lettuce, what ever you like on your tacos.
I use grated pepper jack cheese on my tacos. Im sorry if I am not a authentic Mexican not using Cojita cheese, but it lacks flavor. I am sorry but that is what my taste buds say.
I used the pickled red cabbage left over from the day before when I made Corned beef and cabbage. It is pretty easy, look a that recipe for reference.

The next argument is what tortillas to use. My wife likes flour, I like white corn tortilla that they use in street tacos. Some people like yellow corn. I say, they are cheap. Use whatever you want. Heat them up in a paper towel in the microwave.
Tacos are to be your own creative art on what you prefer. We always just set up a “Taco Bar” and people build their own.

After the meat rest, slice it thin and tell everyone to get a plate and start building their tacos.

I did not put lettuce on mine. I took some pepper jack cheese and sprinkled it on my tortilla, placed the meat on top, then avocado, a dollop of sour cream, some of the wonderful salsa with some tomato and pickled cabbage.
My daughter walked in to my office while I was typing away on this recipe and said she wanted to be in the blog . Here is Mady J and her dog Zoey, the two are rarely inseparable.

My wife, and taco expert took a bite of my taco. She chewed away, focused on the flavors in her mouth not saying a word. When she swallowed, she paused then turned my direction and said “The salsa and flavor is wonderful, has huge flavor. However, the taco lacked crunch. It needed lettuce.”
I made some scrambled eggs this morning and mixed the salsa sauce into my eggs and it was wonderful. It was also good for chips, and I think it would be awesome on white fish. The leftovers give you a ton of options.
I hope you enjoy.
The Hunting Chef

Corned Beef and Cabbage-Sous Vide Style

This could possibly be my fathers last St Paddy’s day on this planet. At least if you asked him he would definitely tell you that. He is 80 years old, and growing more ill but he managed to put it together to come out to the farm for one more Nanna Irish St. Patricks day dinner, and I wanted this one to be special. I got a few ideas from some boys up North in Seattle that I purchased one of my Sous Vide machines from. I highly recommend their product, Joule Sous Vide. I like what they got going on up there so I borrowed some of their ideas and tossed a little of HC flare into the dish. I was really happy how it turned out, I think we all were and we enjoyed a beautiful meal together.
Heat the water bath to 155 F using your Sous Vide machine, then set the timer for 24 hours. Do this the night before.
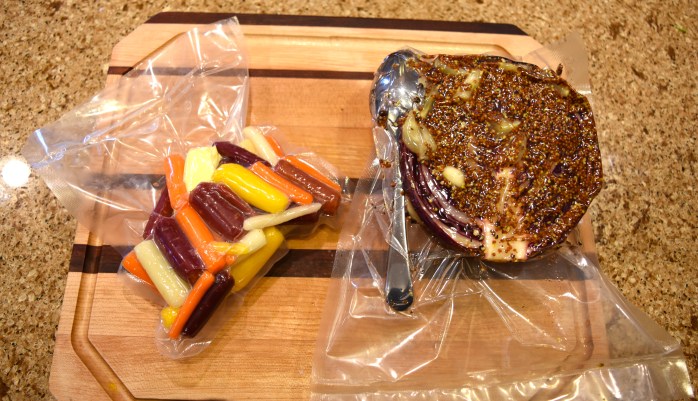
2-3 lb. of prepared corned beef (or as big as you can fit in your largest sous vide bag). Take out of the bag, wash off meat. Then prepare your dry rub.
- 1 tablespoon of coriander
- 1 tablespoon of black peppercorns
- 1/2 tablespoon of mustard seed
- 1/2 tablespoon of crushed red pepper
- 1/2 tablespoon of dill seeds
- 1 teaspoon of clove
Use a spice grinder or blender and grind for about 6-10 seconds. Rub the meat all over and throw into the plastic bag. Seal it in your van packer and throw into the water bath for 24 hours.
Cabbage
You can use half head of red cabbage, one half of green cabbage for color. I used one red cabbage cut in half.
- 1 each 1/2 red cabbage to bag and ingredients below (repeat twice)
- 4 garlic gloves sliced lengthwise
- 1/2 cup of champagne vinegar
- 1 tablespoon of mustard whole grain.
- 1 teaspoon of dill seed grounded
- 1 teaspoon of caraway seed grounded
- 1 teaspoon of sea salt
- 1 teaspoon of pepper.
Add all the ingredients and cabbage to the bag and add a spoon to the bag so it will sit at the bottom of the water. Even when you vac pack the bag it will fill with gasses and rise to the top. I do one half of the the red cabbage to the ingredients above, twice so I have two bags.

Fill a large pot of water and bring to boil and toss both cabbage bags into the boiling pot of water and set timer to 90 minutes.
Potatoes
If I didn’t serve potatoes at our house for St. Paddy’s my father who is a little weak would have mustered the strength to kick my fanny. I used a mixed bag of baby potatoes, the kind that has multiple colors. You can use small baby potatoes or fingerlings if you want.
- 2 cups of baby potatoes
- 1 tablespoon of butter
- 1 teaspoon of salt.
Add all of the ingredients to the bag, seal it and throw it in the same water you have the cabbage in. Set another timer for 20 minutes.
Once the potatoes have cooked for 20 minutes, remove from bag. Get a pan, I am fond of the cast iron pan for this operation. Put three tablespoons of olive oil, and over medium high heat. Gently take a four and smash the potato down in the pan and fry to get a nice crusty brown. Take a nice cookie pan, spray it with pam and flip the non crusted brown side up until all of them are on the cookie sheet and put in oven at 200 degrees to keep warm.
Carrots two ways (mixed for serving and for the puree.
Carrots puree
- 1 1/2 cups of baby carrots
- 1 tablespoon of butter
- 1/4 cup of olive oil
- 1 tablespoon of sugar
- 1 teaspoon of sea salt.
Take the carrots and butter and seal in vac pack bag with a spoon. Throw in the same boiling pot of water you have all the veggies in for 60 minutes. I hope you have a big pot.

I have all the veggies cooking away in this pot. When there is 30 minutes remaining cooking for red cabbage I put the mixed carrots in pot.
Mixed colored carrots
- 1 cup of mixed colored carrots
- 1 tablespoon of butter
- 1 teaspoon of salt.
Seal all ingredients in bag, and throw in the pot.
The meat can still be cooking in sous vide bath. You cannot over cook it so keep it in the bath until you are ready to plate. Remove the orange carrots when there is about 20 minutes left to cook the cabbage. You can put them in your food processor and the remaining ingredients. The olive oil, sugar, and sea salt. When you are getting close, puree the carrots until they are mixed so well they have a smooth but rustic look to them. We are Irish for gosh sakes, not French.

Now the Seattle boys up North fried their parsley, and I got to tell you I loved it. It gives the dish a little crunch and a little taste. You do not have to do this, but I loved the texture.
- 1/4 cup Italian Parsley leaves
- 1/4 cup of canola oil.
- sea salt to taste
Bring the oil to high heat. I used the same cast iron pan I used for my taters. Get ready, the oil is gonna get pretty active when you throw your parsley in. Its gonna jump, spit, kick, and blow up. Have a cover in your other hand to protect you. Toss in parsley, cover, then scoop the parsley out and on to a plate with paper towels. Then hit it them with some sea salt.

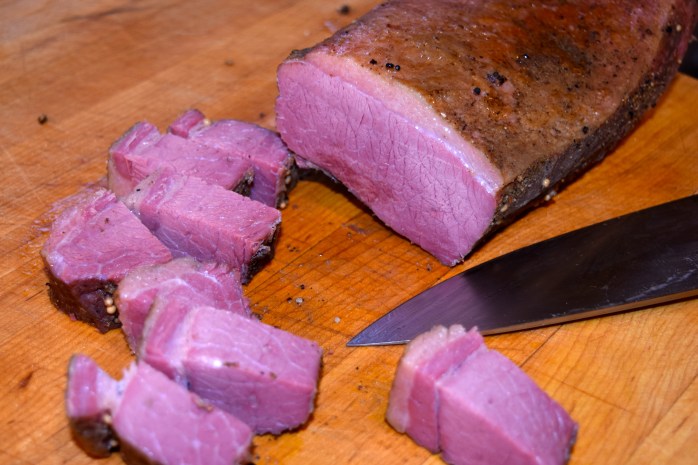
It is time to get this party rooollling. Take the meat out of the bath and dry off with a paper towel.

It is time to start plating this masterpiece. The kitchen is full of laughs, and I get a glimpse of dad looking at me so I stop what I was doing and looked at him. He was sitting at the table smiling. He asked me “Shay you think you are ever going to open a resteraunt?” If I had a quarter for every time he asked me that I think I could afford to open one in New York City.
Take the potatoes out of the oven, get the red cabbage and the mixed carrots out of the boiling water. Cut the cabbage into 1 inch squares. Cut the meat about the same, the reason for this is that you do not want the meat drying out.
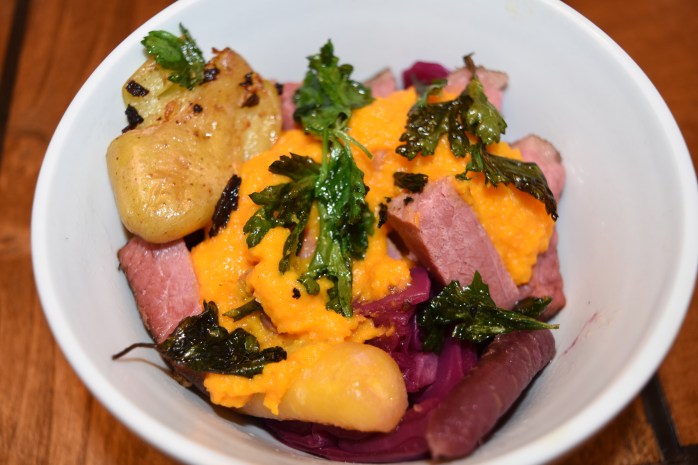
Doesn’t that just look beautiful? Lay some potatoes down on the bottom of the bowl, a few carrots, and pieces of cabbage. Then add a few dollops of the puree, then meat, then top with a few more pieces of tater, cabbage, and meat. Add a few more dollops, then sprinkle the fried parsley.

It seems simple, and it is. Serve it with some warm bread and watch what happens. Everybody smiles, then devours the plate. The pickled cabbage goes elegantly with the meat, and the pureed carrots have a bit of sweetness to the dish that brings it all together.

He couldn’t eat the whole bowl, but he ate what he could. My sister and mother made sure they finished his off for him. My wife, Stephanie who I couldn’t get to eat corned beef enjoyed the dish as well. I know it takes a little work, but it pays off in dividends at the family table. These are the moments, I will never forget. Sitting at the table, laughing with the family, telling stories with my dad, and eating a wonderful Irish meal.
I hope you enjoy this as much as we did.
The Hunting Chef
Sous Vide Lamb Chops with Rosemary and Garlic

Okay folks, time to up the game at Hunting Chef. I have been working with the sous vide technique for a couple of years. What is Sous Vide? It is a method of cooking in which food is sealed in a vacuum-sealed plastic pouch then placed in a water bath at a specific temperature. So in a nut shell, you can cook specified meats at longer durations at the precise temperature. You can basically cook a steak for example at 140 degrees and no how long you cook it for the temperature of the meat will never go above 140 degrees or the water temp you set. This means your product is always perfectly cooked to perfection. You do have to “Finish” the product with direct heat at high heat to give the dish a copacetic appearance. It was designed by the French, and perfected by the rest of the world using the technique. I have tested meats, vegetables, deserts, and eggs in my research.

It seems harder than it is, but trust me it is so simple it will blow you away. It saves you so much time in the kitchen during “go time” its not even funny. So this is how simple it is.
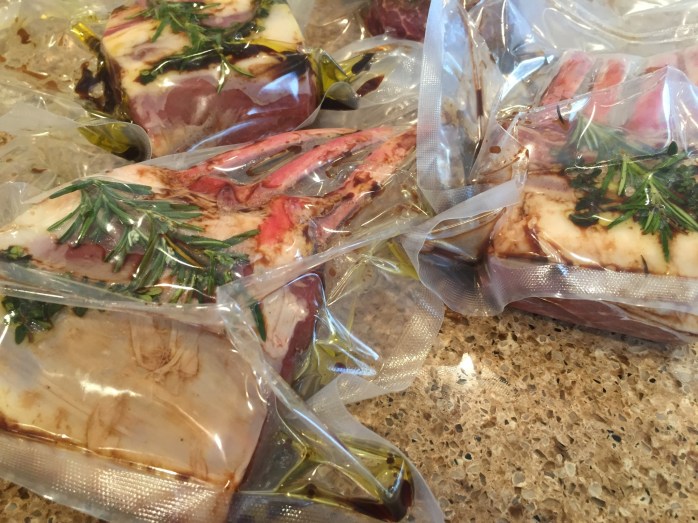
- Rack of Lamb
- olive oil (1 tablespoon for each bag)
- Sprigs of Rosemary (one for each bag)
- Garlic clove, cut in half lengthwise (one for each bag)
- Soy Sauce (1 tablespoon for each bag)
I have a professional vac pac that I highly recommend for any outdoorsman. The best 900 bucks ever spent. If you don’t have one, you can use zip lock bags and take the air out. First thing you need to do with lamb is shave as much fat off as you can with a knife. This is what produces that gamey flavor that makes most people cringe and hate lamb. Unless you are British…They love that gamey taste.

Carve away at the white fat, then cut them into double chops. Put them into the bag, add garlic, olive oil, soy sauce, and rosemary sprig and vac pac.
The cooking process is going to take about 2 hours, once the water is heated to 133 degrees. So you can put in the refrigerator until you want to begin cooking.
I set my sous vide to 133 degrees then put the time on for 2 hours and begin the process. As it cooks I can work on my risotto, and sides.
When the meat is completed, the lamb is needs to be “finished” before plated. You can do this with a broiler, searing in a pan, torch, or in my case the bbq. You basically, just want to brown the meat so it looks like you want to serve it.

Season the lamb with salt and pepper and do a quick sear. Remove from heat and get ready to plate.

Just nice and brown with high heat. I love this crispy look to lamb.

Plate and serve immediately. Get ready for it….wait…and watch as people cut their meat and see perfection. The flavor exceeds the beautiful cosmetics of the lamb.

Look at this picture and see how it is cooked perfectly entirely thru at exactly medium rare. This is what sous vide gives you in the kitchen.
Give it a try, you will not be disappointed, unless you buy mutton or something. Buy some local spring lamb, I promise you will like it.
The Hunting Chef
Lemon Chucker Picatta with Capers and Artichokes

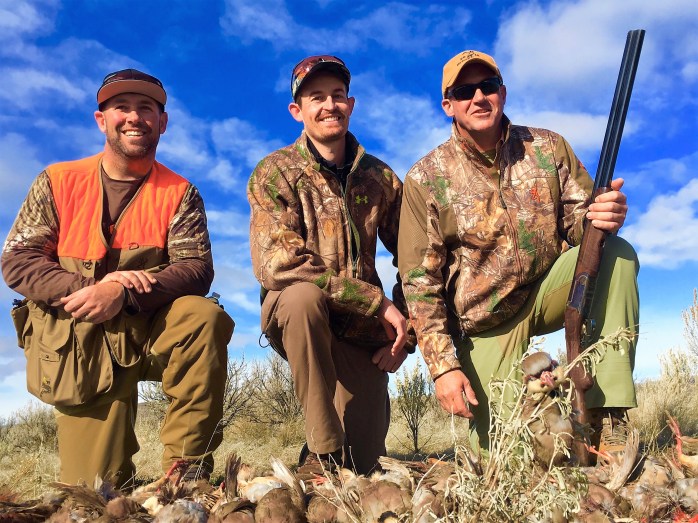
I recently was on a hunting trip with clients and friends at Highland Hills Lodge in Condon, Oregon. I was pleasantly surprised on how much I liked this ranch. First off, the lodge itself is like a 5 star hotel, along with 5 star service. The hunting was awesome with good dogs, guides and terrain.

I was also impressed with the chef, he went out of his way to assure that each of us gained 10 pounds before we left. Mission accomplished Chef! At any rate, he made a chucker picatta rendition of the old Italian classic using his style. This got me thinking, and I immediately turned to my friend Travis who must have been thinking the same thing because he reads this blog and he says “You got this dish Hunting Chef….knock it out of the park.”
Now don’t get me wrong, the chef prepared a fine dish but I wanted to go to the next level. Which I am sure he would do if we were throwing down with this dish. So it got me thinking, reading, and taking notes what I like in a pasta dish. I was eating artichokes with my daughters and it hit me. I love artichokes, and hearts would be perfect in this dish. So here is my rendition of the classic dish Chicken Picatta, but with chucker.
Picatta Ingredients:
- 8-10 Hungarian chucker breast (depending on size, you can substitute chucker with 4 chicken breast just in case your husband is poor shot)
- 1 cup of all purpose flour
- salt and pepper (I prefer Jacobsen sea salt its fantastic).
- 3 Tbs of Olive Oil
- 3 Tbs of unsalted butter
- 3 garlic cloves chopped
- 1 cup of dry white wine
- 1/2 cup of chicken broth (homemade is preferred, use those left over Costco chickens).
- 2 whole lemons (keep lemon peels for zest)
- lemon zest
- 2 6 oz. marinated artichoke hearts
- 3 Tbs of capers
- 2 Tbs of chopped parsley
The first thing I do when preparing chucker from the field is check, then double check that there is no bb shot in the meat. Nothing worse than someone biting down on a bb to ruin their appetite. Highland hills did a phenomenal job of meat preparation when they butchered the game birds and sent them home with us. I didn’t find one bb shot in the meat. Trust me I looked. What I like to do is inspect the meat with a high powered flashlight.

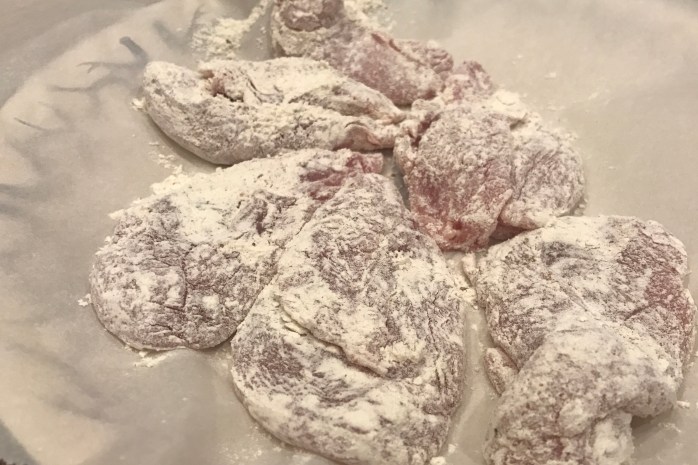
Once I have conducted my investigation. I pat them dry. Then take your flour, add 3 teaspoons of salt and pepper and put into a zip lock back. I find that to be the easiest but you can use a bowl if you want. I prefer not to get yelled at by the Commander in Chief of the hacienda, so I choose ziplock bags because I don’t get the flour all over the kitchen. Toss your breast into the flour.

See how clean it is? Flour in zip lock makes a happy, which means happy life. Remove the breast and put on plate and toss in the fridge to allow the flour to set for 30 minutes. This will keep the flour from flaking off the meat when you fry it.
This is going to be a fast process, it all happens pretty quickly. I serve my picatta over fresh pasta so I am going to give you my tips to that as well.
Butter Parmesean Pasta Ingredients:
- linguine, fettucine, or any pasta you want to serve. I love Fresh pasta, it is the key to life.
- 1 cup good Parmesan cheese
- 3 tablespoon butter
- 1/2 cup of pasta water
Get the water for pasta boiling in a pot, meanwhile bring a nice size frying pan to medium high heat. Melt 3 tablespoons of butter with 3 tablespoons of olive oil. Then add your chucker to the pan and brown both sides, 3 minutes each side roughly.
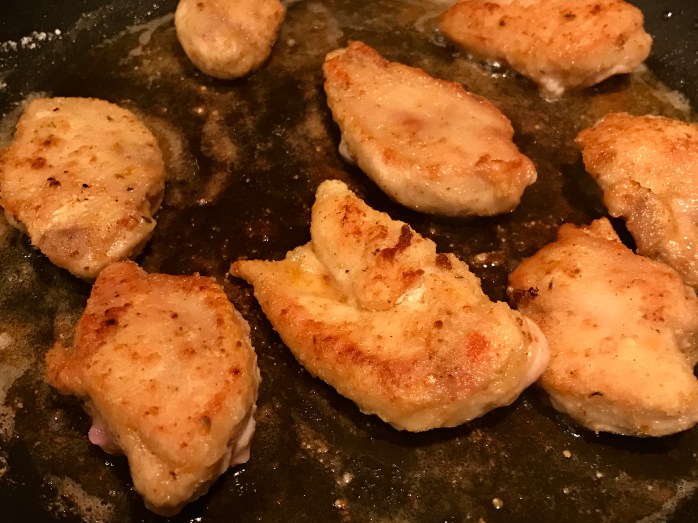 Do not over cook, just brown then remove to a paper towel lined plate. Add another teaspoon of butter and garlic for one minute, then add artichokes (drained). Stir in one cup of wine, bring to simmer and cook until wine is reduced to half, about 4 minutes. Stir in chicken broth, fresh lemon juice, and capers. Cook, stiring until sauce thickens a little bit then add one tablespoon of butter.

Throw the pasta in the water. Fresh pasta usually takes about 4 minutes. As that cooks, add the parsley to the artichoke dish, reduce heat. Then put the chucker gently back into the pan. Taste the sauce, if it needs salt sprinkle a little on it to taste.
 Take the pasta out of the water. Remember to keep 1/2 cup of water. Take pasta and put it back in the pot, add butter, while mixing. Then add water, while mixing well add parmesean.
Plate the pasta, add the chucker and artichokes, and capers to the top with some sauce. Sprinkle with Parmesan, and grate some of that fresh lemon rind for some zest and serve. The chucker is mild and tender, filled with lemon pizzazz and then the touch of capers and artichoke finishes the dish off perfectly.

I hope you enjoy this dish with your family. One of my favorite things in the world to do is sit with my family and enjoy a Sunday dinner. I would not trade that for the world.
The Hunting Chef
BBQ Oysters with Chimi Mayo and Manchego Cheese

If you follow this blog, you will know there is a lot of BBQ oyster throw downs conducted in my world and on this blog. I have searched the world over, and have conducted hours upon hours of research in the library, as well as time in the test kitchen perfecting what I thought was the perfect bbq oyster. This recipe comes from my peeps down at Portland’s new hot spot for dining….Ox Restaurant. The place is rocking Argentinian style food that packs a punch straight in the mouth of from flavor town. If you ever want to get your taste buds a work out, go to Ox. You will not be disappointed, I am a huge fan of what they got going on in that place.
First thing you want to do is go get yourself some fresh oysters to shuck. I am a big fan of the Hood…
View original post 345 more words
Sweet and Sour Spicy Melon Balls

I know what you are thinking….what in the heck is the Hunting Chef doing writing about melon balls? That is like Batman playing badminton in the wind with Pee Wee Herman. I get it, it does sound a little odd. Please bear with me and let me tell you why. My oldest daughter and I like to go to San Francisco and eat at this Italian joint called North Beach Restaurant, we have been doing this for 10 years. They make this anti pasti dish with house cured Prosciutto , mozzarella, and sweet melon that rocks your palate. When I saw this recipe in Fine Cooking, I was thinking….Well maybe Batman can play badminton. This could be good on salads, with seafood, etc. If you ever do make it to North Beach, make sure to ask to see where they cure and hang the prosciutto, it is pretty amazing.

Ingredients:
- 6 to 8 lb.firm ripe melons, honeydew, cantaloupe or a mix.
- 2 cups of granulated sugar
- 3/4 cup white wine vinegar
- 1 cup filtered water
- 1 teaspoon sea salt
- 2 teaspoon crushed red peppers
- 3 sprigs of mint
You will need a melon baller to make the melon balls. Make sure to get into the melon deep so you can rotate the baller thru meat of the melon to get a full ball.

Once I get a full use of one melon, I make a 1″ cut basically cutting the slab off to start again.

Get a sauce pan and bring filtered water to boil then add sugar, vinegar, salt, and crushed red pepper to boil. Then turn off heat and let cool. Take the mason jars, make sure they are clean and add your melon balls, and then put some mint leaves into the same jar, push them down the side.
 Then pour your liquid over the melon balls and mint and leave 1/4 inch of spacing. Put the tops on them and let sit in the fridge for a minimum of 4 days.
 I did not have house cured prosciutto, but I did buy some at the store and served them with mozzarella.
 Phil took this photo as we tested the product. The sweet taste of melon, followed by sour, and finished with some heat. These little babies are going to come into tie together some excellent dishes later, but I was impressed with them as an appetizer as well. I would definitely put these on my Christmas day appetizer platter coming up.
Give it a try.
The Hunting Chef

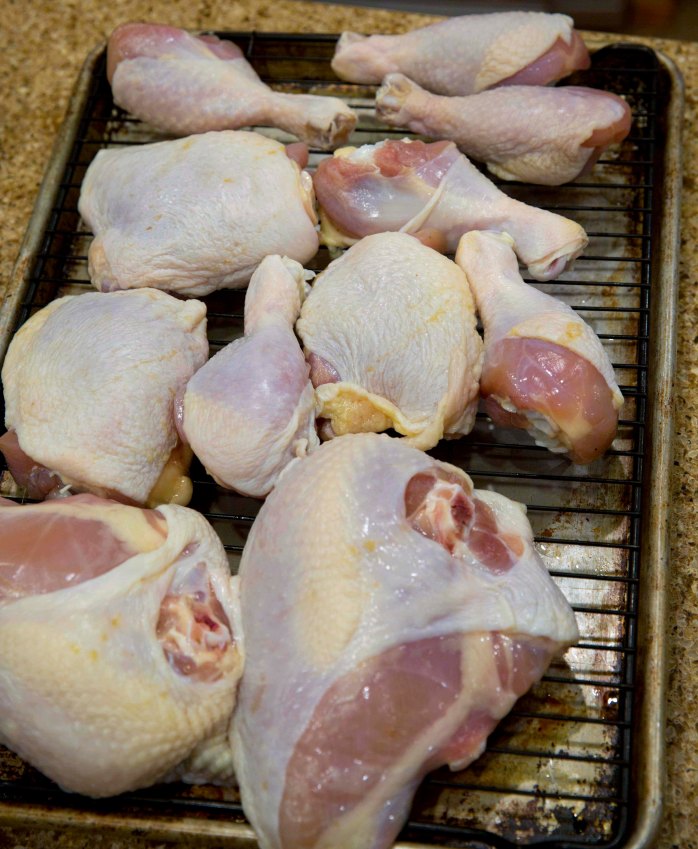
Buttermilk Fried Chicken

I get asked to do this for people quite often, especially my parents and good friends. So when my buddy Phil asked me to do this I said “Sure, but you are taking the photos.” He agreed and off we went. I think everytime I do this recipe, I come up with something I would change to make it even better. So after ten times of doing this recipe, I have changed it once again to make my final recipe and post it for you all. My test kitchen, to your table.
The first thing you need to know is the importance to brining chicken. It is the single most important step of having awesome, moist, and juicy chicken. Trust me, if you skip this step do not even bother continuing on with the recipe. I have changed my brine time to 3-6 hours, no more than 6 hours or you will have salty chicken. I have done this 100 times and the end result is too salty.
Brine Ingredients:
- 8 cups of water, 4 cups to boil, 4 ice cold to add later
- 1 cup of salt
- 1/4 cup sugar
- 1/4 cup honey
- 5 garlic gloves smashed
- 4 bay leaves
- 1 orange cut into quarters
- 1 tablespoon of peppercorns
- 1 small bunch of thyme, tied.
Boil the water then add all the ingredients and boil for 10 minutes, then let cool. Add the 4 cups of ice cold water and pour over chicken. Make sure to have the chicken container in plastic or zip locks because metal can give off a metallic taste.

Phil was not here when I did the brine, so he does not get credit for this awesome brine picture. Brine for 3-6 hours. 6 HOURS MAXIMUM.
Rinse brine off, and let dry for 2 hours at room temperature. I have read this several places and it helps when it comes to keeping the oil temp perfect. One of my inside peeps at the Screen door in Portland gave me this tip…he wouldnt give me anymore than that but I will take ’em where I get ’em. After rinsing, put on a rack and let dry for two hours.
Things you shall need:
Coating
- 4 cups of all purpose flour
- 1/4 cup garlic powder
- 1/4 cup onion powder
- 3 teaspoon of cayenne pepper
- 3 teaspoon of ancho seasoning
- 2 teaspoon of ground black pepper
2 cups of buttermilk
1 quart peanut oil
So I like to use a food processor and process all my coating ingredients, then separate into two bowls.

I use the third bowl for buttermilk, and I put them in sequential order. Flour, buttermilk, then flour again, then onto parchment paper. That is exactly how I am going to do each piece. Dunking them in that exact order.

One piece in flour mix, then buttermilk, then flour mix again.


I use peanut oil for frying. I don’t know why, perhaps it makes me feel better eating fried things. I use a nice size pot because I dont like oil splatter. I pour enough oil to submerge my chicken. Some like to do it old school in a cast iron pan like grandma but that makes a huge mess. So I go with enough oil to submerse my chicken, about a quart. Bring the oil to exactly 320 degrees and do this slowly. Do not swing past it going high heat and go to 360 and start throwing chicken in. You will burn your coating and undercook the chicken. Everything is slow and easy here partner.
Once the oil is stabilized at 320 degrees on your thermometer that I know you are using because it is important.

Add a few pieces of the chicken. They will want to go to the bottom so its important as it cooks to move them around so they don’t get burned on one side.

Put a few pieces and in nice and easy, and start the timer. 13 minutes is what you are looking for adjusting the heat as if it gets lower. If the timer is getting close make sure that the chicken isn’t getting to dark. If it is lower the temp. and keep moving the chicken in the pot if needed.

I line a plate with paper towels. Then lay the pieces on them and sprinkle immediately with sea salt. This is a slow process so have your oven at 225 degrees and put the plate into the oven to keep chicken warm until you finish all the pieces.

This is where it gets dangerous. Once the chicken is done, watch your fingers because as the old Colonel used to say….finger licking good.

I use Jacobsen flake salt to sprinkle on the chicken. This photo is shown with hickory smoked Pork Shank beans (My fathers Missouri recipe).
I hope you enjoy.
The Hunting Chef
Phil Ottum Photo Credit (with the exception of the artistic brine photo off my i phone).

Recent Comments