
The Hunting Chef 44 Birthday-Argentina Style Part two

This is the second day of my 44 birthday celebration. The morning began with breakfast for 12 people. I pull out the World War one Cast Iron skillet that Grover casted me off his original one. It is one heavy piece of cooking equipment to add to the arsenal but it produces amazing food.

I call this the “Kitchen Sink” and it has just about everything in it but…..the kitchen sink. We have seasoned potatoes, chopped onions, yellow peppers, lots of garlic, bacon, pork from the pig roast, hot sausage from Mt. Angel, veal chorizo, and the best ingredient…GOUDA Cheese.

This breakfast process takes about 45 minutes to do it right. The potatoes and the cheese need to be crisp and brown before serving. The garlic bites are amazing. We put a whole head of chopped garlic in this bad boy.

We serve this on the plate, and then Todd puts two eggs over easy on top and gives you a piece of toast. I was so hungry I didn’t get to take a picture because I was eating it like a lawn mower. We went on an unsuccessful Morel mushroom hunt (it was too cold). Then returned to prep for the big dinner.

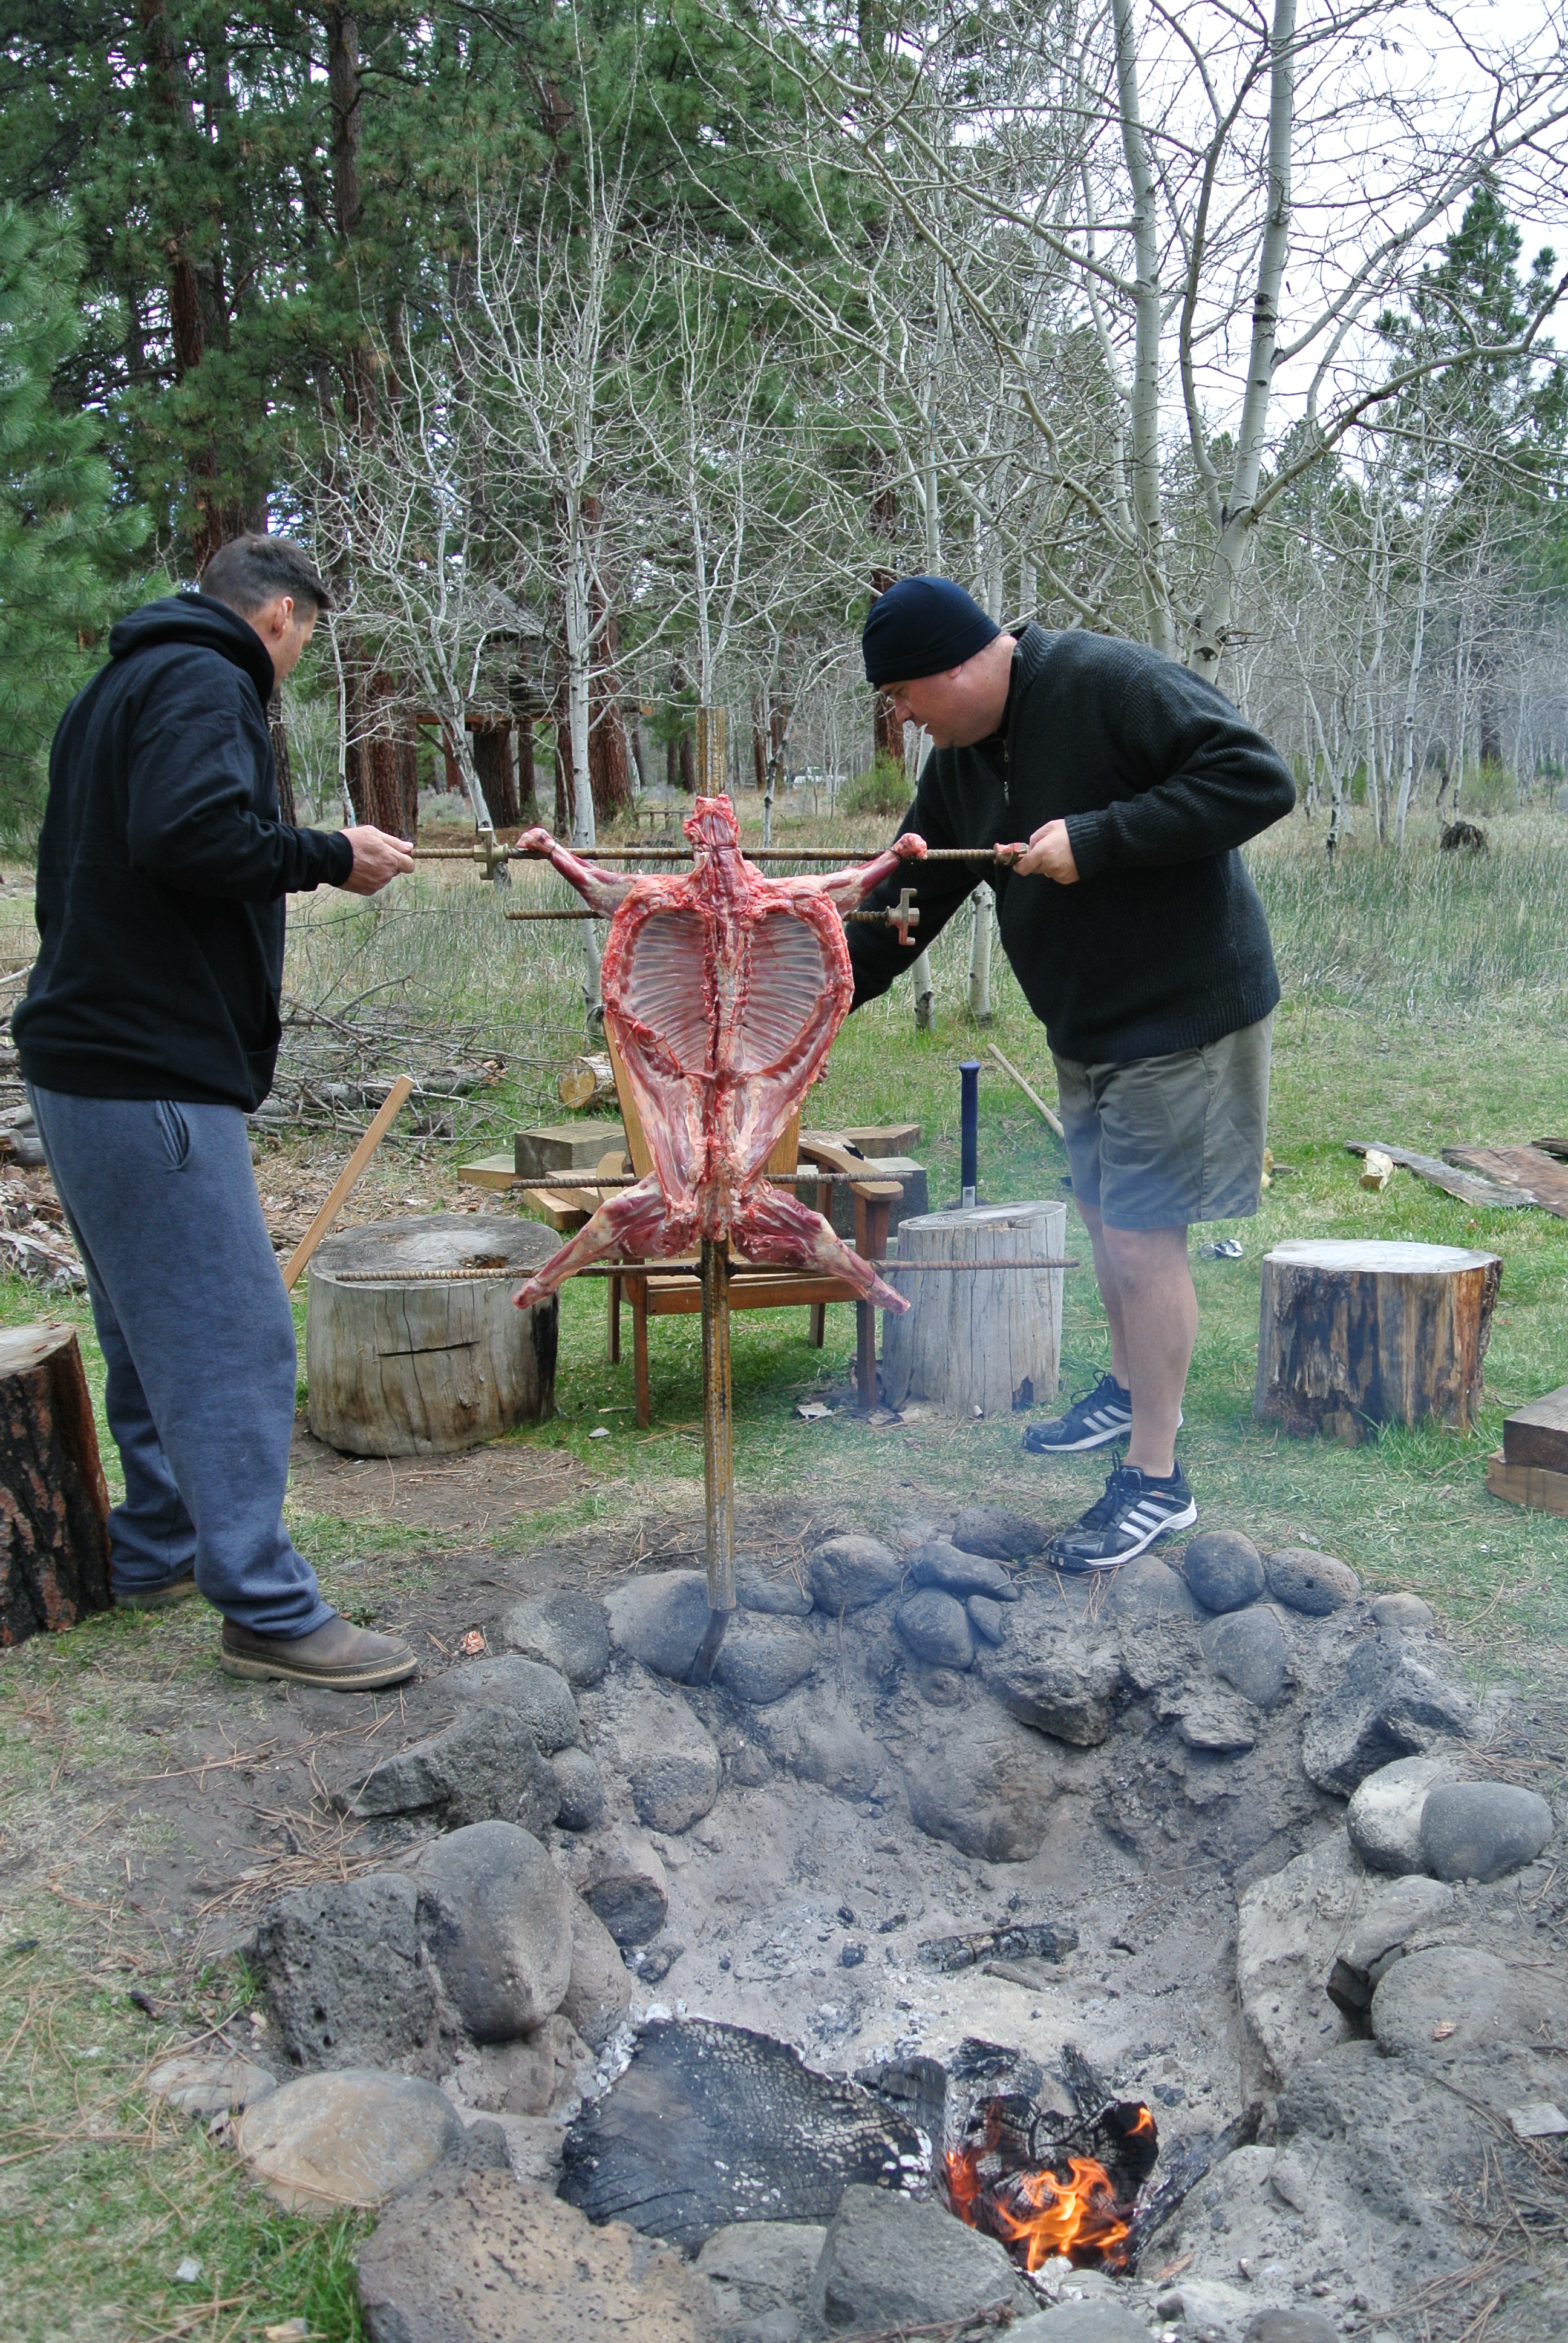
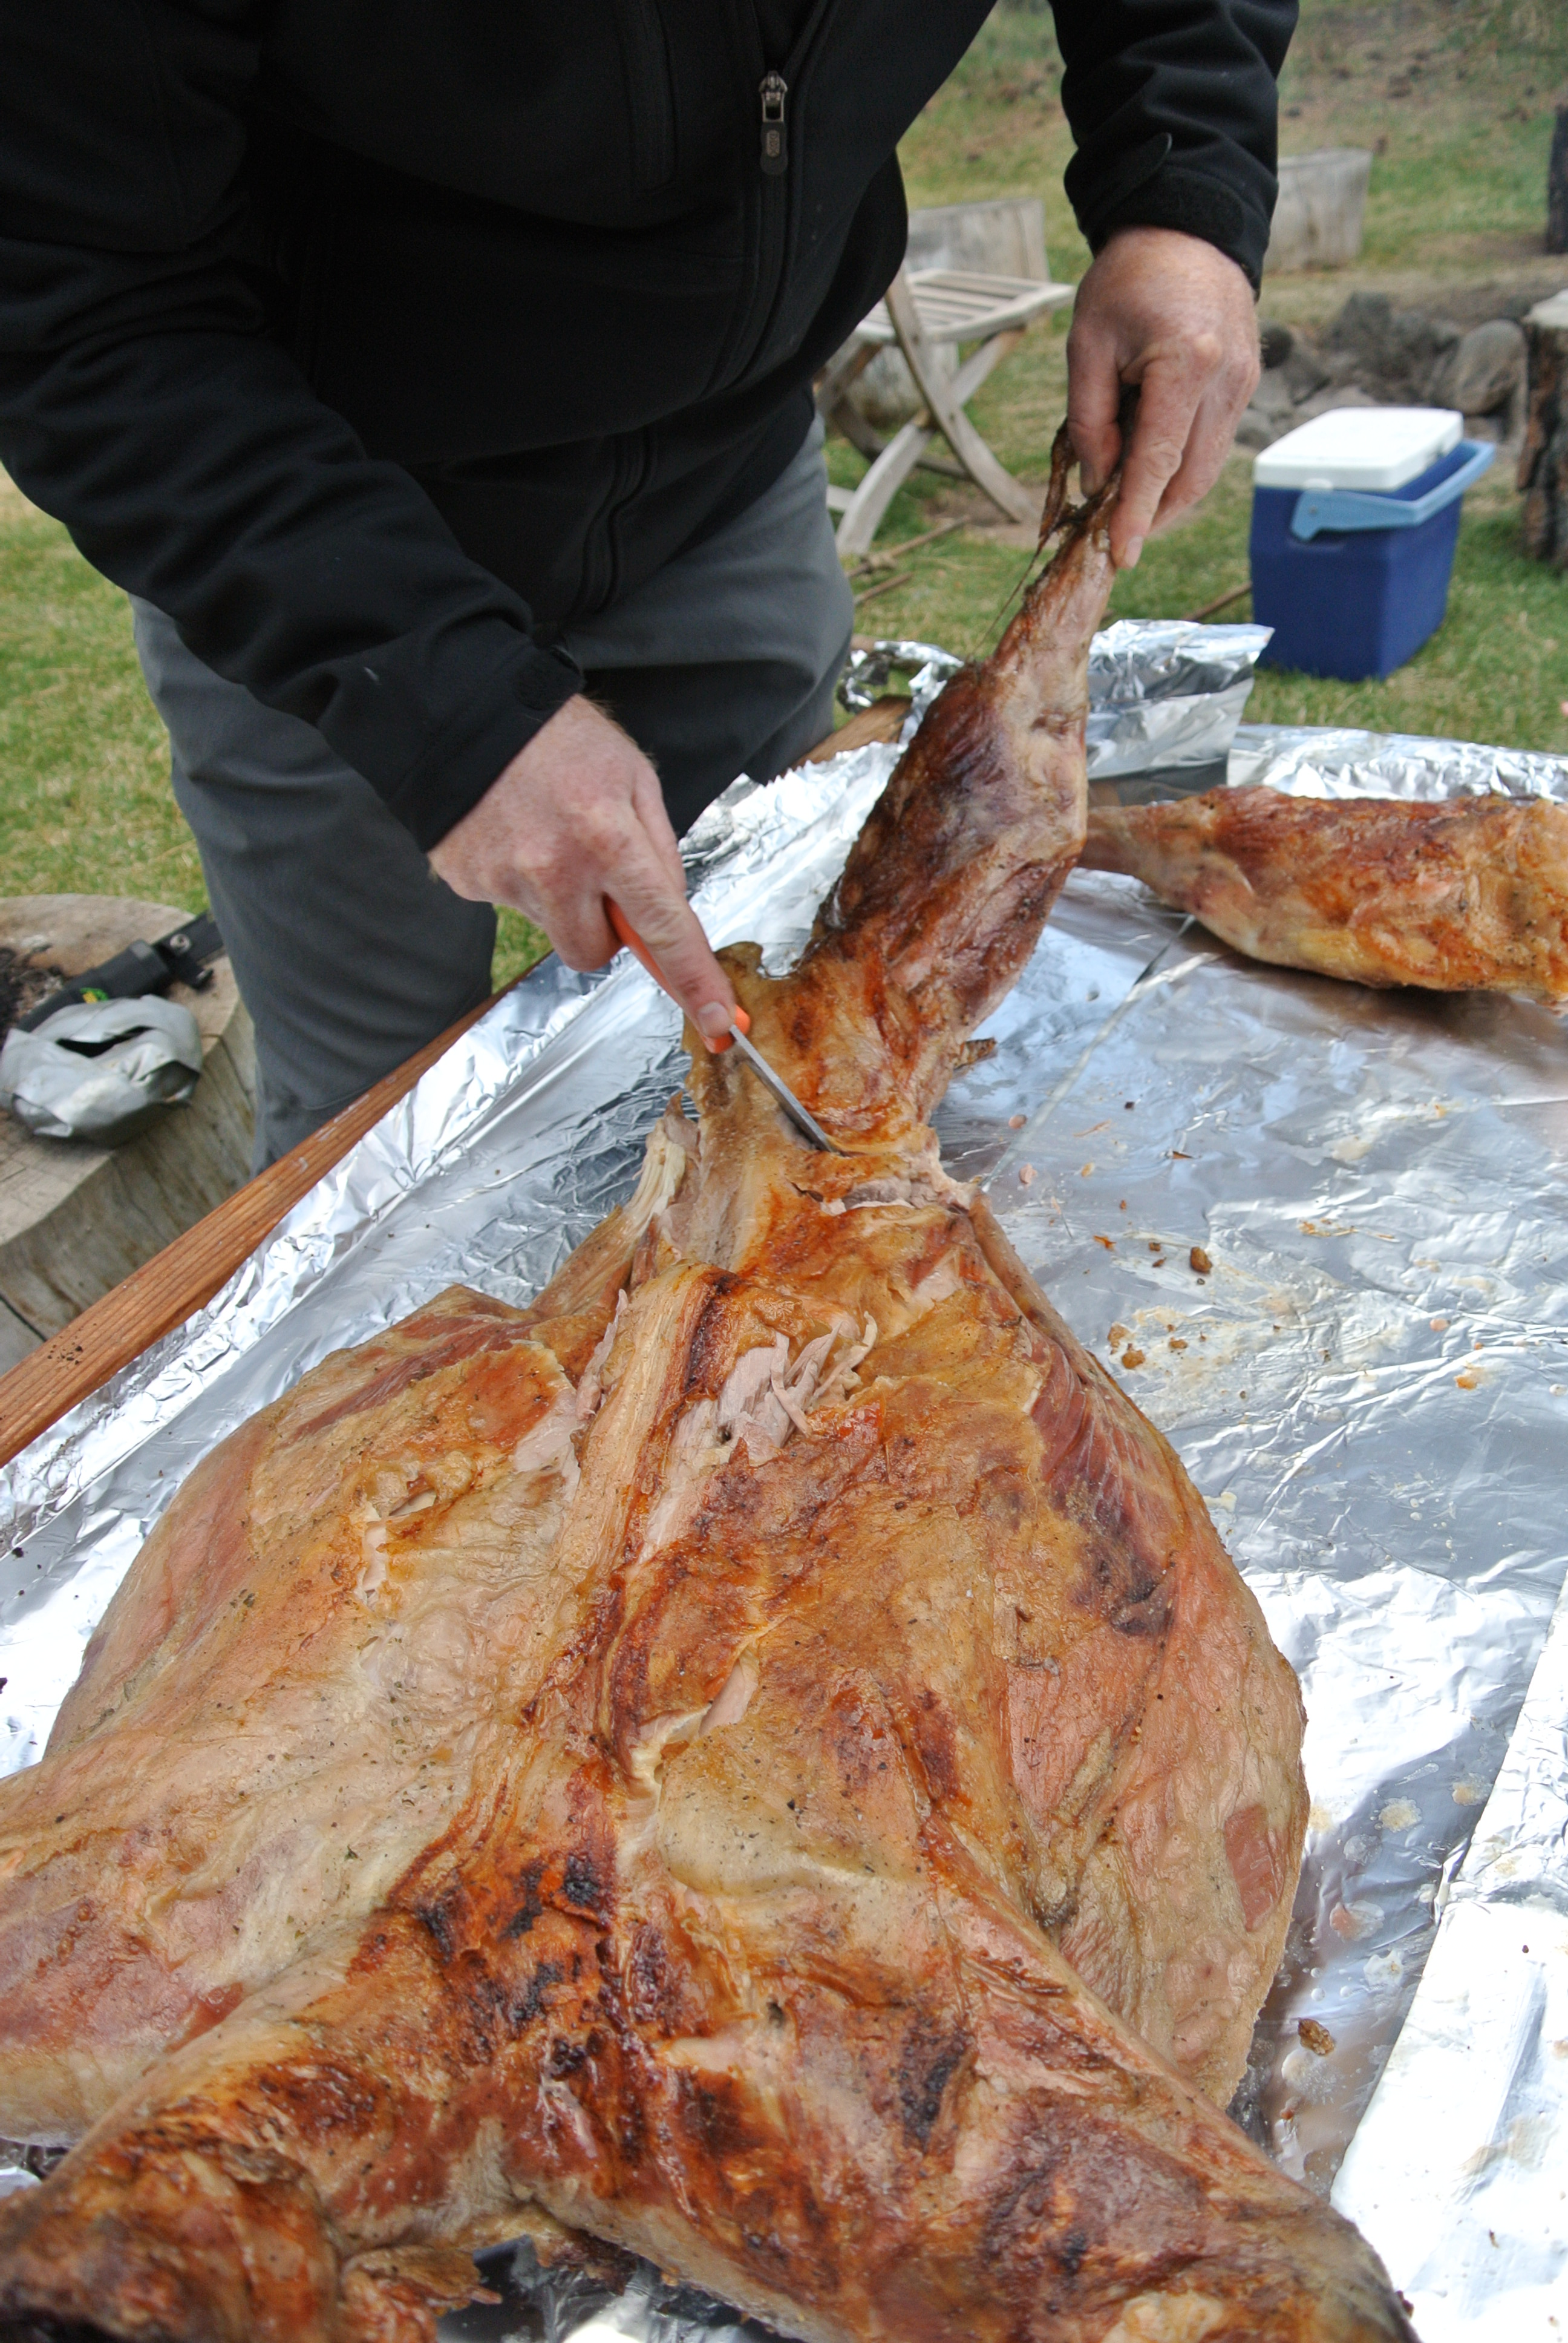
Wayne made a wonderful Lamb roasting spit for the fire. Basically the lamb is tied to the spit in the open fashion so it can cook evenly over the fire. This takes approximately 3 hours. We drive a stake into the ground at an angle and put it at the precise degree we need. Nobody fell into the fire.


While this gets going. I retreat to the kitchen where the ladies are drinking wine and talking about hair color and fingernails.

Now when I say “Empanadas Cooking team” that refers to the lovely lady in the middle. Basically she cooks and works in the kitchen and the other two sit and watch drinking their wine and talk to Shery while she works diligently in the kitchen. Where is Alice?

Meanwhile the BBQ boys have are milling around the fire making sure their drinks are full and the fire is producing heat.
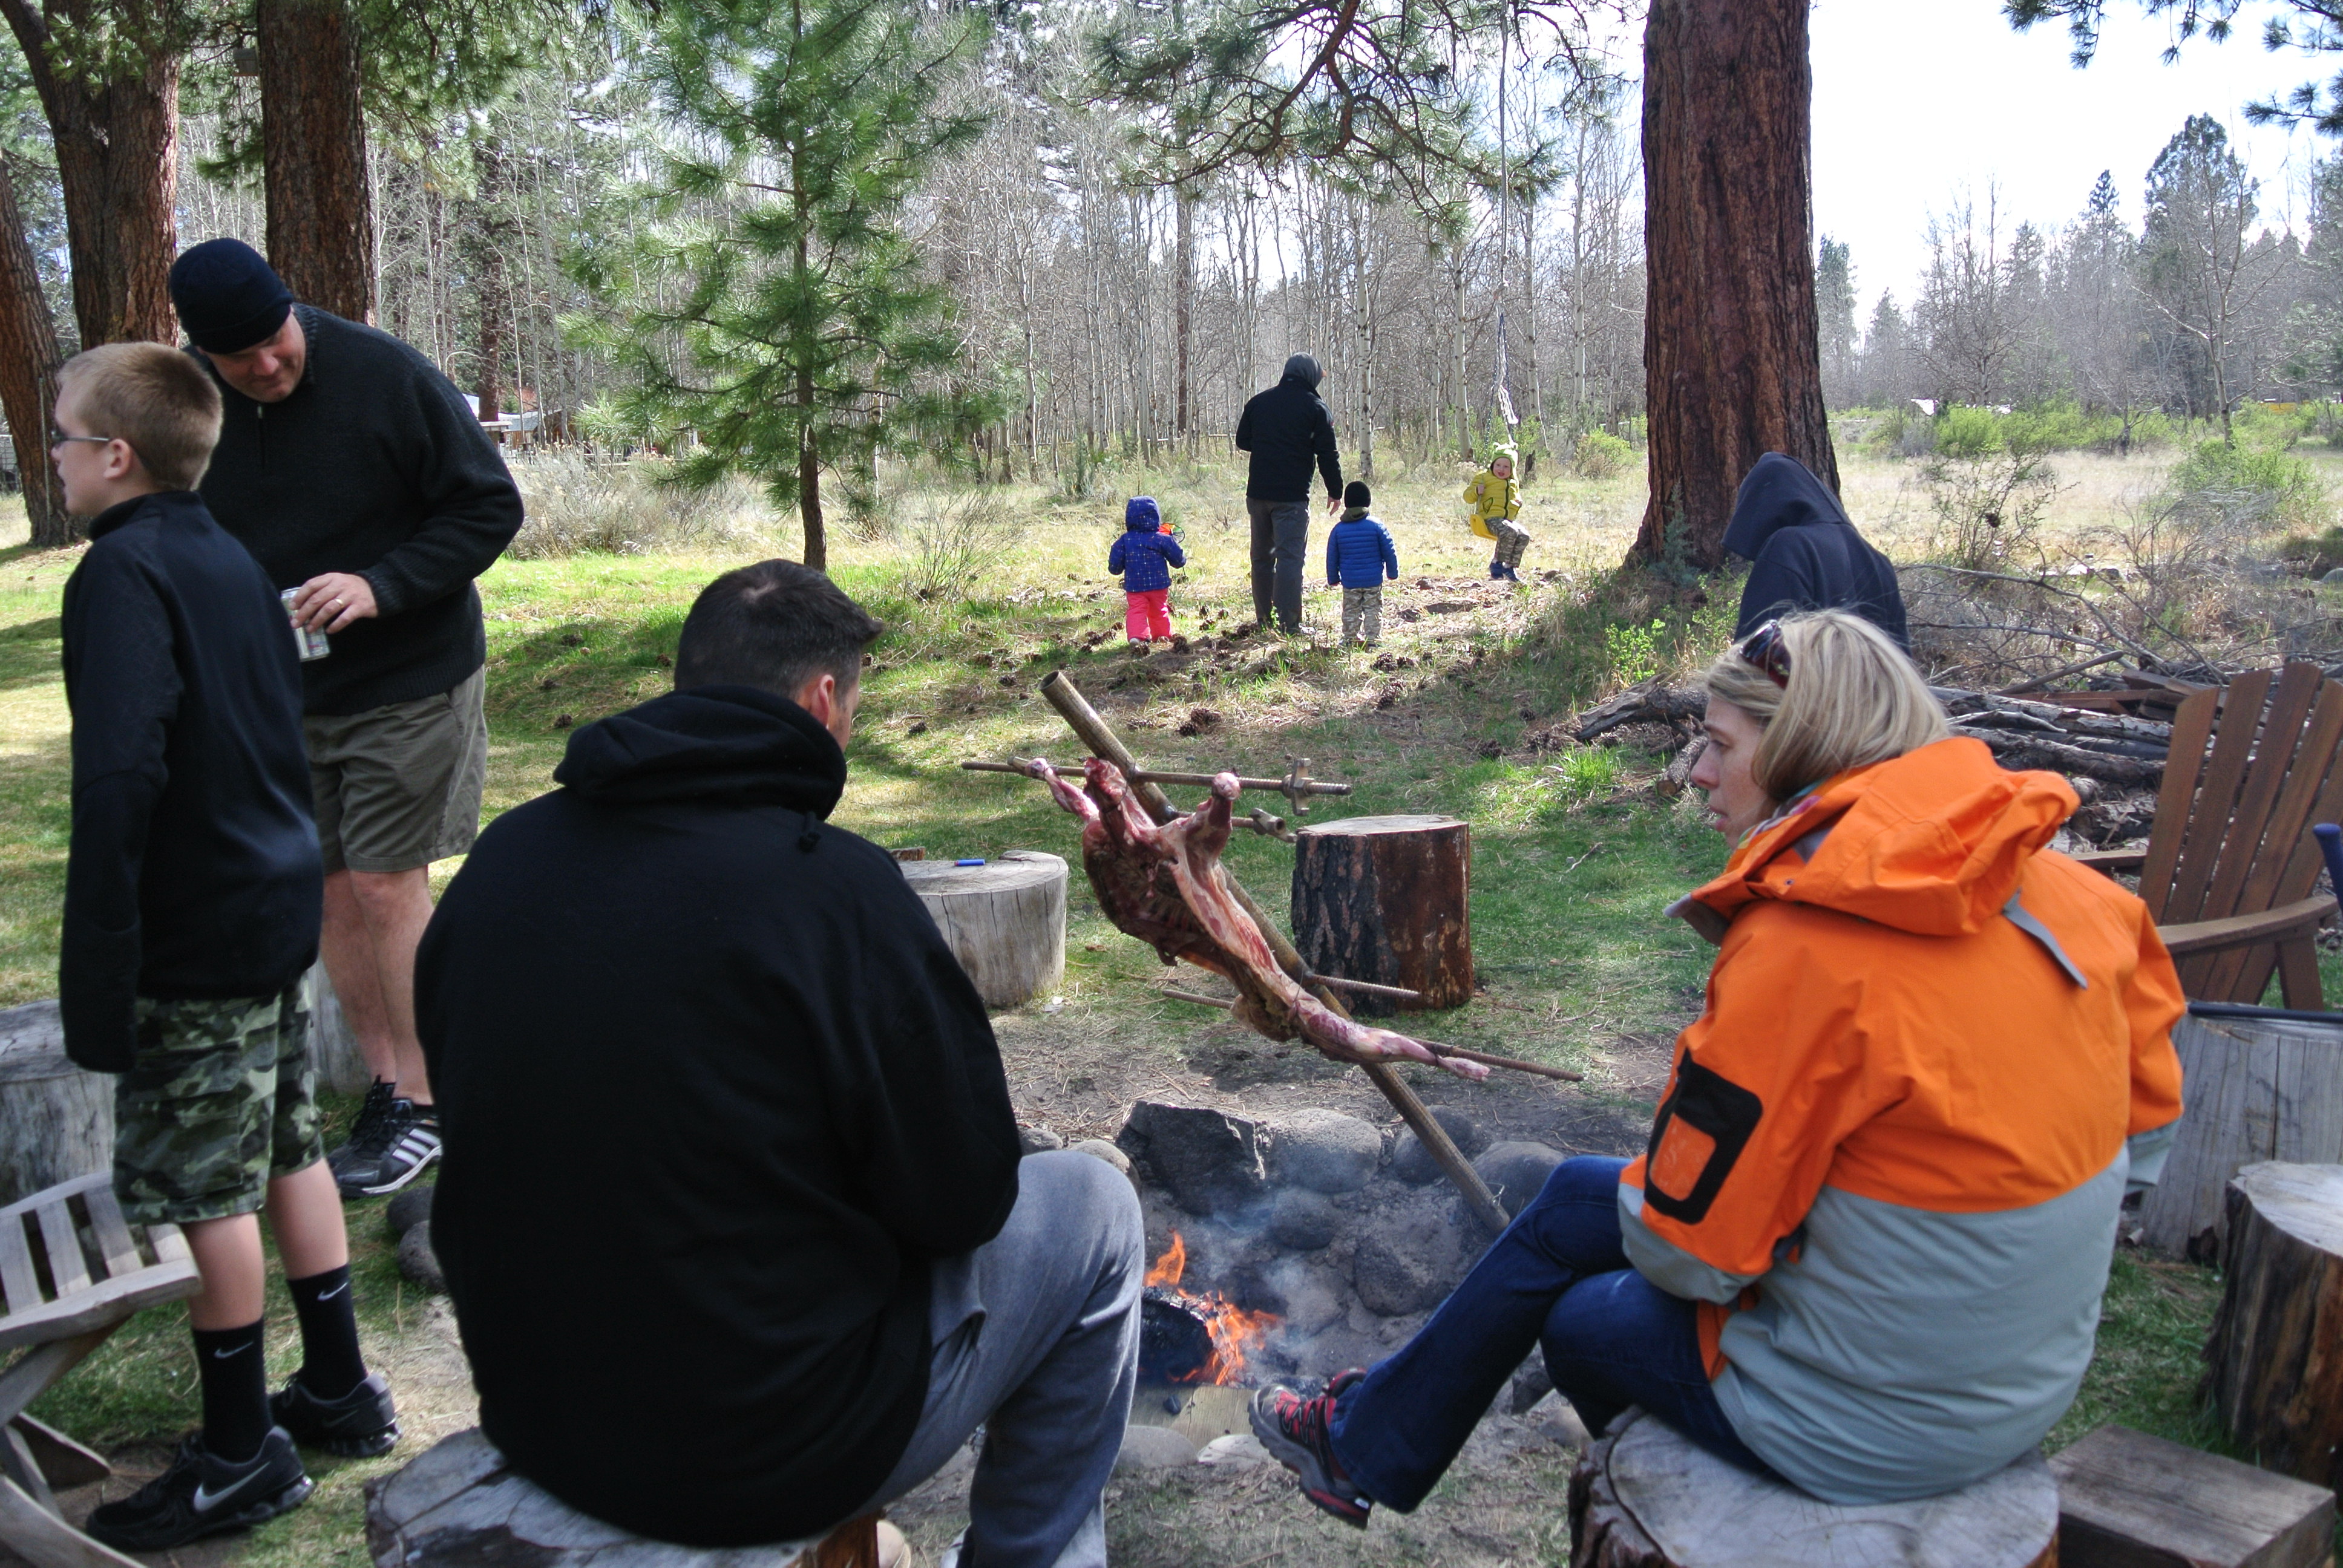
What I love about this type of cooking in the cold, is that it gets us all outside to enjoy the fire and friendship.

Where is Alice?

The lamb is putting off a very good smell. I am surprised that Grizzly bears have not snuck into camp. We turn it around every so often and took our meat temperature gauge to assure a smooth even cooked lamb.

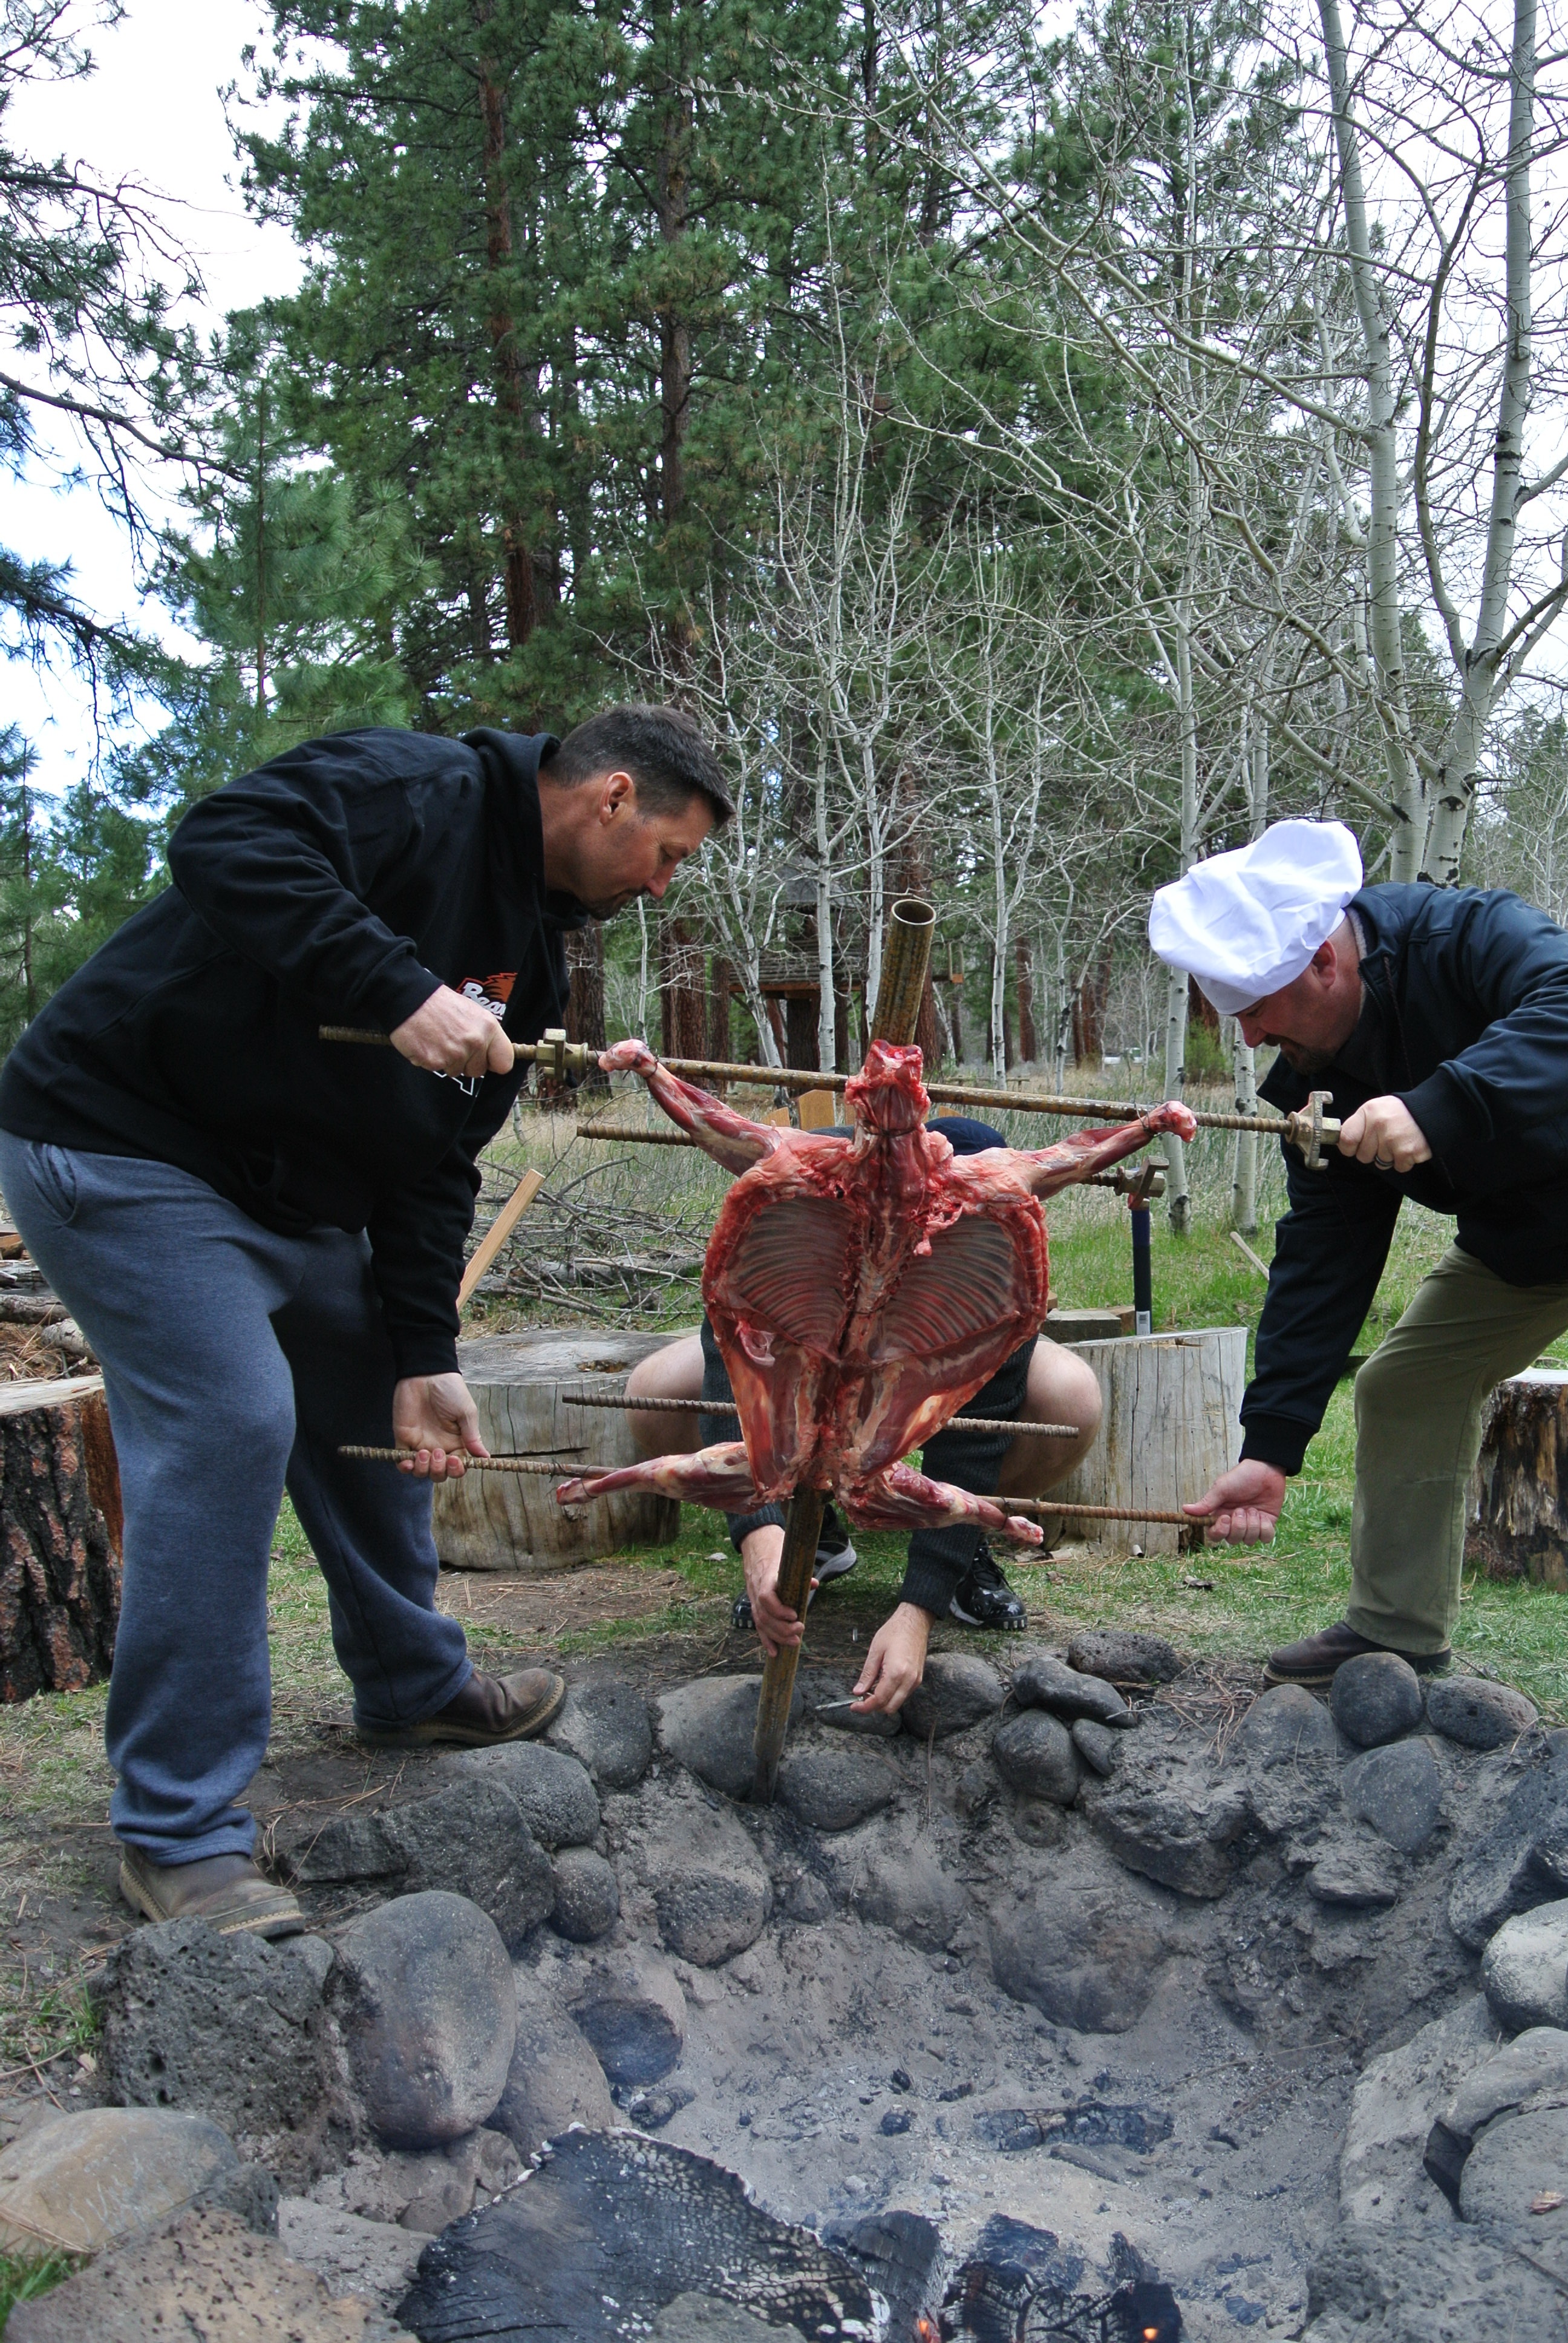
Now about this time we realize two things. Wayne is no longer with us, and we have located Alice in the hot tub where she has been for 7 hours. When I say “Wayne is no longer with us” I mean mentally, not physically. He is now operating in that portion of the brain that only can be operated by killing 1 million brain cells to get there. Someone has stolen our charcoal from our sausage cook station and threw them in the fire. A minor set back that we recover from.

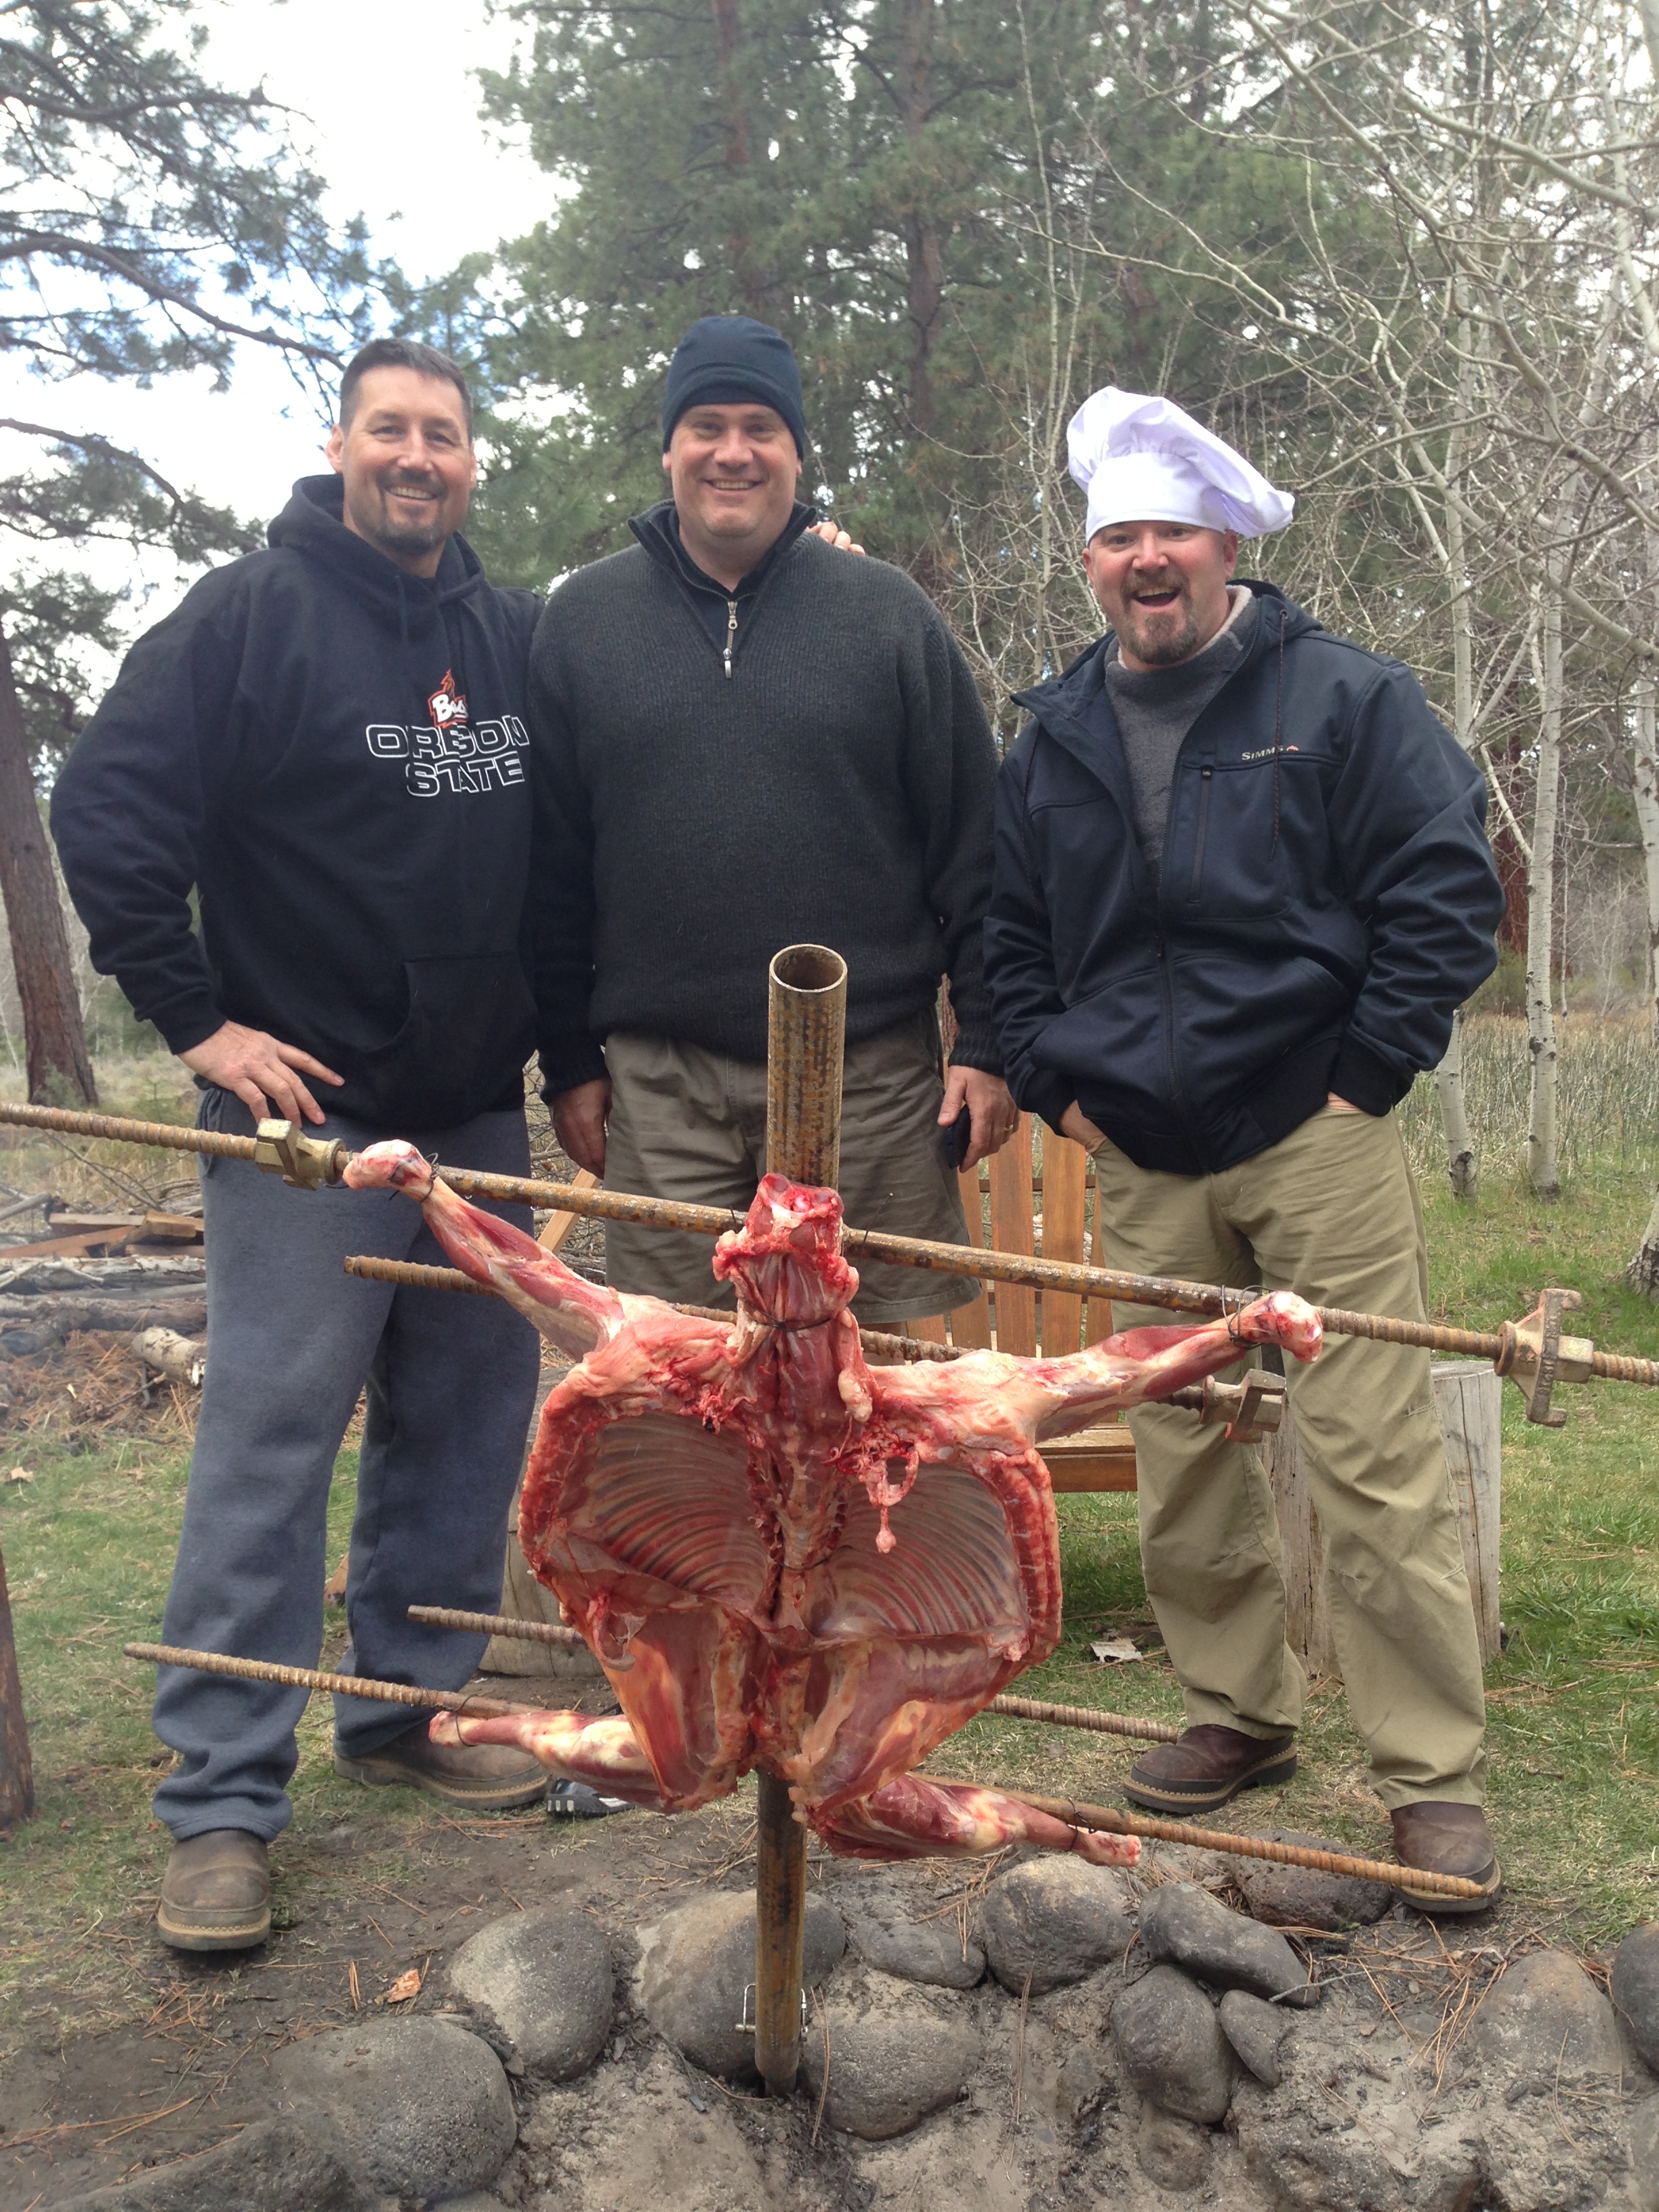
We had to recruit a new “Cut” man to begin to slicing up the finished lamb because our man was down. Trevor’s first question is if we had surgical gloves because he didn’t want to get the meat flavor on his hands. Todd and I looked at him like “Did you just say that?”.
We moved everything inside because it began to snow, and Trevor’s hands were cold.
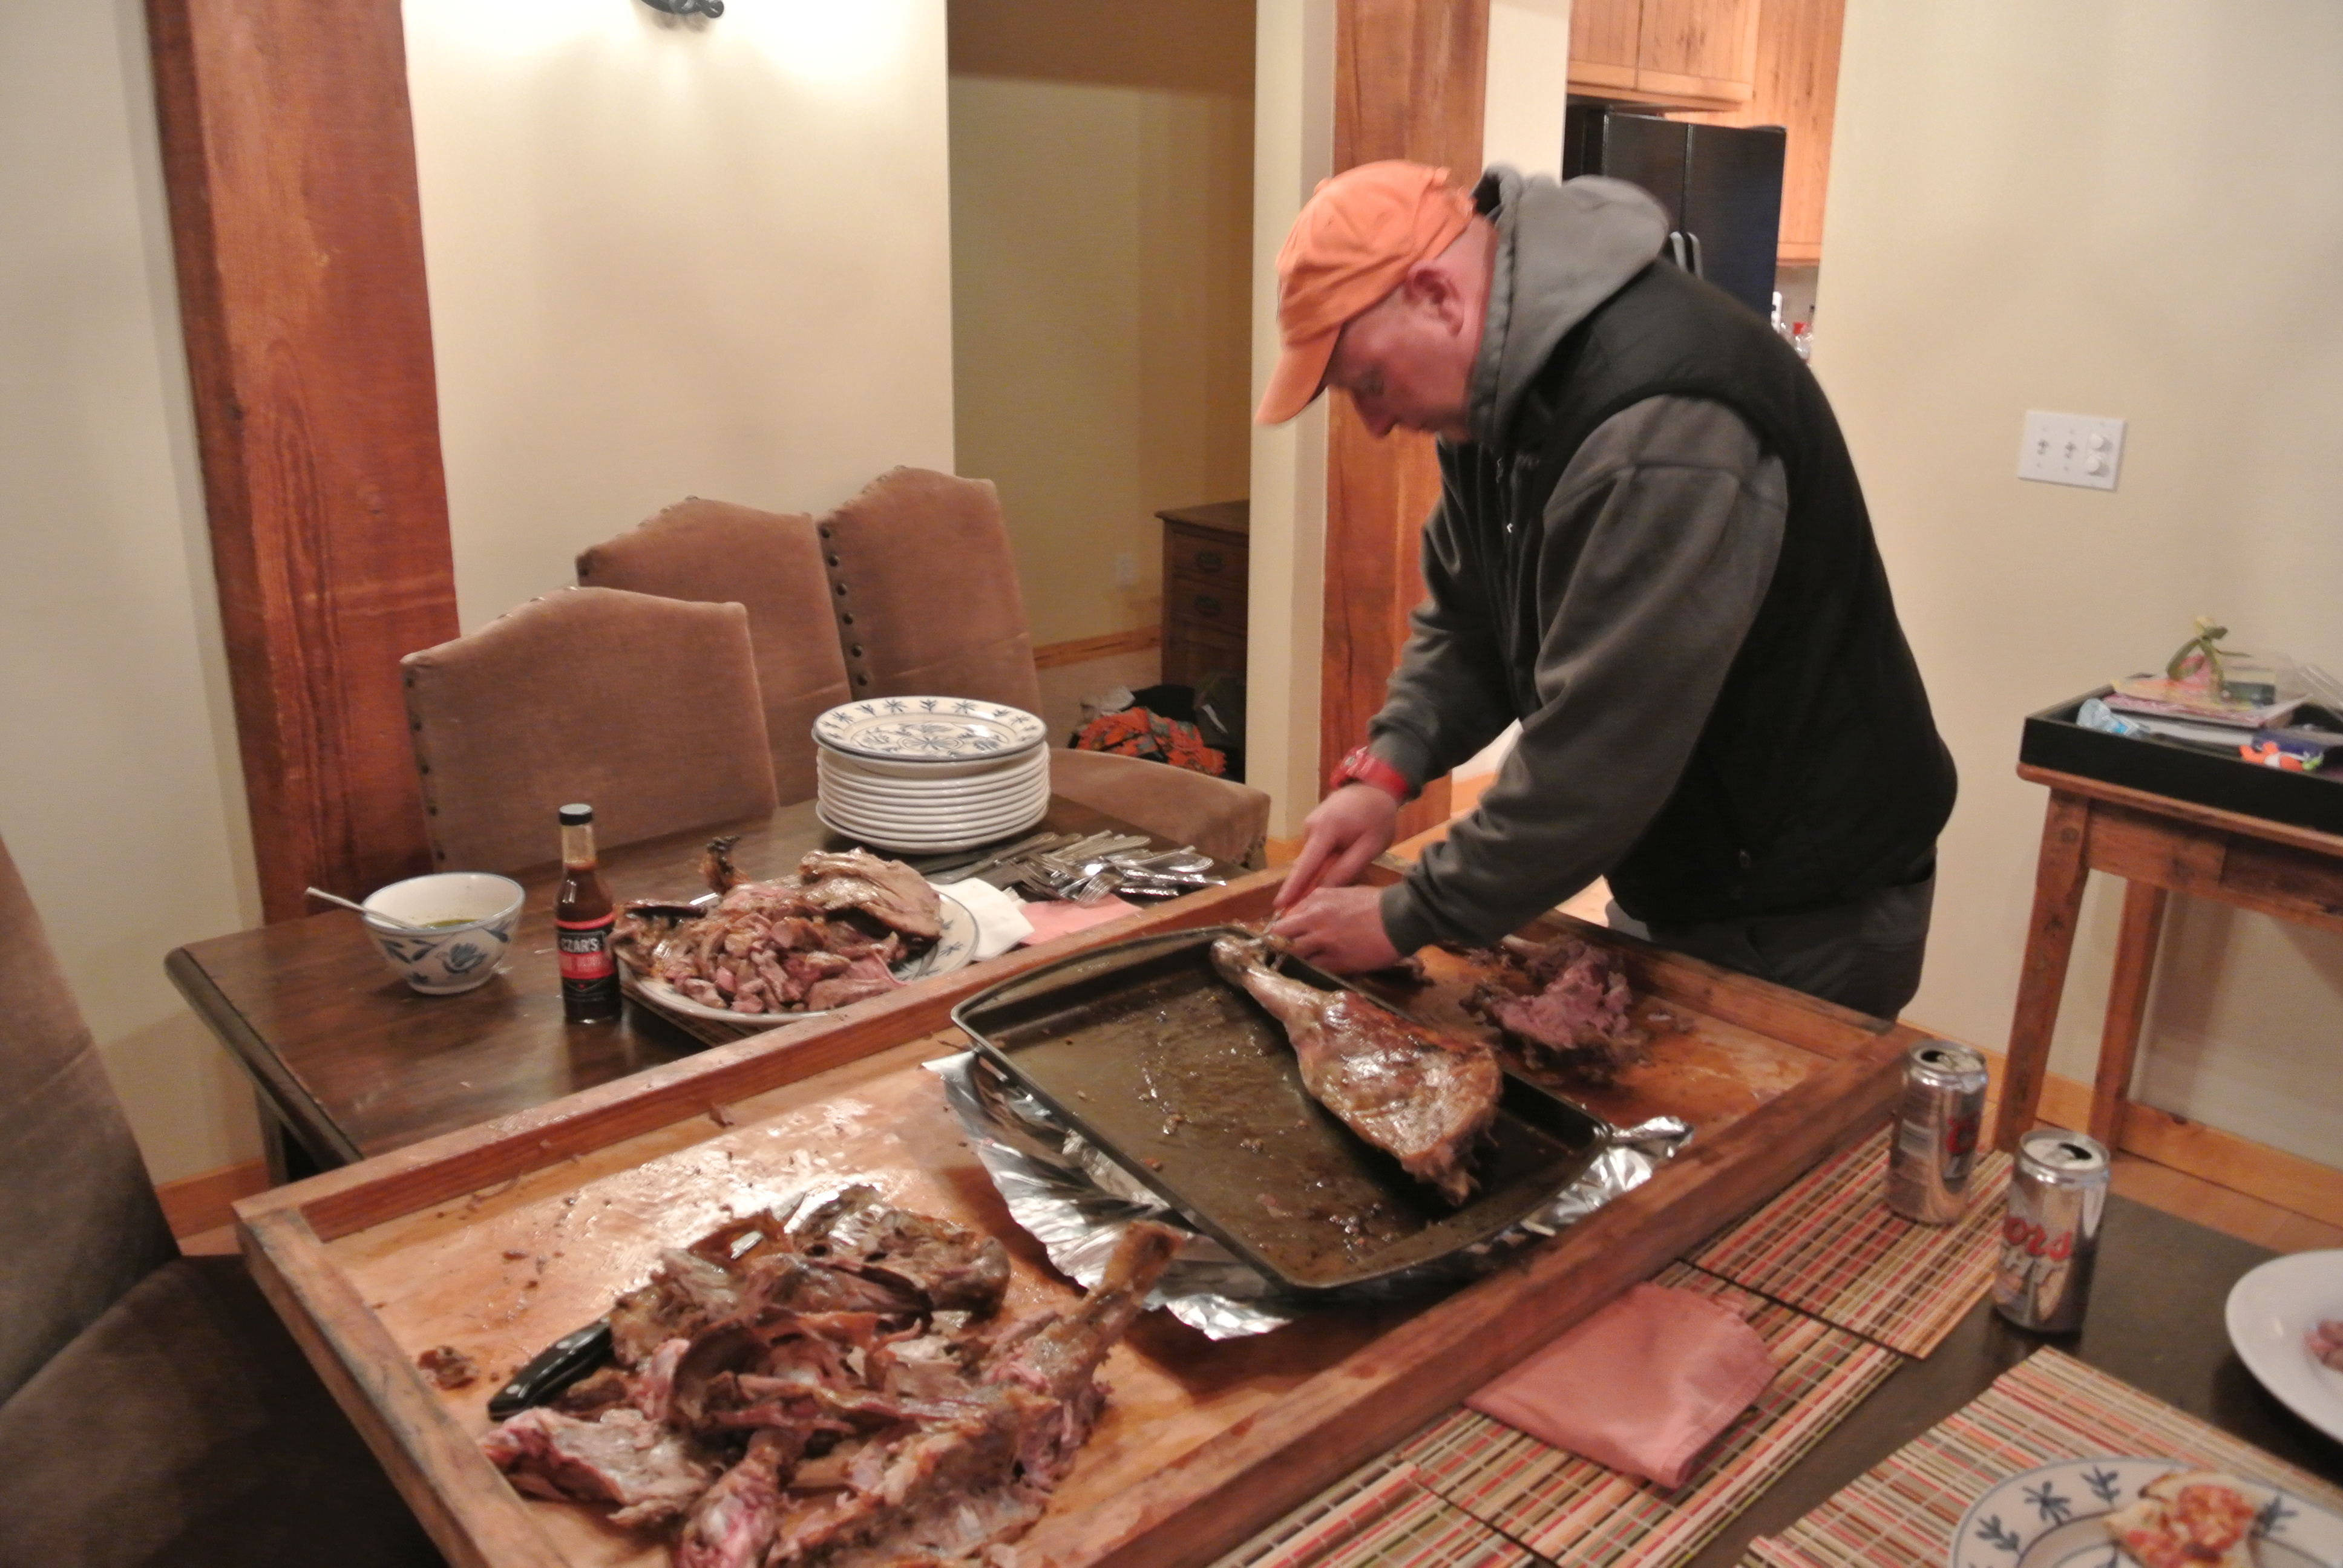

We serve this meal family style. Everyone grabs a plate!

The Meat Savant makes his way to the kitchen after groping Trevor, his wife, me, and the dog. At least he is an equal opportunity groper, he does not care.

The meal is served and the glass of wine is poured. A great way to finish off the night.

The next day we found a comercial Traeger smoker bbq, that we used at our wedding. The company wanted to sell it, and we basically stole it. We could get four lambs in this bad boy. The three of us were giggling all the way home thinking about the deal we got. Look out people, we have entered the NFL.

We had a great time and I am thankful to have such good friends that enjoy cooking and eating as much as I do. I never even thought about the fact that I turned the dreaded 44. It was a great birthday.
Thank you.
Hunting Chef

The Hunting Chef turns Double Quatro Part 1
I recently turned 44, and my wife and friends decided that it was the perfect opportunity to celebrate over a three-day food, drink, and more food bender. We made a few calls to the butcher, we made a check list of ingredients, watched a couple Argentinian videos and off we went. Friday night, we decided to begin with a nice 50 pound young pig. This would be our pre-funk bbq.
 Big Wayne, you may remember him from the last time three of us got together for beef brisket (it is on the blog). He made up his secret injection brine and began the process of injecting the pig.

Then you lay the top back on with about 10 lbs of charcoal (you must have a remote thermometer in the thickest part, the hind in). Meanwhile Big Todd gets the drinks ready for “John Dailey’s”.

The top is laid on for two hours.

After two hours, you flip the pig. You add more coals and just monitor the process until the pig is 170 degrees.

Waiting as you smell the pig roasting is like torture.


Then you lay the little fella on the butcher table and get some knives and get to work.

This was our pre-meal to the big one that was the next day, which was Argentina Birthday Style.

One thing you have to remember is that it gets real busy around that table, so when you’re snapping photos and drinking wine you have to watch your P’s and Q’s.

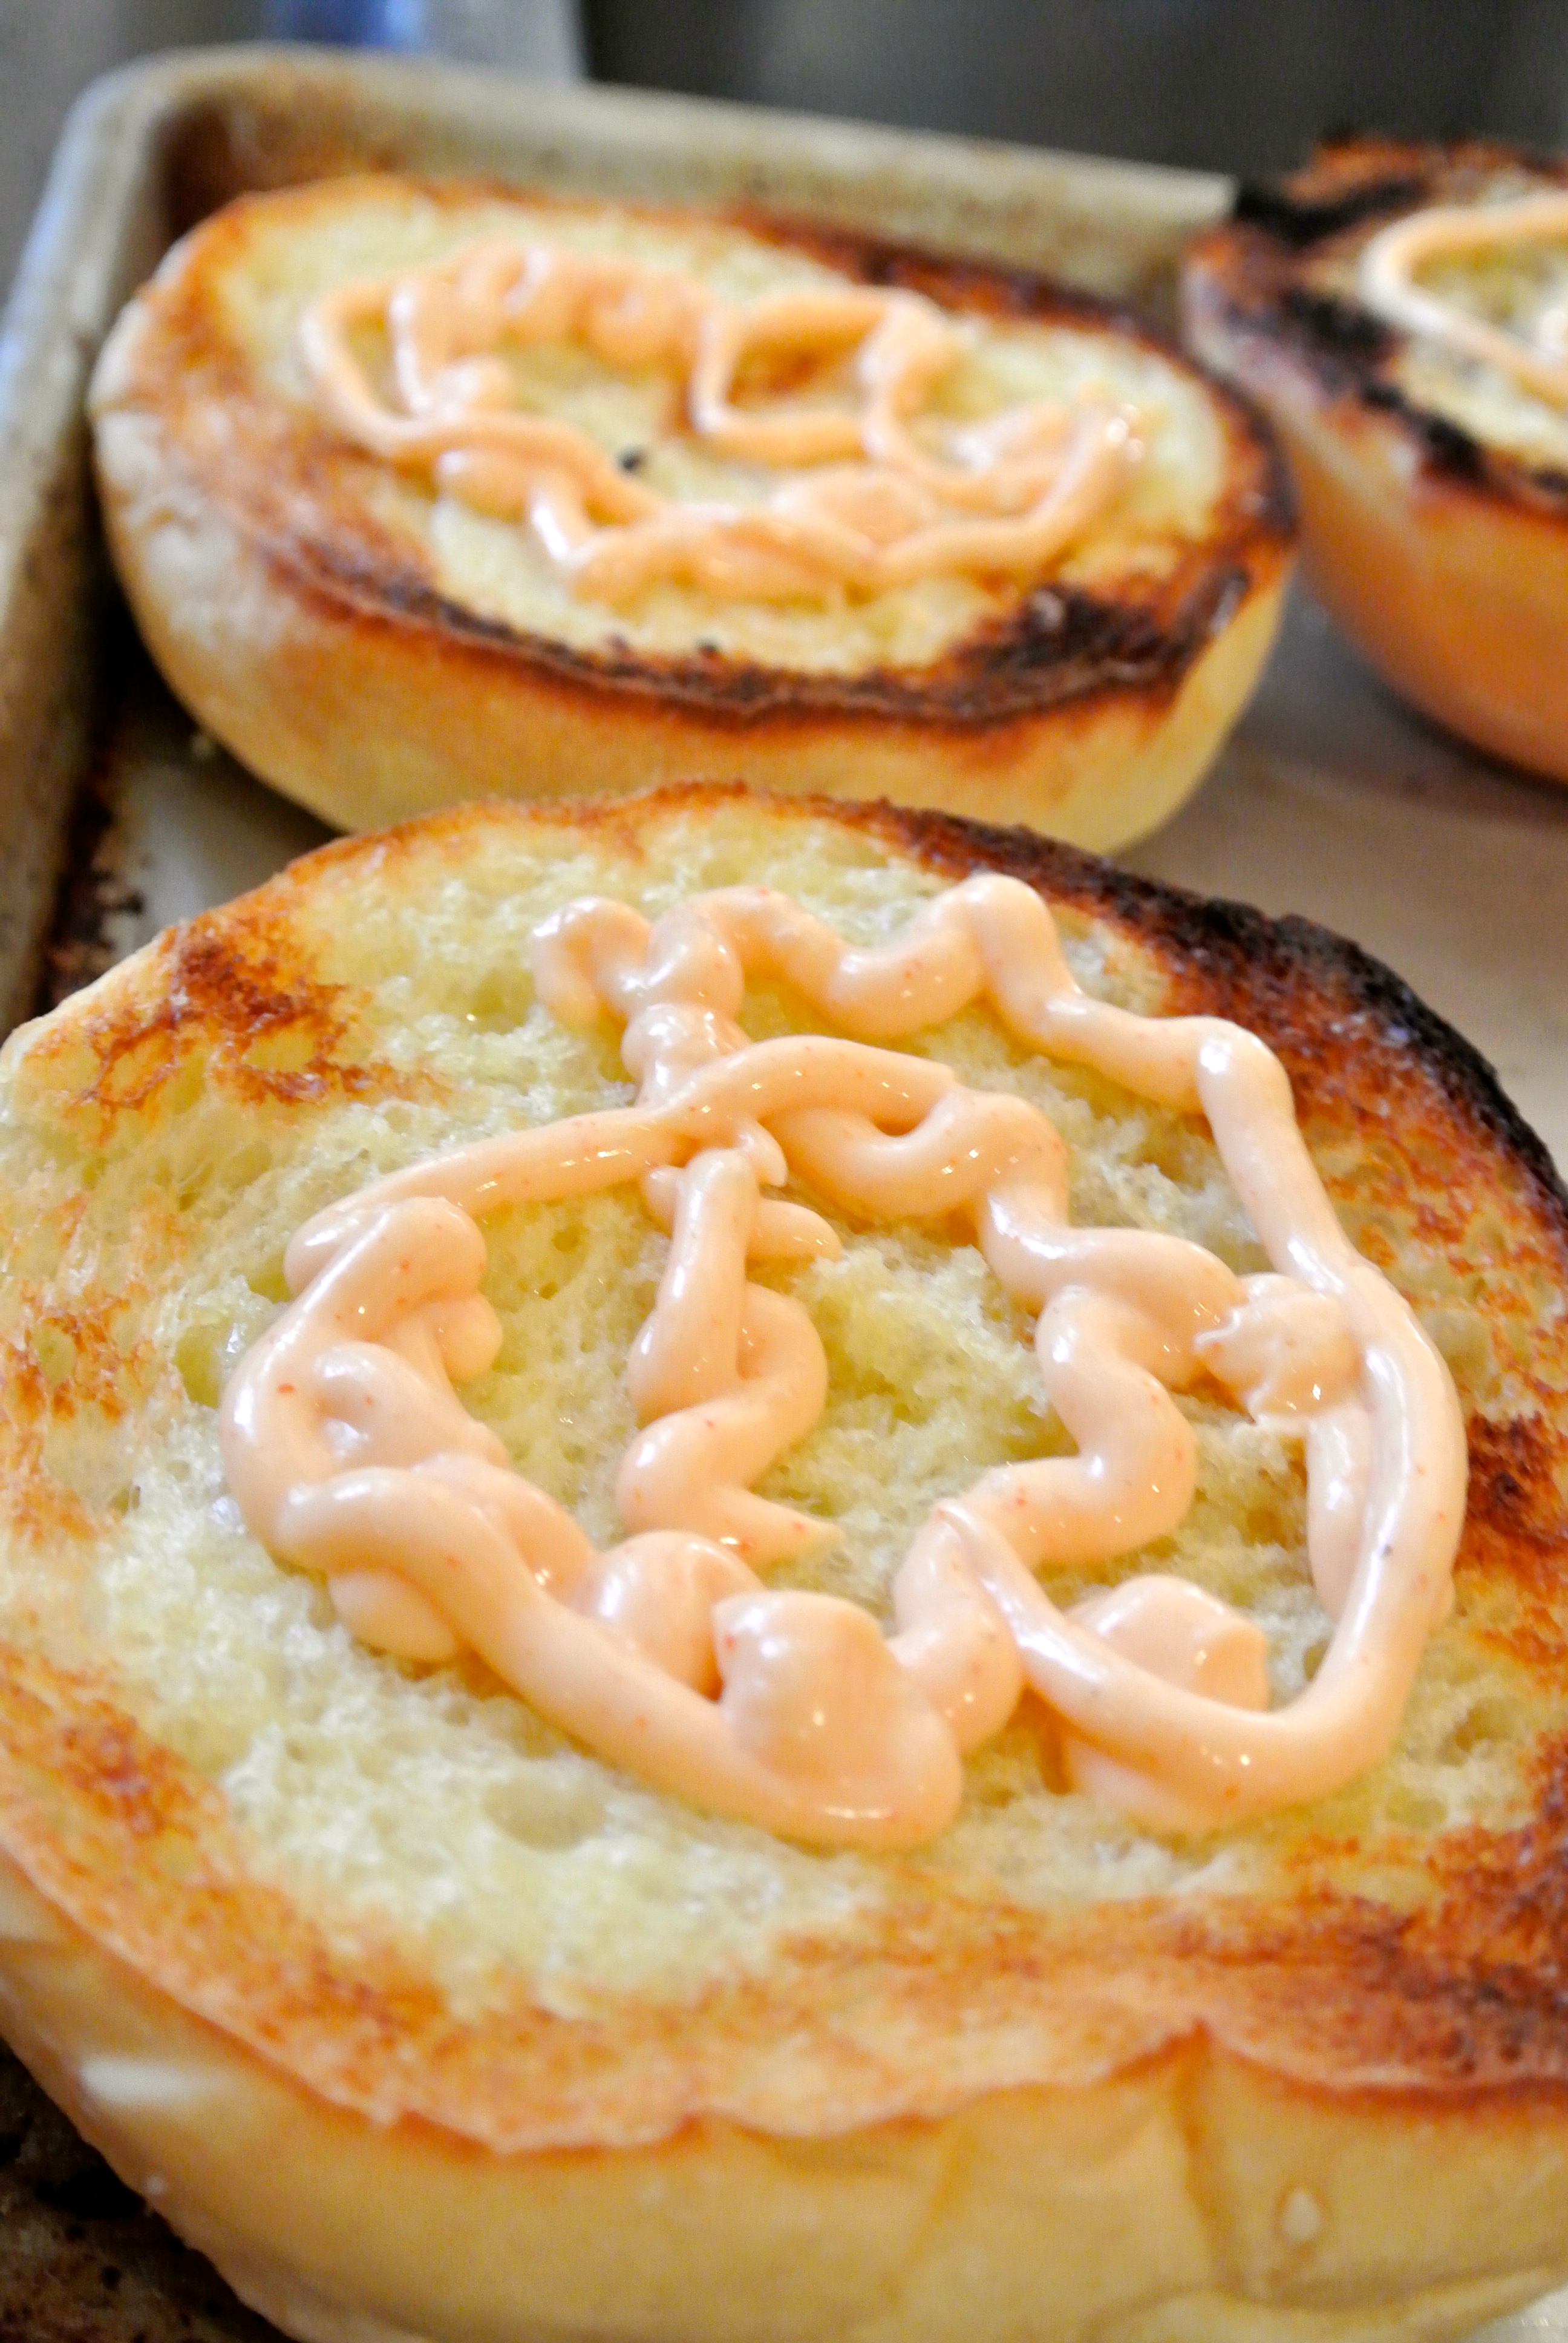
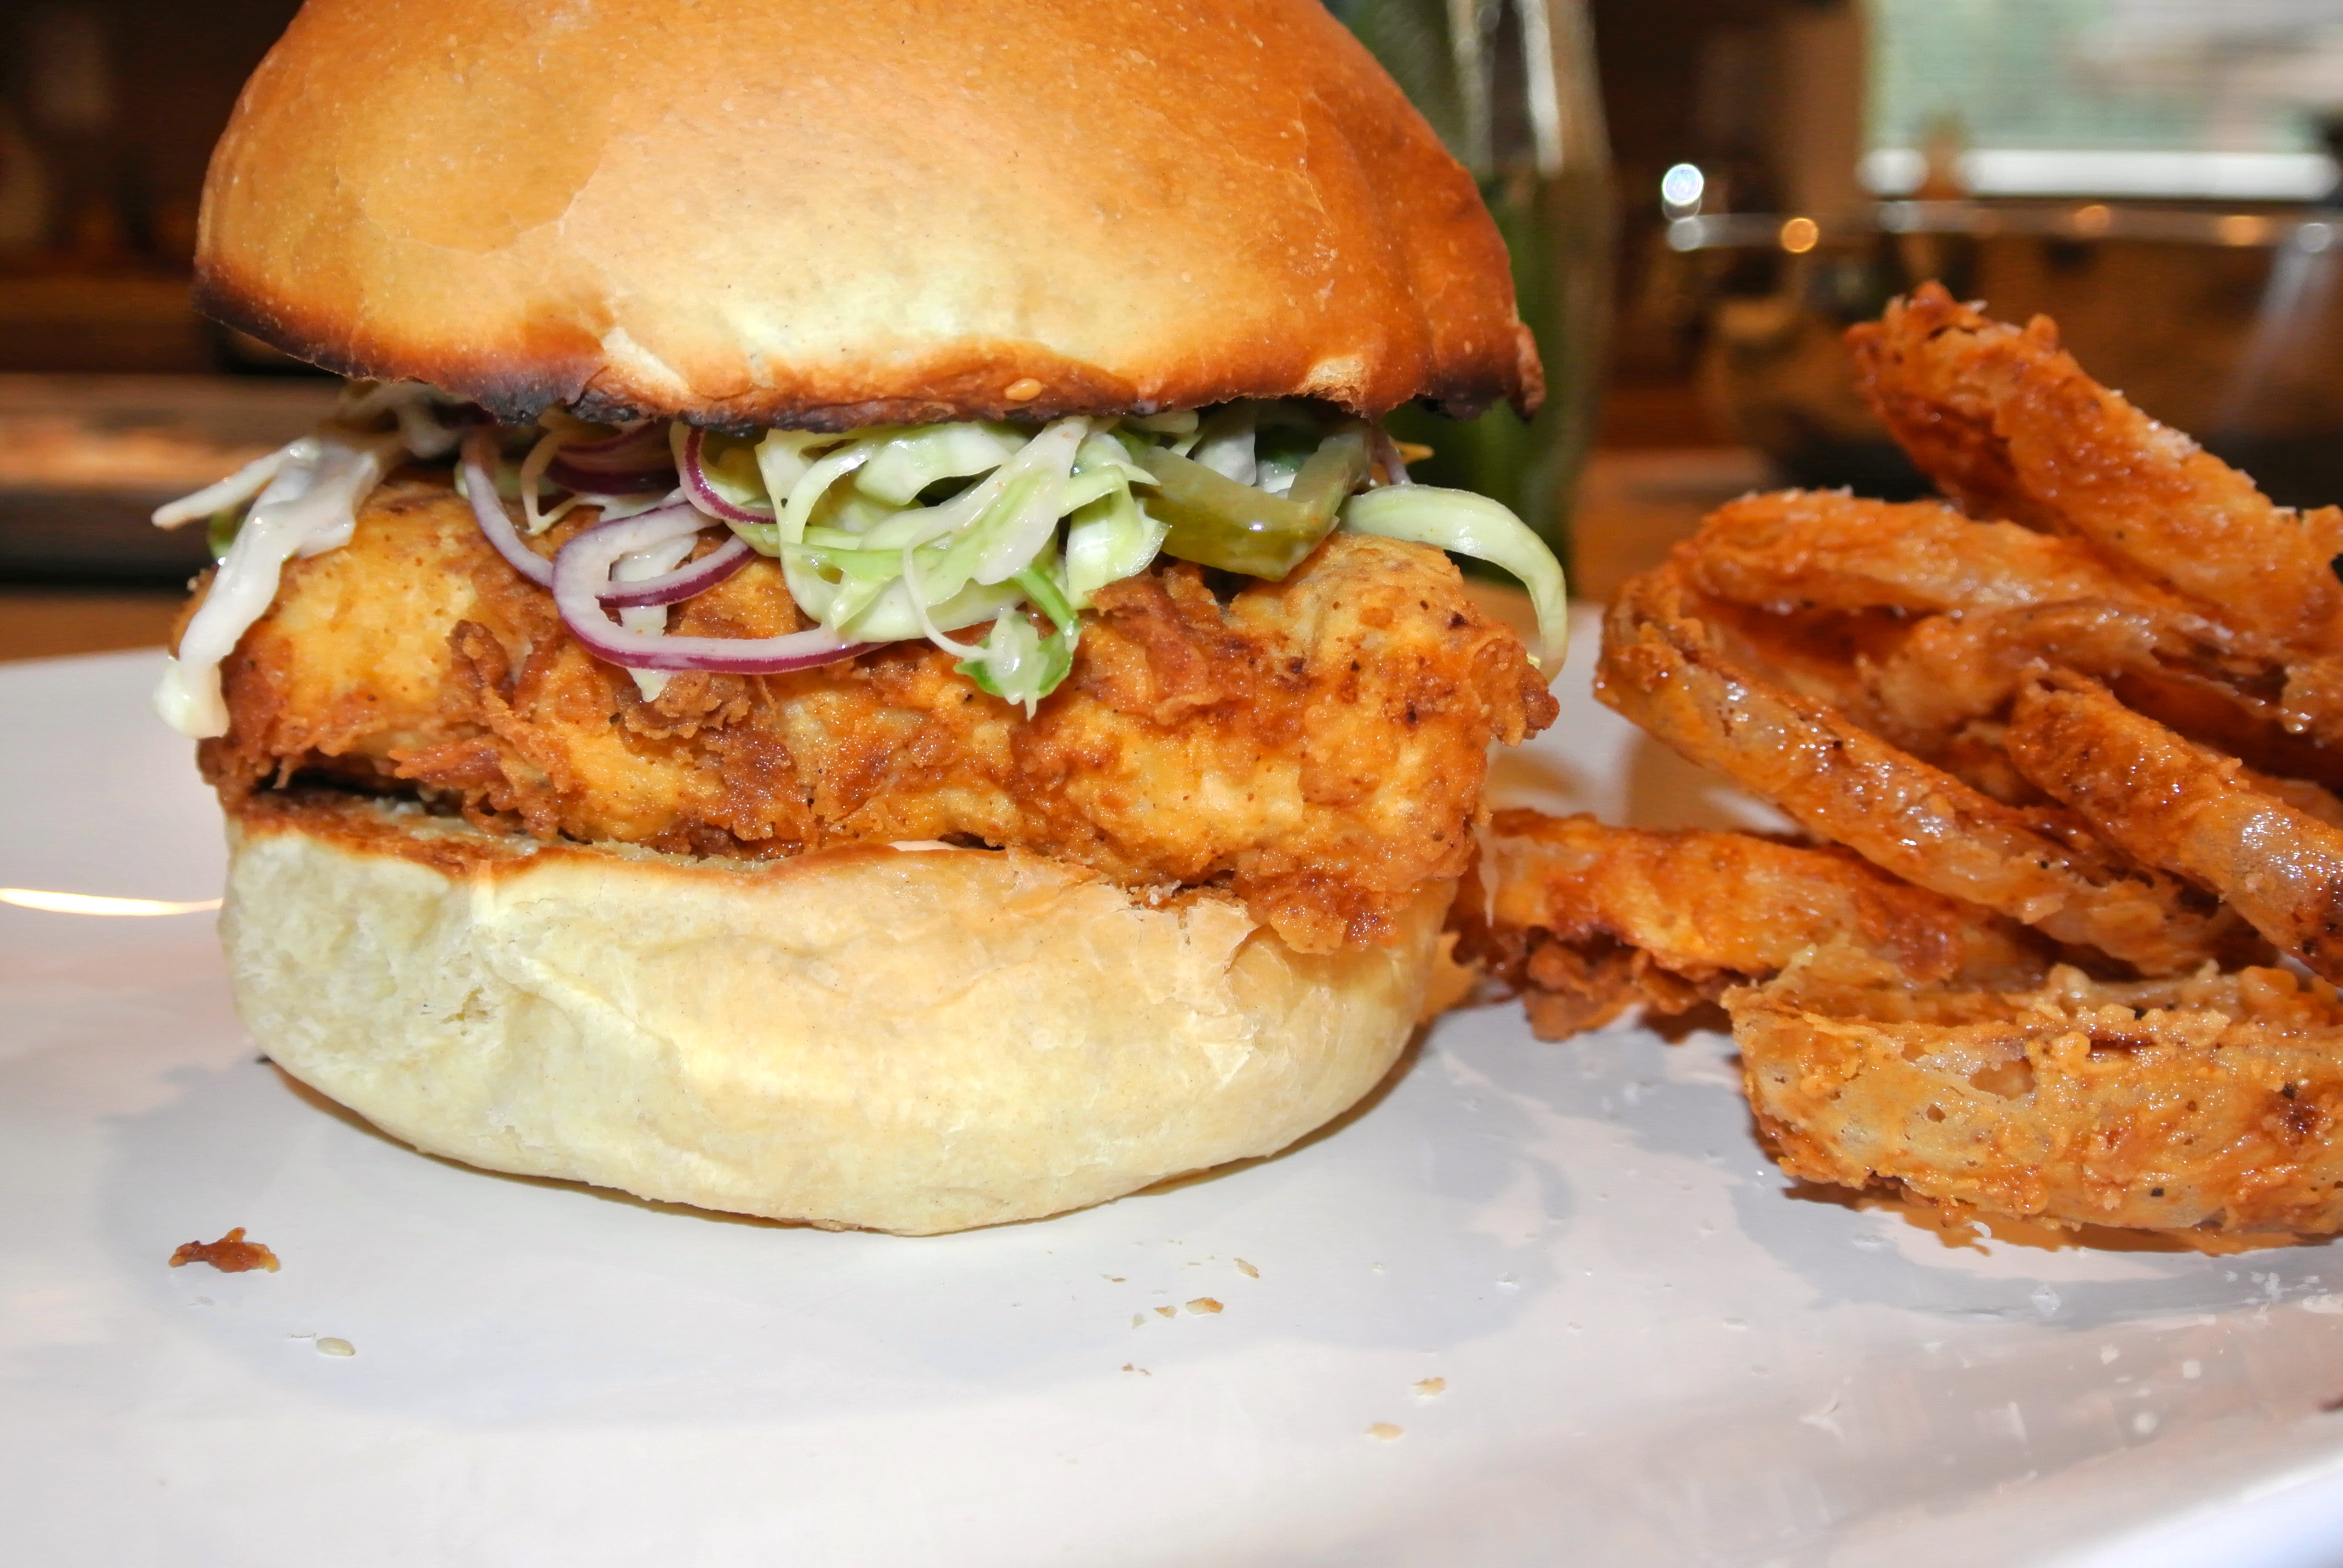
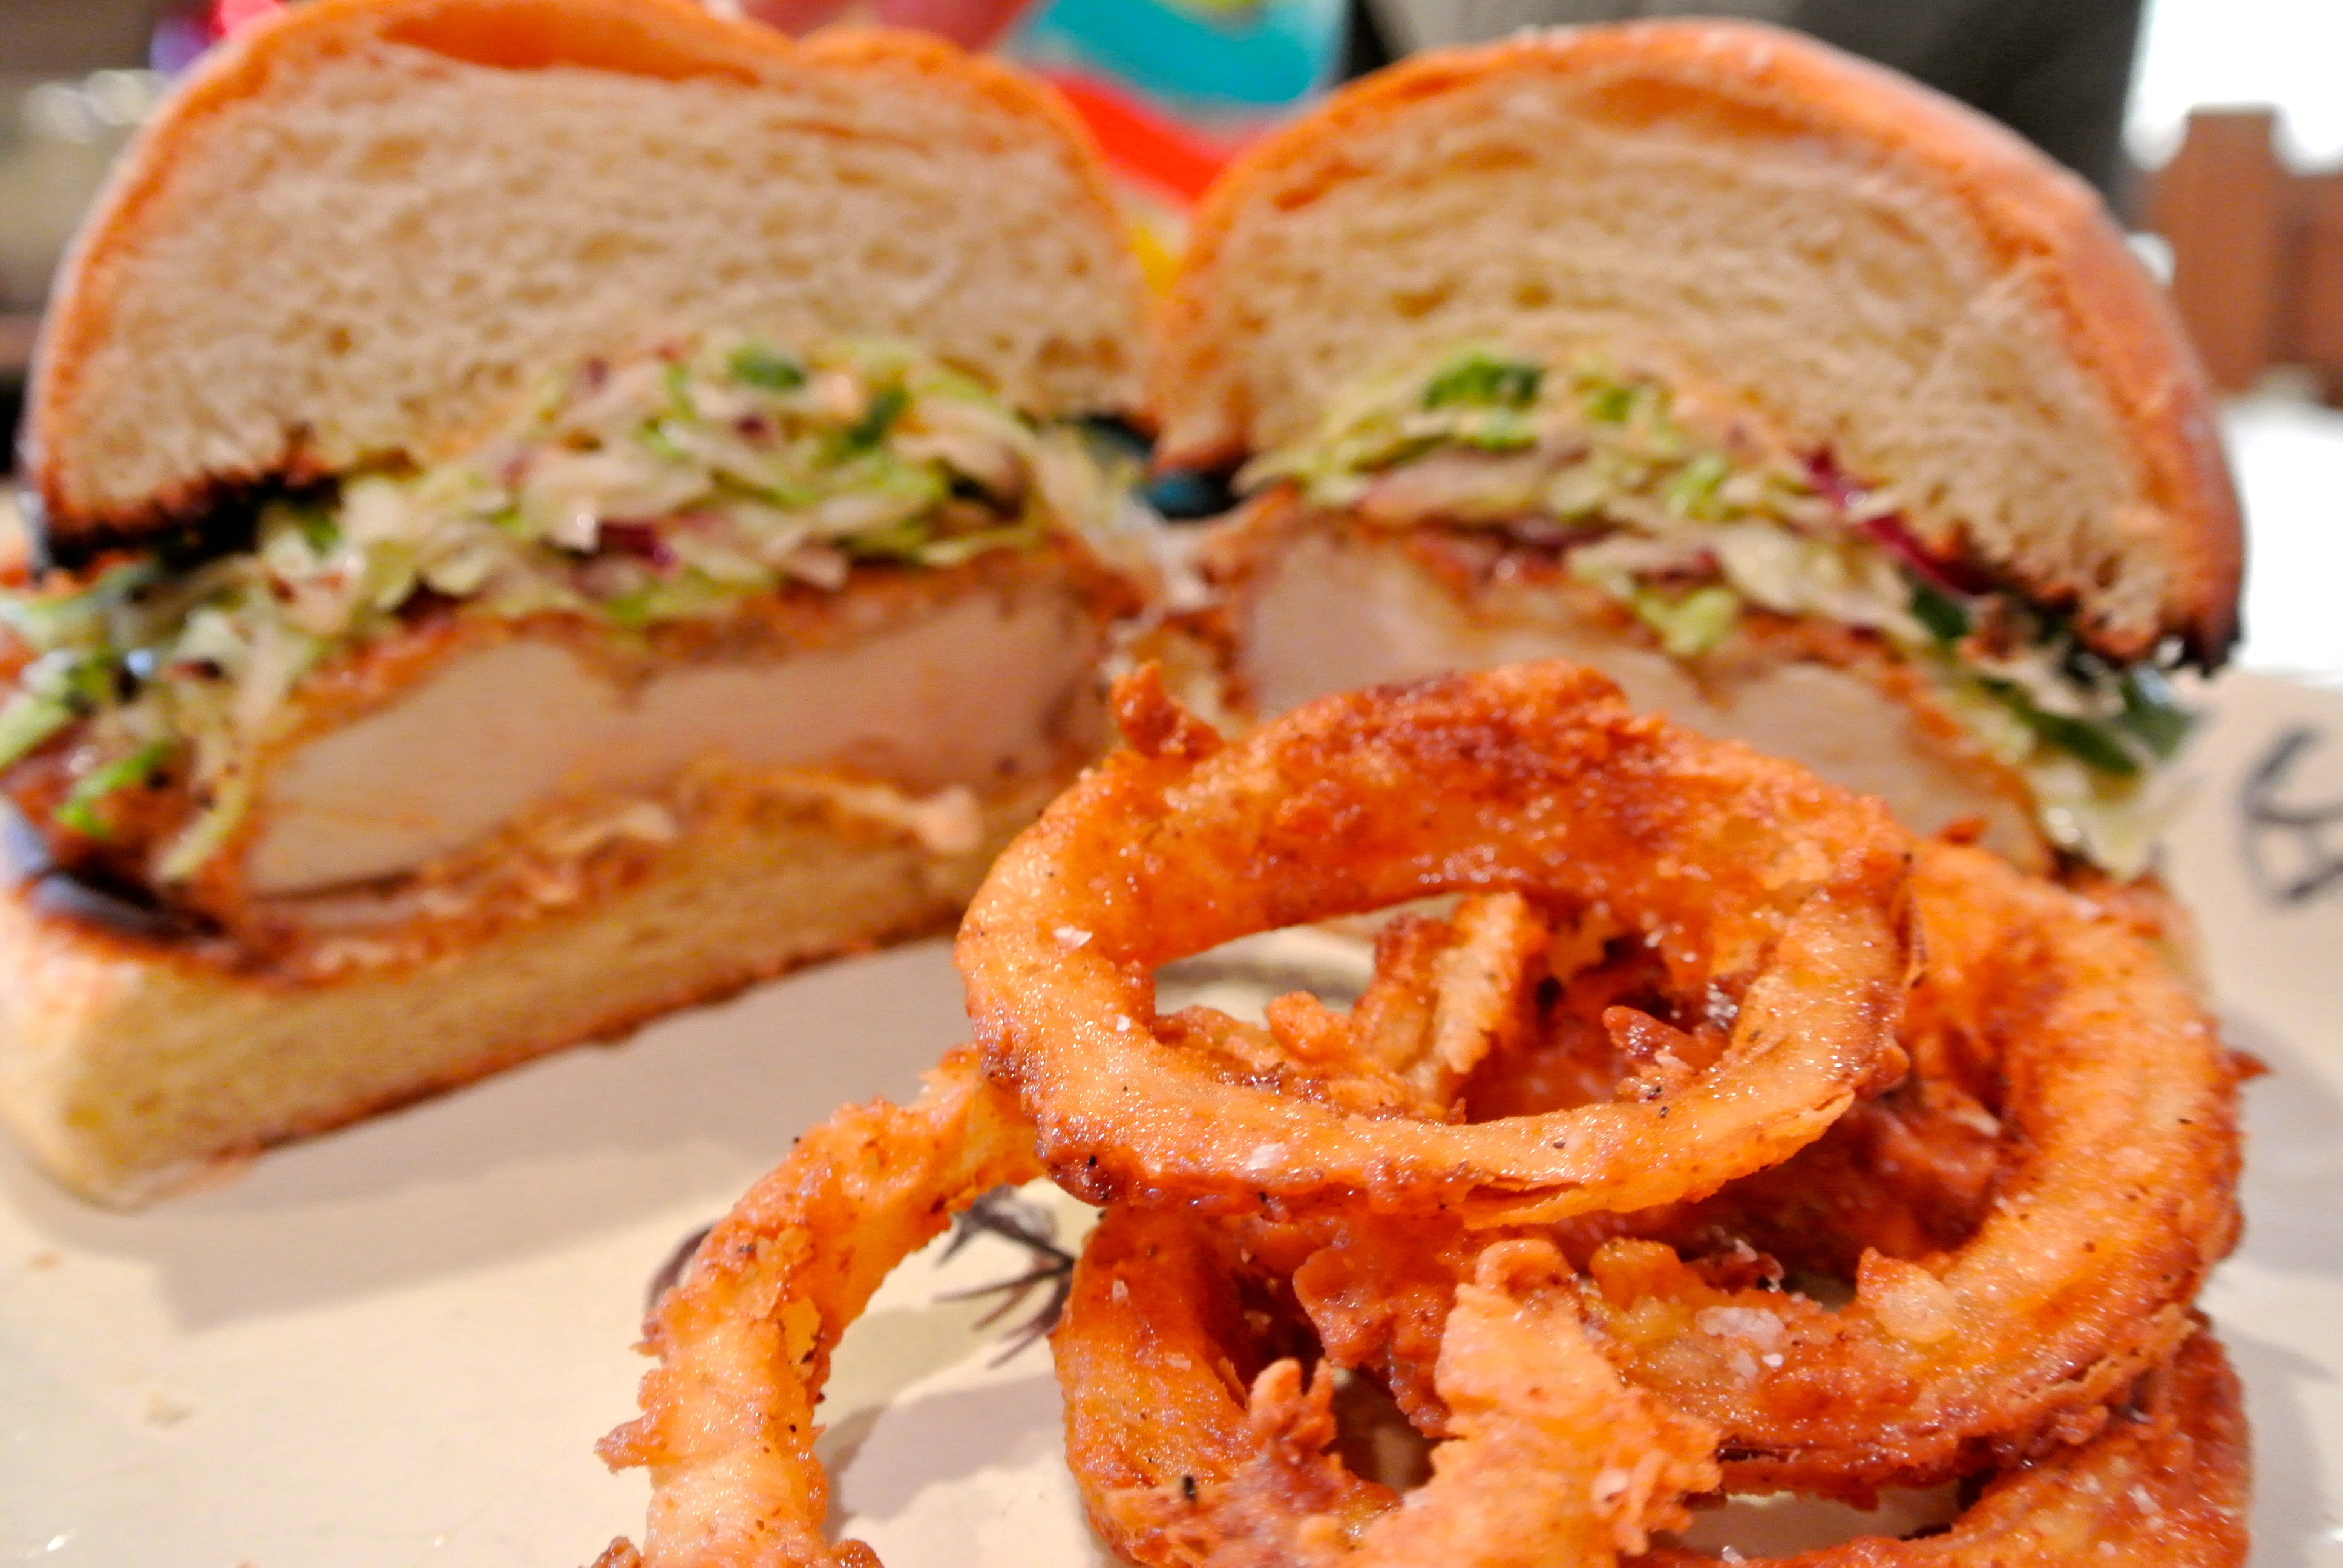
Fried Chicken Sandwich with Slaw and Spicy Mayo

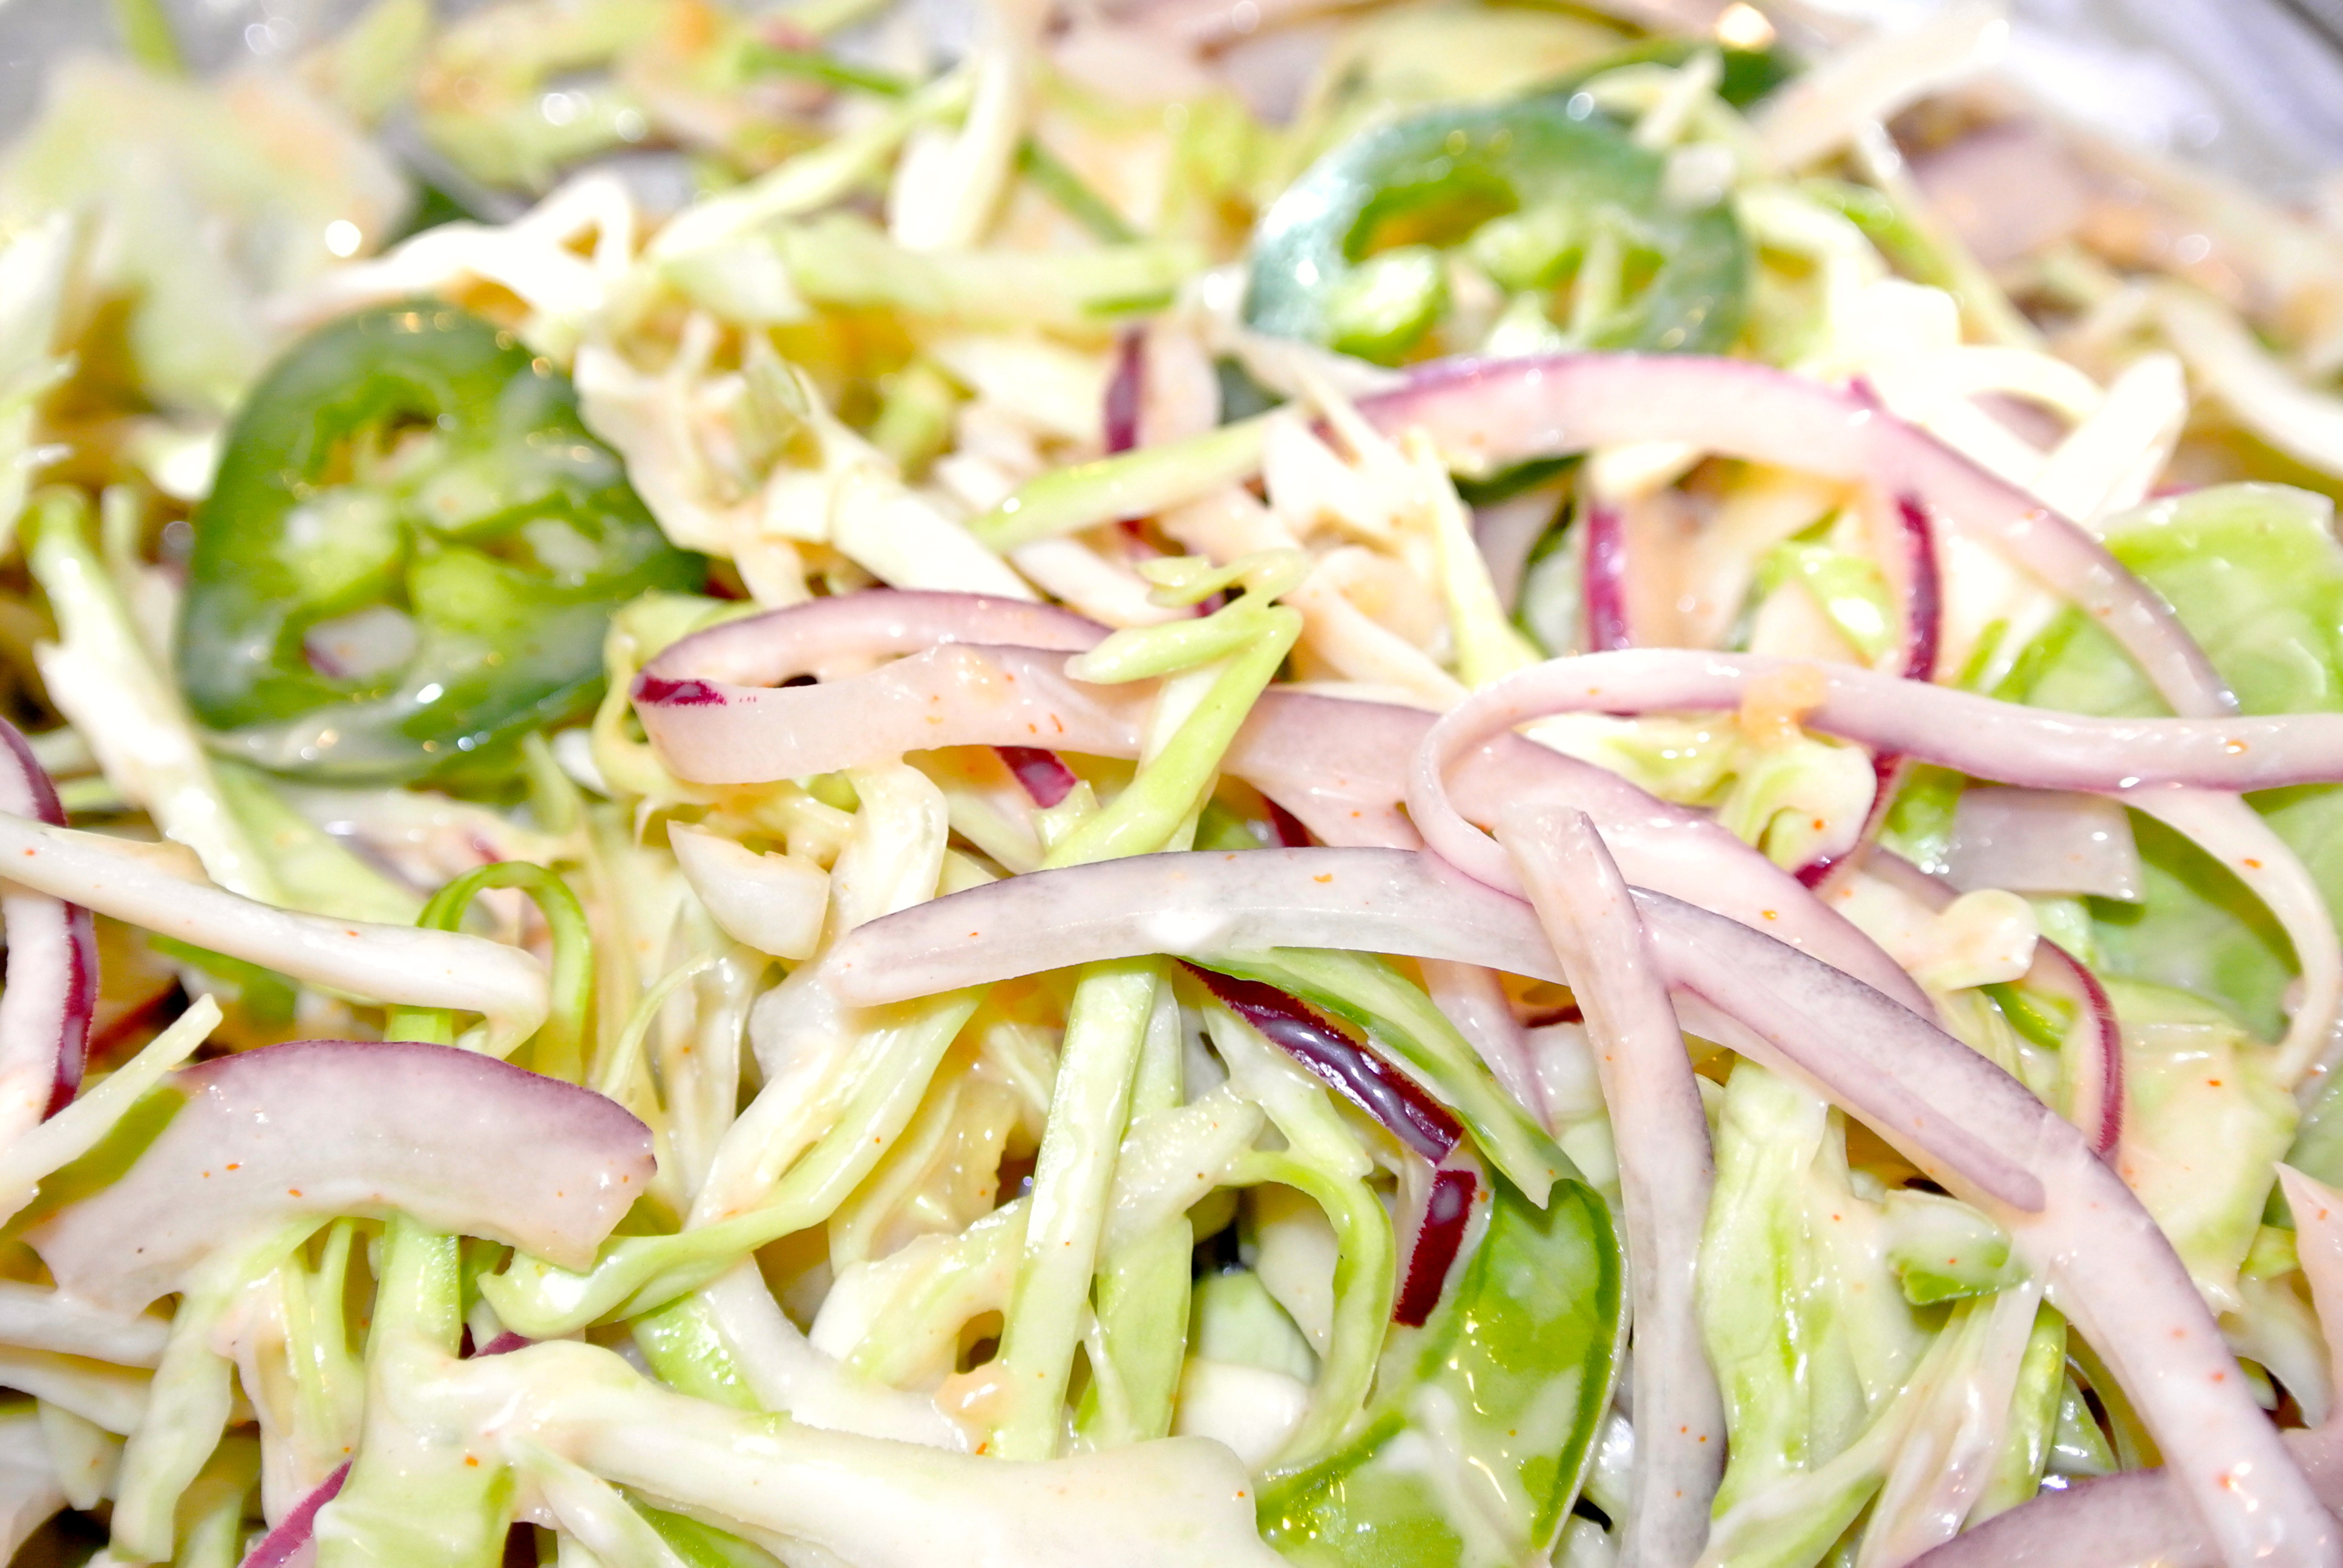
I got my new Bon appetite Magazine and it was all about making the perfect sandwich. I made a few little twist but kept to the recipe. It was Sunday, so I got a day off from my diet and invited some friends over to the “Test Kitchen”. I brined my chicken the night before, just to give that sammy the edge on moisture. It turned out great. The slaw has some heat to hit from the jalapeños, but well-balanced.
Spicy mayo and slaw
- 1 garlic clove, pressed or finely grated.
- 1/2 cup mayonnaise (I used the fake stuff).
- 1 Tbsp. of Tapatio hot sauce (use your favorite if you have one).
- 1/2 small red onion thinly sliced
- 1 jalapeño, thinly sliced.
- 4 cups thinly sliced cabbage
- 1/2 cup bread and butter pickle slices, plus one 1/4 cup of pickle juice (I used my hot homemade pickles).
Fried chicken and assembly
- 2 cups all-purpose flour
- 1 Tbsp. ground black pepper
- 1 Tbsp kosher salt plus more
- 1 cup of buttermilk.
- 2 skinless, boneless breast, halved crosswise
- Peanut or Vegetable oil for frying
- 4 white sandwich rolls
- 2 Tbsp. unsalted butter at room temperature
First thing to prep is the sauce and the slaw. For the Spicy Mayo mix garlic, mayonnaise, and hot pepper sauce in a small bowl. Cover and chill in fridge.
To make the slaw, toss onion, jalapeño, cabbage, pickles, and the pickle juice into a bowl. Mix well in a large bowl cover and chill.
Fried chicken assembly
Whisk flour, pepper and salt into a small shallow bowl. Pour the buttermilk into the other bowl. Working one piece at a time, dredge the chicken into the flour mixture, shake off excess. Dip into buttermilk, allowing the excess buttermilk to drip into bowl. Dredge again in flour mixture, shaking off excess.
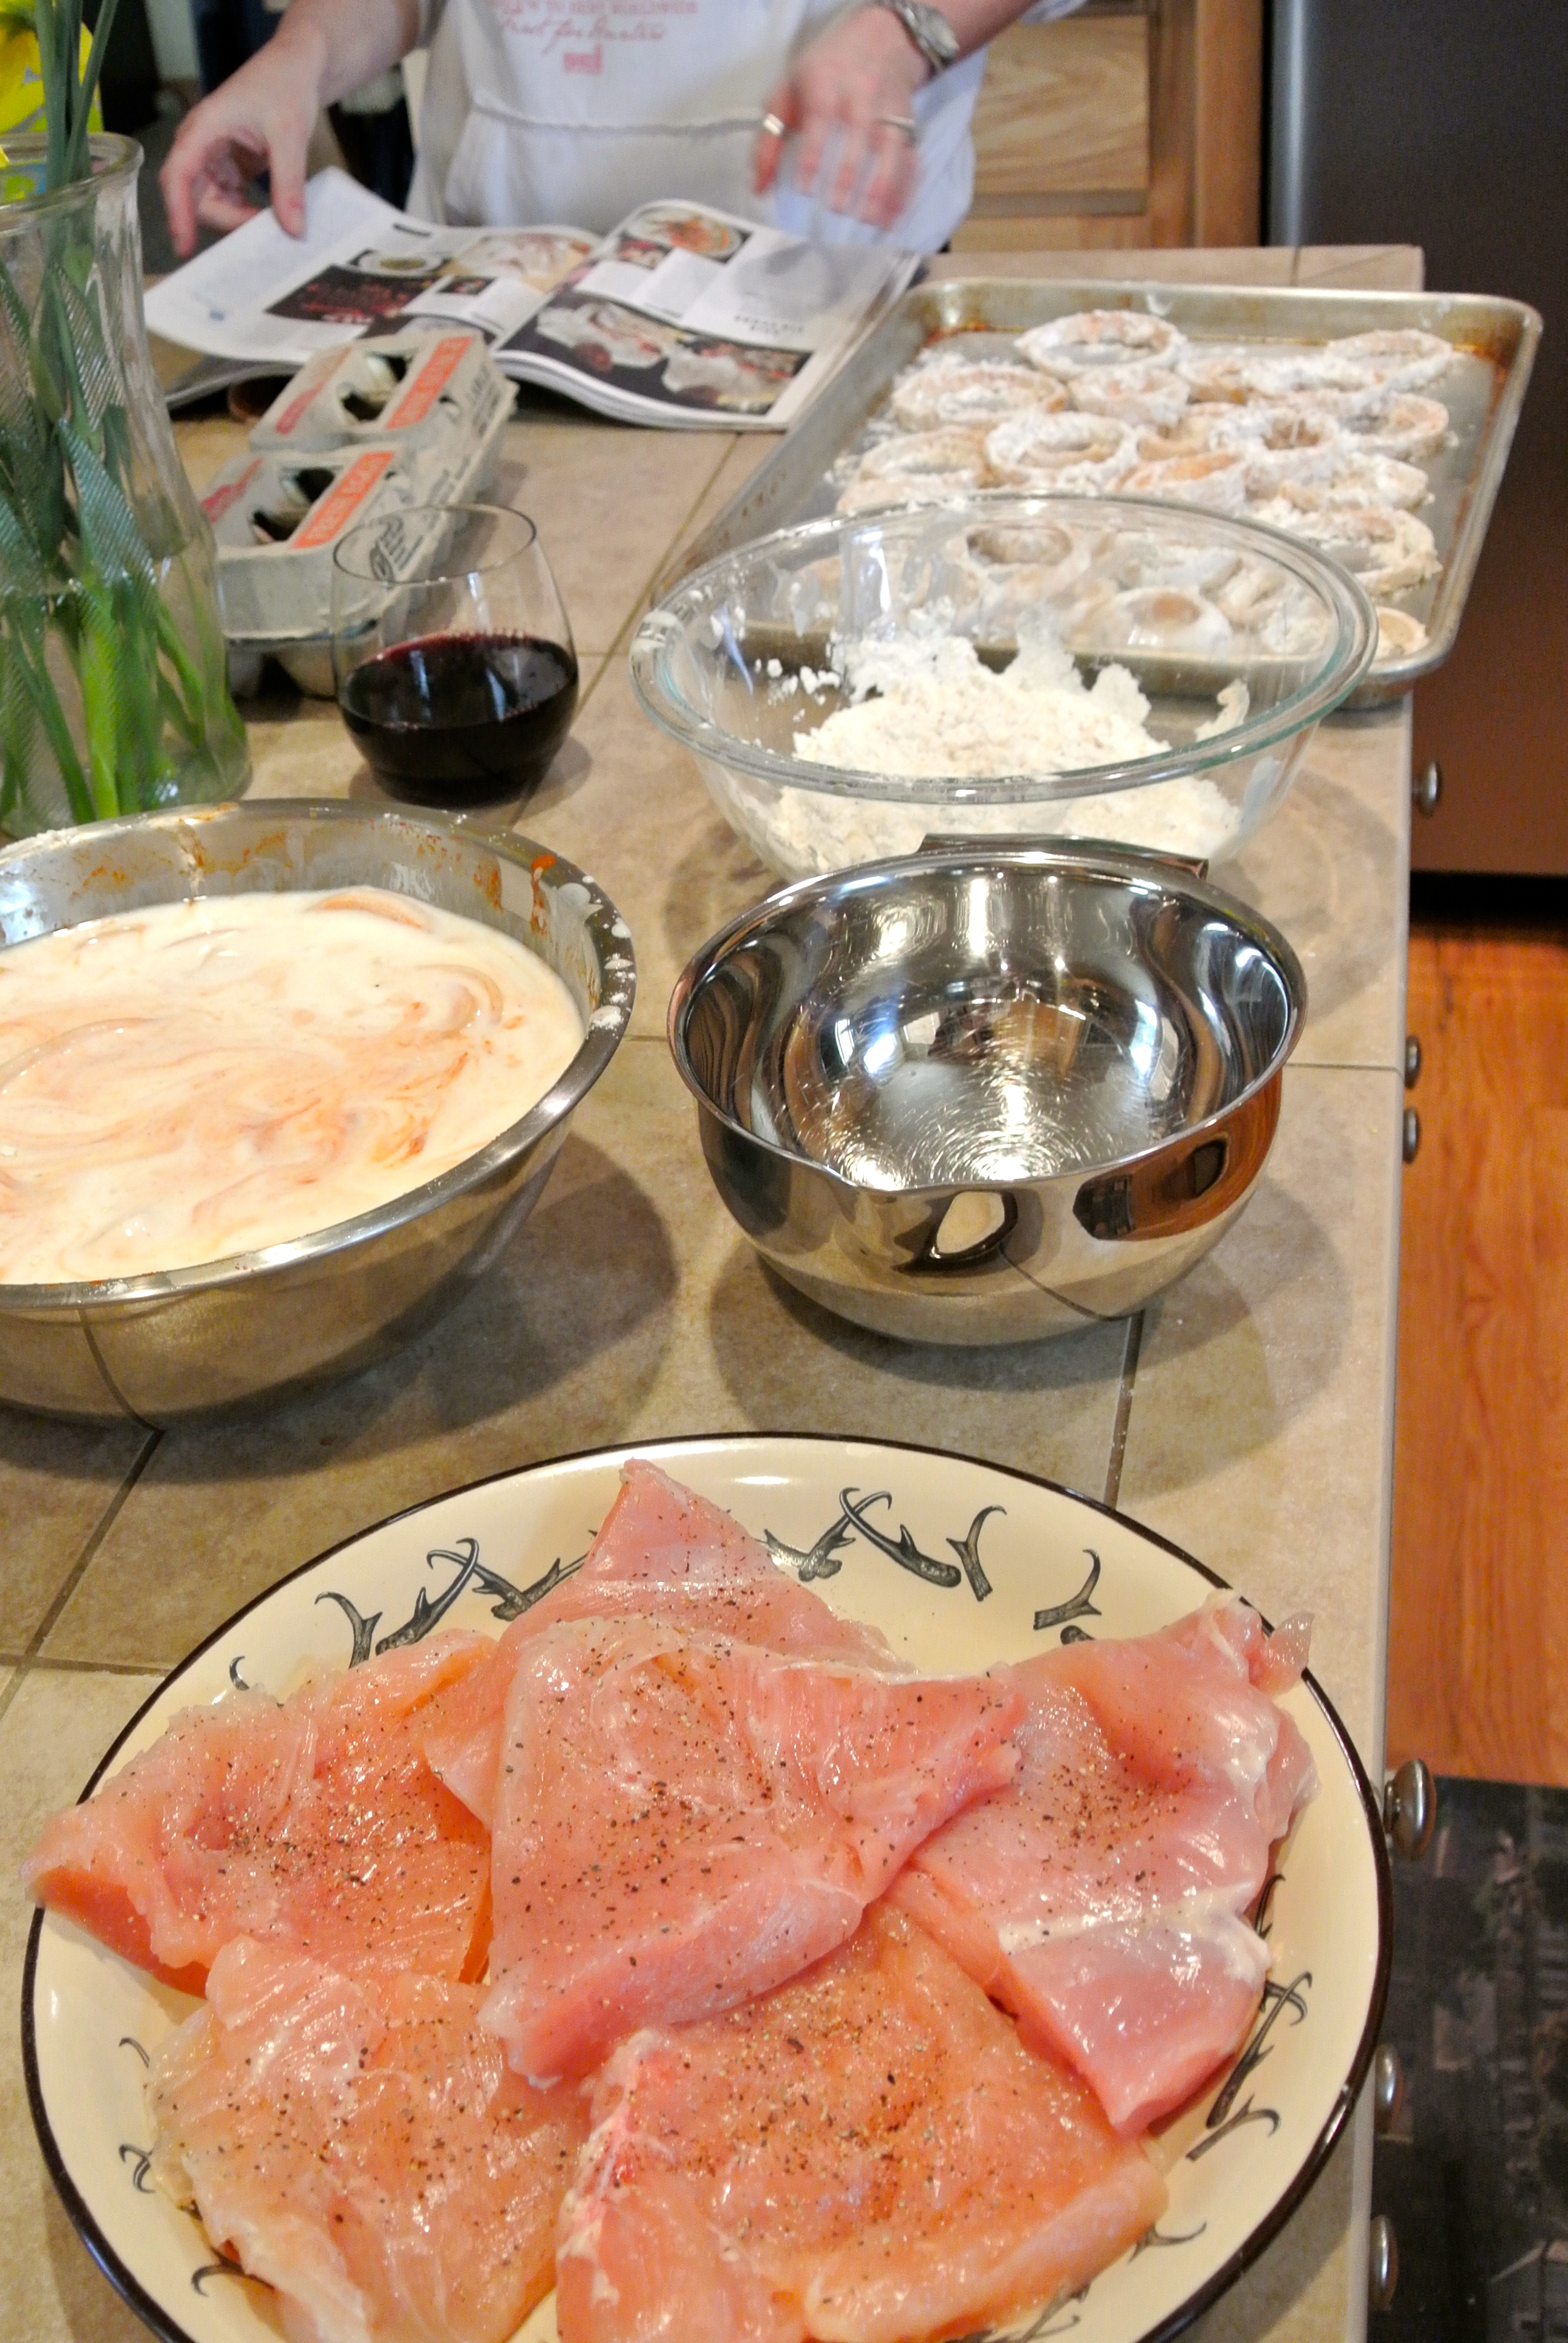
As you do this process, make sure to pour wine for your friends so they make fun of you while making a mess.

Get the oil into your cooking pot or deep skillet. Bring your oil to 350 degree temperature. I like to use a thermometer, it the only way you can be sure of the actual temp. Fry chicken until golden brown and cooked through, roughly 7 minutes. Make sure to turn them so one side does not get overly brown. Transfer to a wire rack set inside a baking sheet so you do not get yelled at by your wife for getting oil all over the place and having the “heckler” saying “Yeah” to everything she says.
Spread the butter on the rolls and broil them so they are nice and brown.
Build your sandwich with sauce, chicken, cabbage slaw and serve.
The chicken should be just as moist and juicy as can be if you brined it. If you do not have time it is not the end of the world. I cannot wait to do this with pheasant.
I hope you enjoy. Give it a try, this one is a good one. Back to the Gym for me.
Hunting Chef
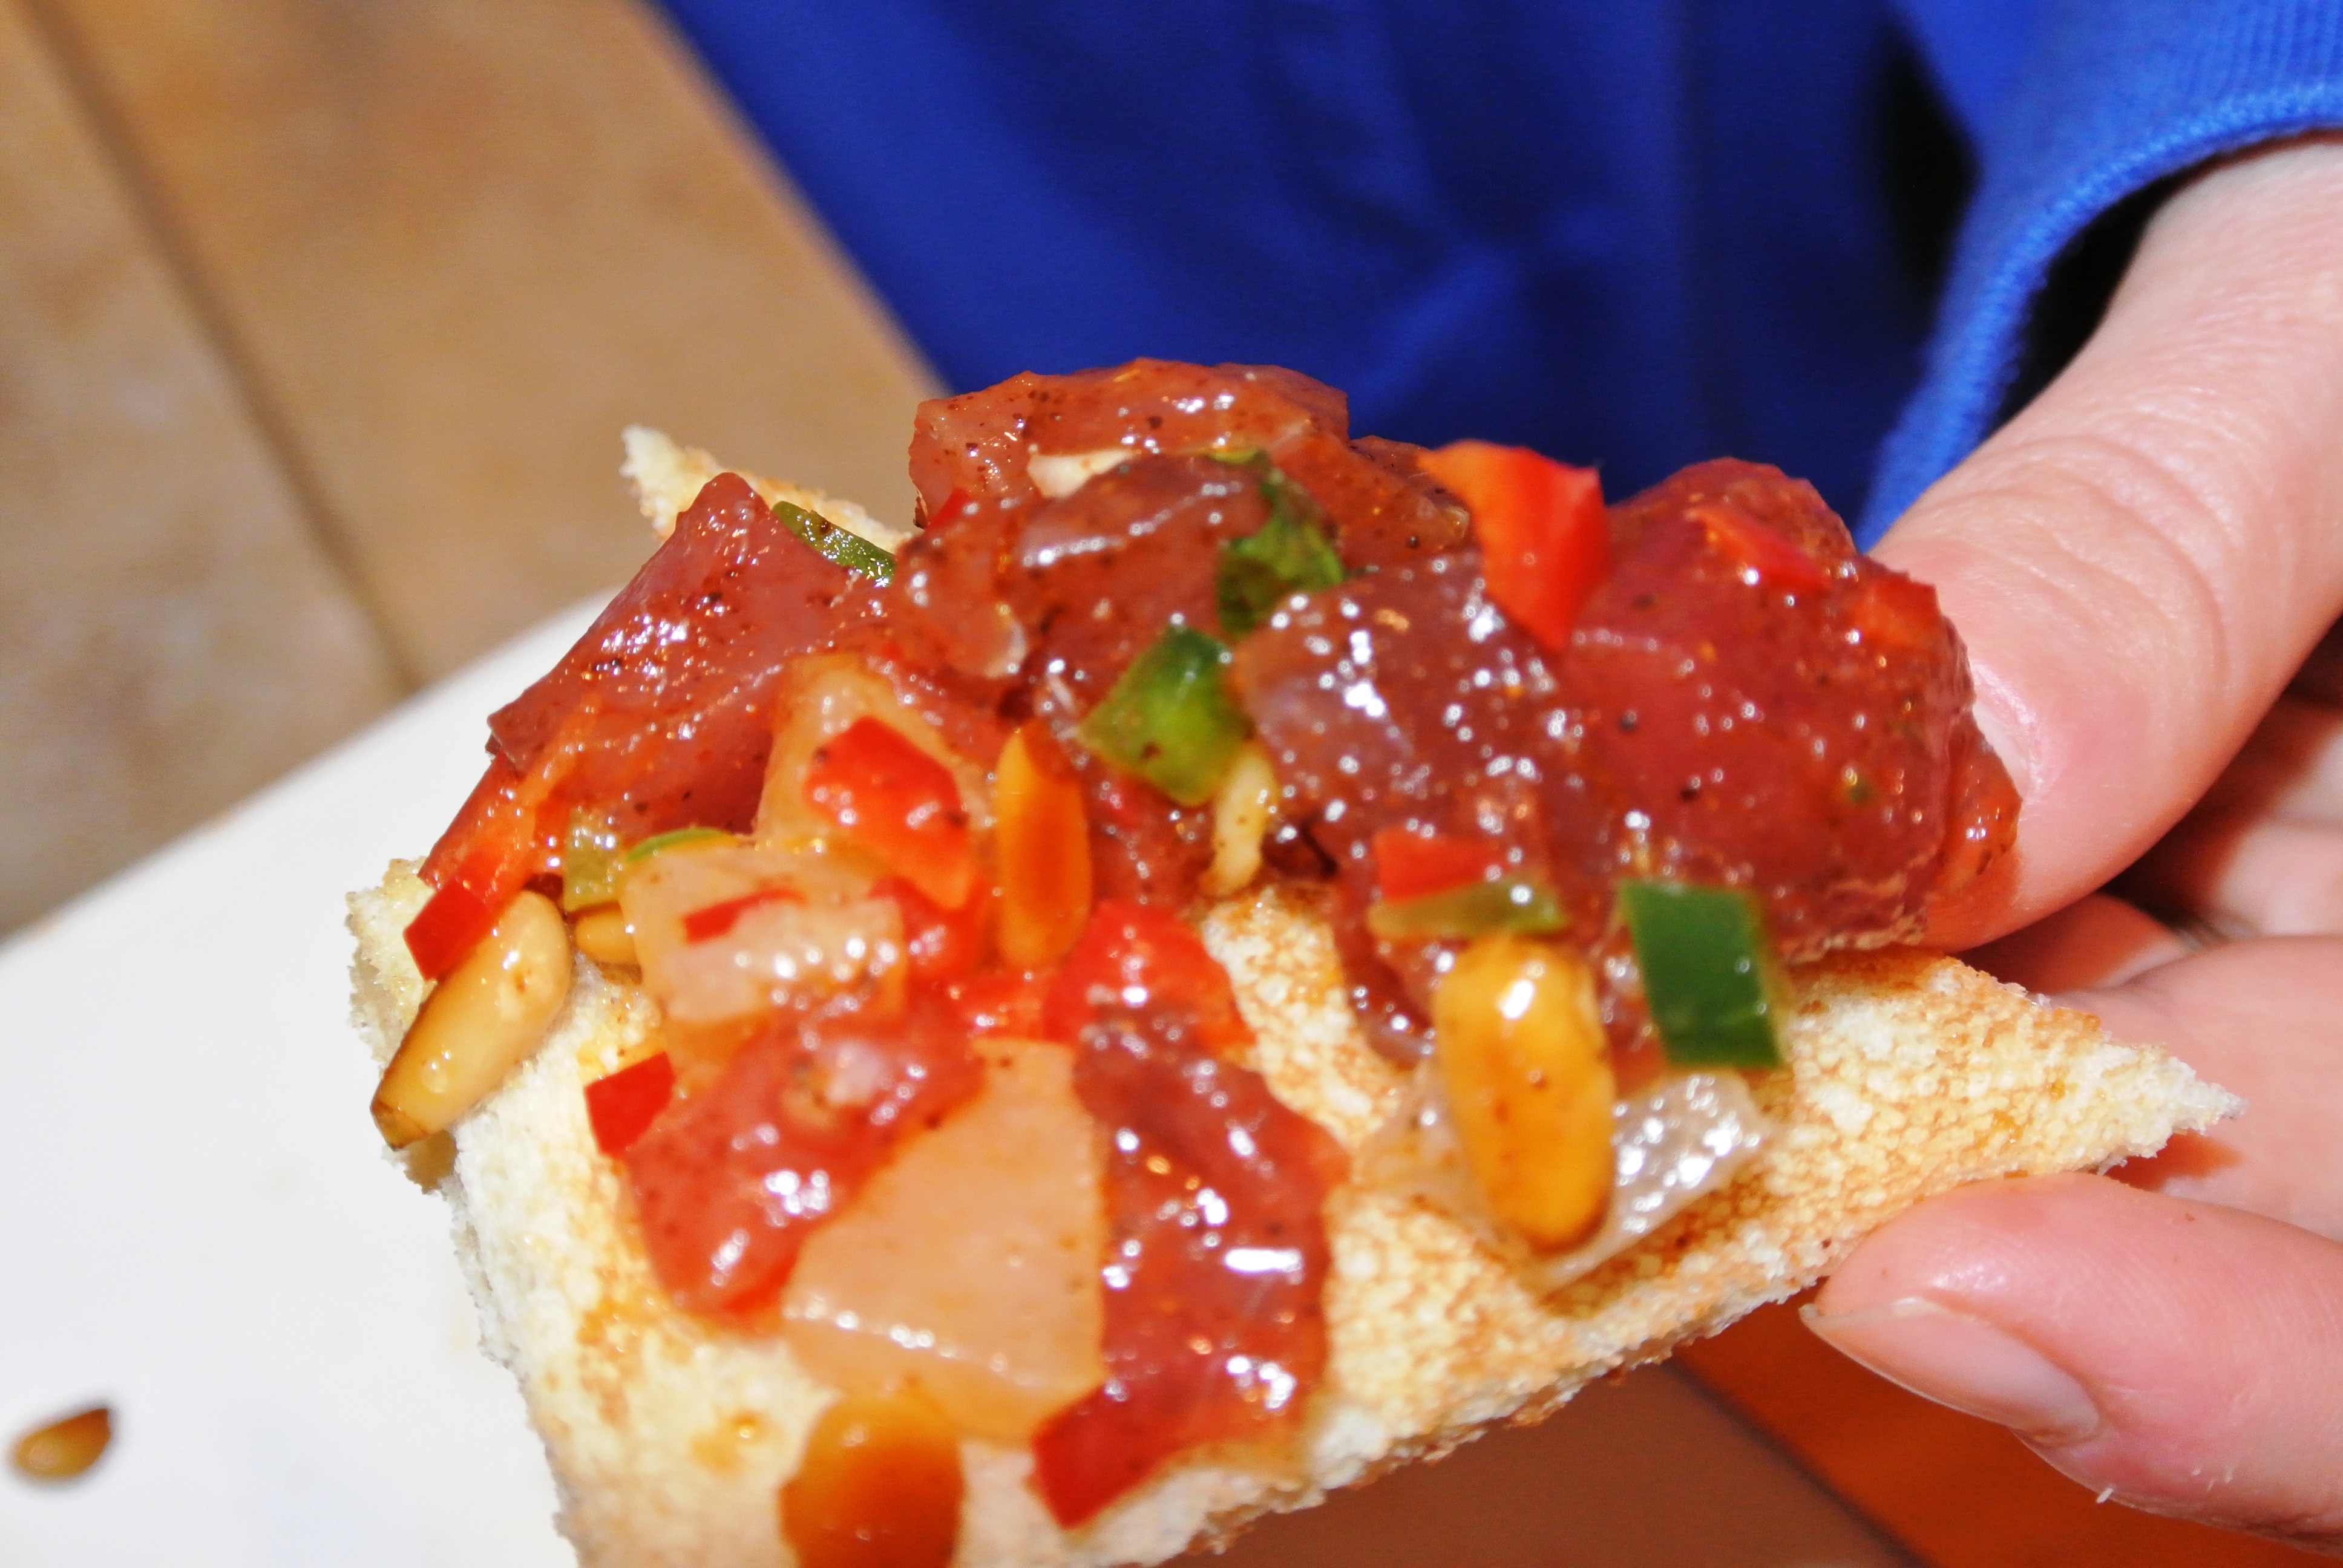
Tuna Tartare with roasted chili oil and hot peppers

I travel to the bay area of California a lot, and one of my favorite dishes that I look forward to is Michael Mina’s Tuna Tartare. It is amazing, so after having it for my 545th time last week, I watched them prepare it and asked a lot of questions. Then I did a little research and found it. It is not that hard to make and it is spot on. This is an excellent appetizer, and will put you in good graces with your wife….if you are leaving for Africa like I am in four days. It is not that hot either, it is a perfect blend of flavor.
- 8 oz. Sashimi grade Ahi, diced.
- 2 garlic, minced
- 1 green jalapeno diced
- 1 red jalapeno diced
- 2 tablespoons of pine nuts, toast them in a pan first.
- 2 tablespoons of diced asian pear (you can use a Bartlett as well).
- 4 quail eggs (you can buy them at the local sushi place, or use a farm egg).
- 2 tablespoon of mint, chiffonade
- 1 teaspoon of ancho chili powder
- 1 teaspoon of sea salt
- 3 tablespoon of roasted chili oil
- 1 teaspoon of white pepper
- 8 slices of white bread, toasted.
Freeze your tuna for about 10 minutes, then dice. Mix tuna with ancho powder, sea salt, white pepper and 2 tablespoons of roasted chili oil.

Make sure you toast your pine nuts on medium heat in a pan with a few drops of olive oil. Toast for 3-4 minutes until they turn light brown. Dice both peppers and set aside. If you have a ring mold that works very well for presentation. You can also take a small bowl or a can, spray the inside with pam and pack the tuna mixture. Turn upside down on plate and it should give you a nice presentation. If you are using a farm egg you can have a larger portion, if you got the quail eggs you can do four smaller portions.
At this point it is always good to check and see what your sous chef is doing on the main course dish.

I usually freeze the serving plate for 20 minutes before I plate the product. Once you plate the tuna, and put your egg on top of the tuna mixture, you are going to put all the ingredients around the plate. Put a little mint down first, sprinkle some sea salt and pepper around the dish, put the separate ingredients around the plate like this photo. Drizzle a little of the chili oil on the plate as well.

Toast the sliced bread and cut the crust off. Cut the toast in half like in a triangle. When you are ready to serve the dish table side. Bring a fork and a spoon and mix all the ingredients on the plate together. It is all about the presentation. Mix well, as you tell the story about how you learned this from The Hunting Chef who stole it from Mina in San Francisco. Once it is mixed well, serve.
I hope you enjoy this dish, we sure did. I made it twice in two days!
I am off to Africa for two weeks hunting the dangerous Cape Buffalo and will be off the grid for a while. See you guys on the flip side.
The Hunting Chef.
Cioppino with EVERYTHING in it

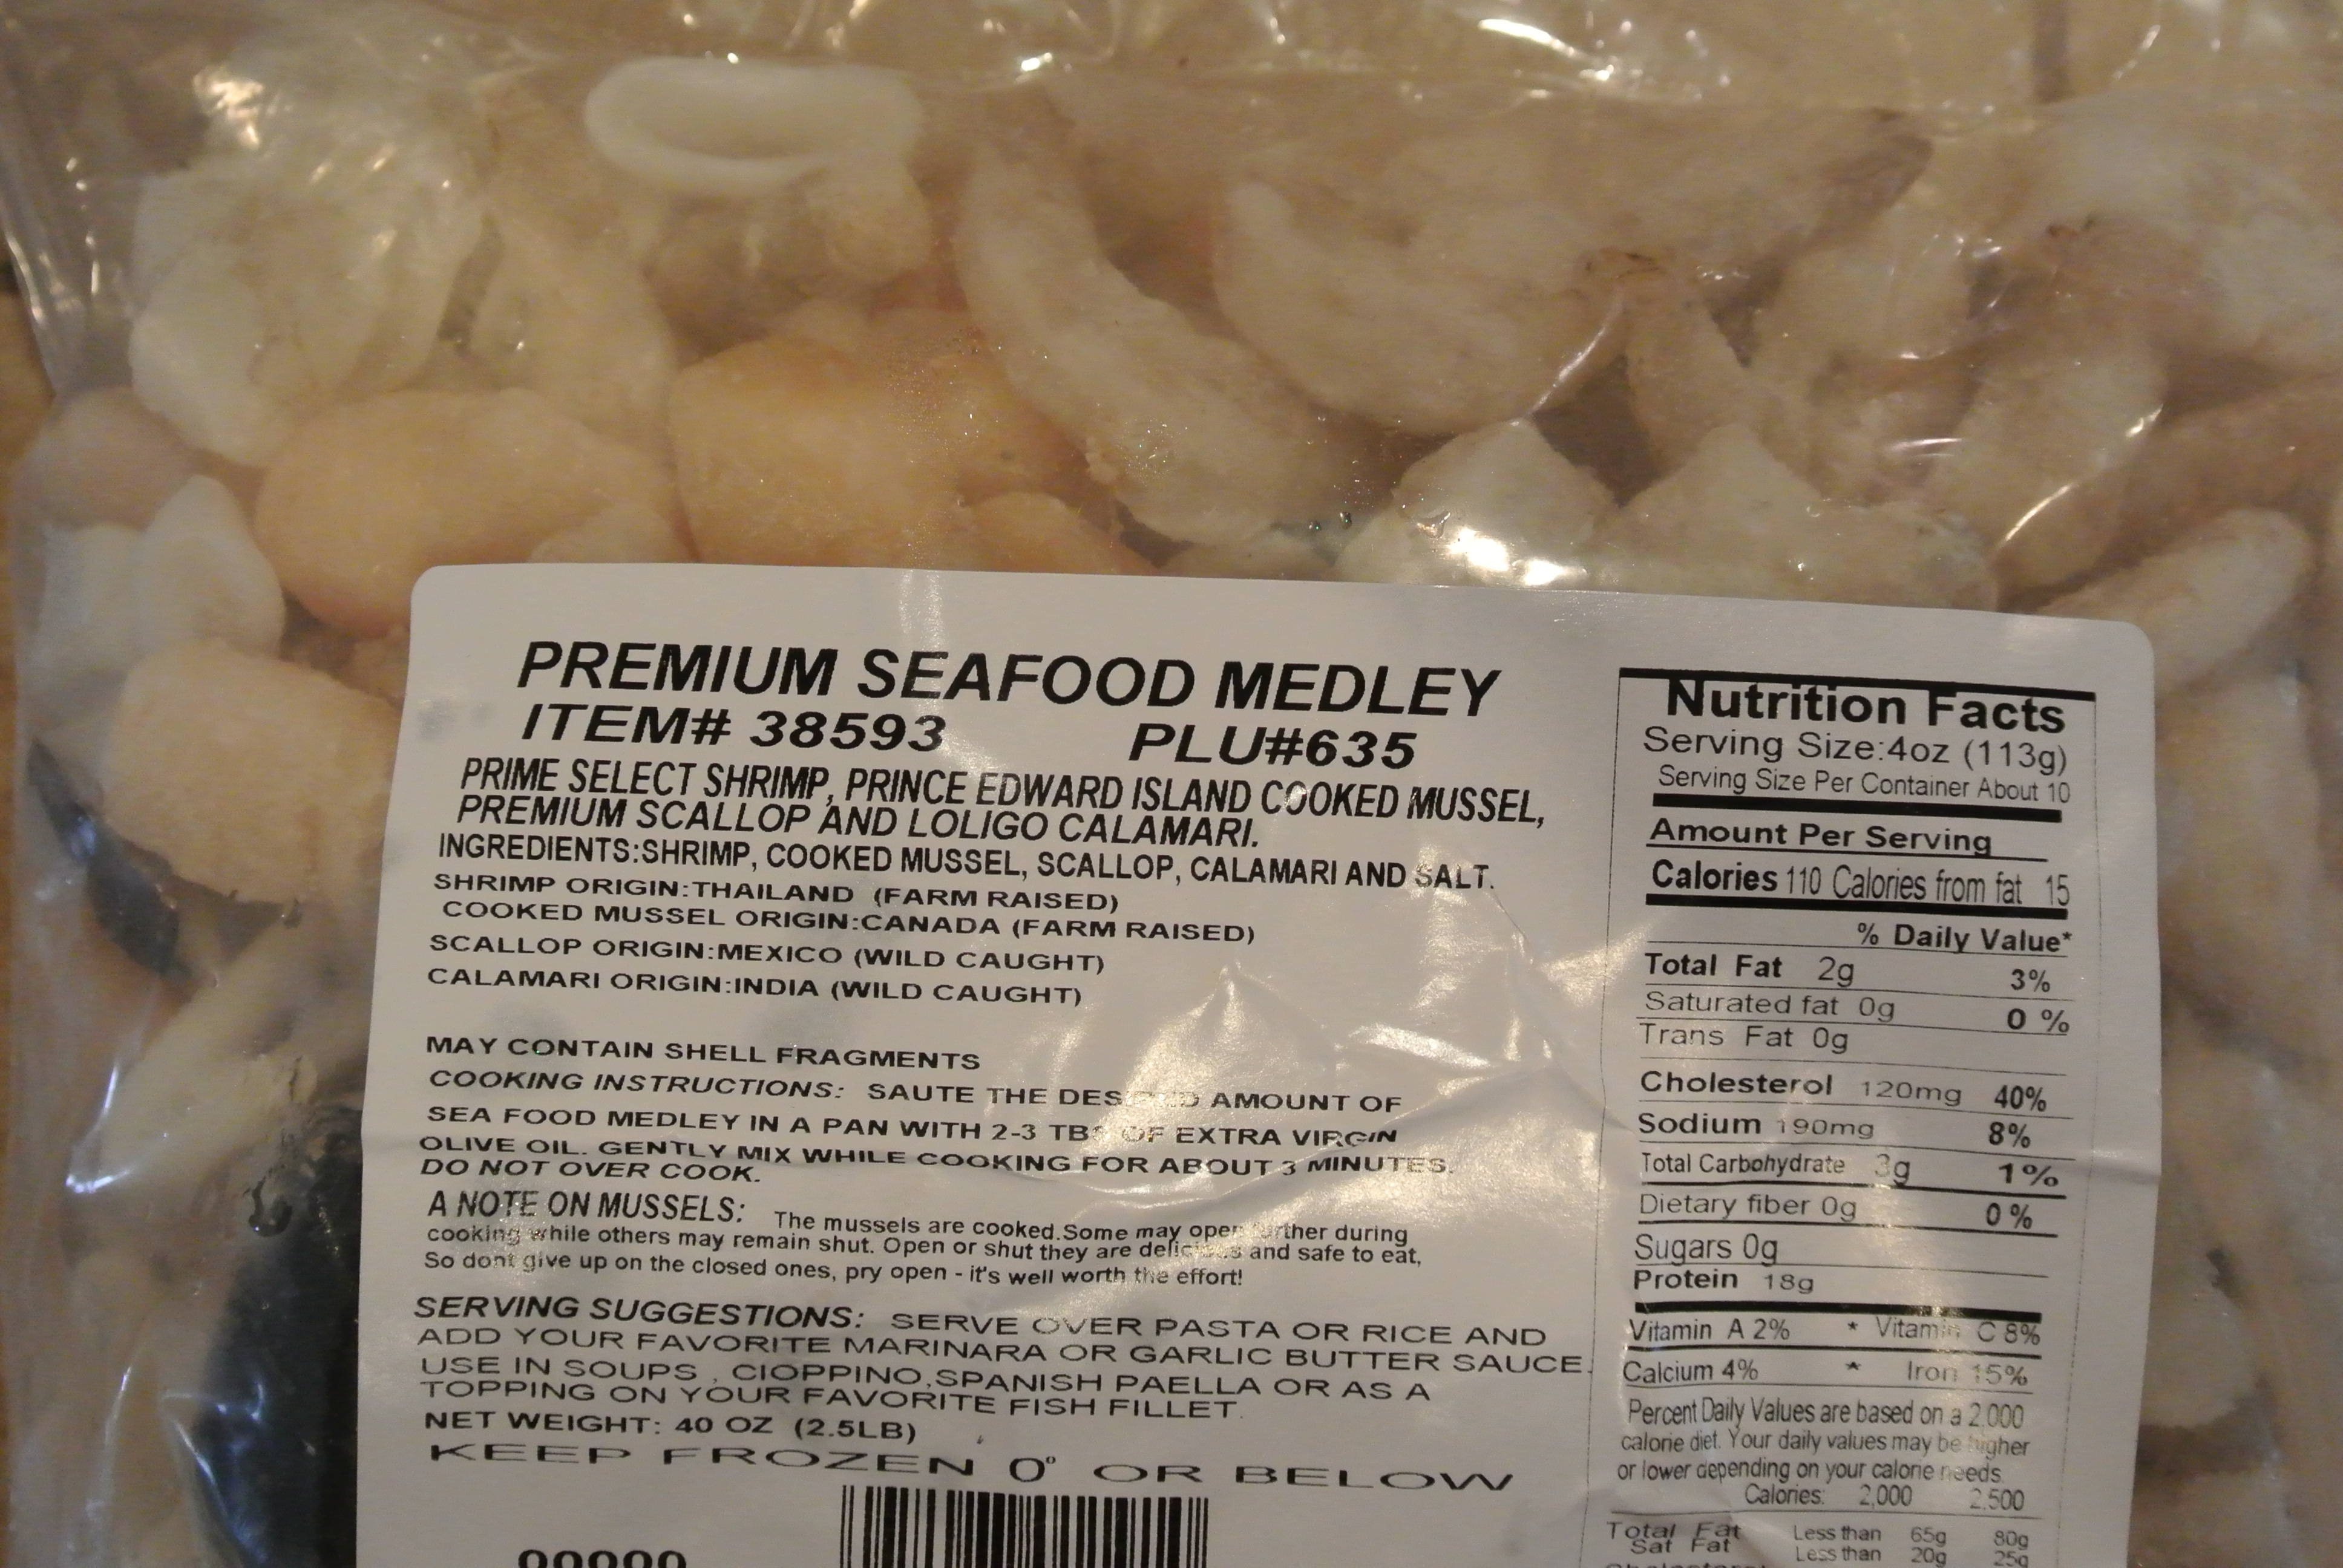
On the way back from a successful steelhead fishing trip on the Umpqua River last week, Grover and I got to talking about food. That is something we share in common, so for 3.5 hours we talked about the best dishes that we had on the coast. One of my favorite dishes was the Cioppino I had several years ago at a place in Newport, Oregon called Sharkies Cafe (or something like that). We went back and forth for several hours with our mouths watering. The next day, I could not stop thinking about it. It was Sunday, and it was my day to indulge so I started doing research, taking what I liked from this recipe, adding what I liked from the others. Michael Mina, a very well-known Chef from San Francisco had the best recipe I have seen, so I did a few tweaks to it. I would just give it a try to invite my family over for some dinner, if it did not turn out I would not blog about it. I took some halibut and razor clams out of the freezer and took off for Costco where I knew they had the seafood medley package (full of calamari, shrimp, mussels, and scallops)
I had the Seafood, now it was time for the base.
- 6 large garlic cloves chopped
- 2 whole garlic
- 3/4 cup of olive oil
- 1 red bell pepper seeded and chopped
- 3 jalapeños, seeded and minced.
- 1 yellow pepper seeded and chopped.
- 1 large yellow sweet onion chopped
- 1 large bay leaf
- 3 tablespoons of tomato paste
- 1/2 cup of red wine
- One 28 can of stewed tomatoes
- Four 8 ounces bottles of clam broth
- 1 1/2 cup of water
- 1 tablespoon of salt and pepper
- 1/2 cup of packed basil leaves
- 1 teaspoon of red pepper flakes
- 2 pounds of halibut cut into 1 inch chunks
- One bag of Premium Seafood Melody (Costco)
- 1 pound of razor clams
- 3 Dungeness crabs de-shelled and cleaned, or 1 pound of lump crab meat.
In a large soup pot (a very large one), heat up about 1/4 cup of olive oil until it is nice and hot. Add the chopped garlic (not the whole ones), jalapeños, bell peppers, onion, and whole bay leaf. I add a little dose of pepper at this point as well.

Over medium high heat, cook until softened and beginning to brown, about 10 minutes. Add the tomato paste and cook, stirring, for one minute.

Add the wine and cook until nearly evaporated, about one minute longer.

I take my stewed tomatoes and give them a quick mix about in my mini food processor.

Add the tomatoes and cook over medium high heat until slightly thickened, about five minutes.

Add the clam broth and water, season with salt and pepper, and bring to a boil. Simmer over medium heat until the broth is reduced to about 8 cups, about 20 minutes.

Do not put that mini food processor away, you need it. Add the basil leaves, the two whole garlic and 1/2 cup of the remaining olive oil and crushed red pepper. Process the basil until smooth and season with salt and pepper.

Set sauce aside for later. While the pot simmers, cut the halibut into one inch cubes.

Then I cut the razor clams about 1/2 inch strips. I put all of it in the bowl and wait for company. The next step is very fast.

When you are ready to serve. Bring up the heat to medium. Add the halibut first, give a minute. Add the shrimp, muscles, clams, calamari, and scallops and cook for 7 minutes. Add the crab, cook for 2 more minutes and serve (you can also buy the shelled at Costco if you do not have the means to catch it. It is cheaper and good quality). Taste the sauce, this is when I would add a little salt and pepper if you need it. When you dish into bowls, finish with drizzle of the basil sauce. Stand back and watch them smile.

This dish would be one of those meals that I may make for myself if I knew it would be my last. My family and friends gave it a huge endorsing and I was proud of the outcome.
I hope you enjoy
Hunting Chef

Greek Gyro Wrap

A few months ago a good friend of mine, Ryan Nopp gave me a book for Christmas. It is called “Great Sausage Recipes and Meat Curing” by Rytek Kutas. It is an older book, but it is a piece of gold for those of you interested in the art of making sausage. I read the entire book from start to finish in about 4 days, which is a marvel considering it is a book about making sausage. It’s not the “Fifty Shades of making Sausage” if you know what I mean. At any rate, I have always been searching for a recipe to make Greek Gyro meat and it has been unsuccessful until I got to the end of the book, in the chapter….Misc. Favorite Recipes. JACKPOT!!!
Let me tell you folks, I never blog about the bad recipes, this one puts a ton of different flavors on your tongue and finishes better than any store-bought Gyro’s I have ever had, and trust me I have had my share of them.
Greek Gyro Wrap
- 2 lbs of lean ground pork sausage
- 2 lbs of ground lamb sausage
- 1 lb of lean ground beef
- 2 teaspoon of salt
- 2 teaspoon of marjoram
- 1 teaspoon of coriander
- 1 teaspoon black pepper
- 1 teaspoon of savory
- 1 teaspoon of Thyme
- 1 teaspoon of rosemary
- 1 egg
- 1/4 cup of soy protein (I found this in the nature bulk section of Fred Meyer)
- 1/2 cup of water
- Pita bread you can buy in the bread section of most grocery stores.
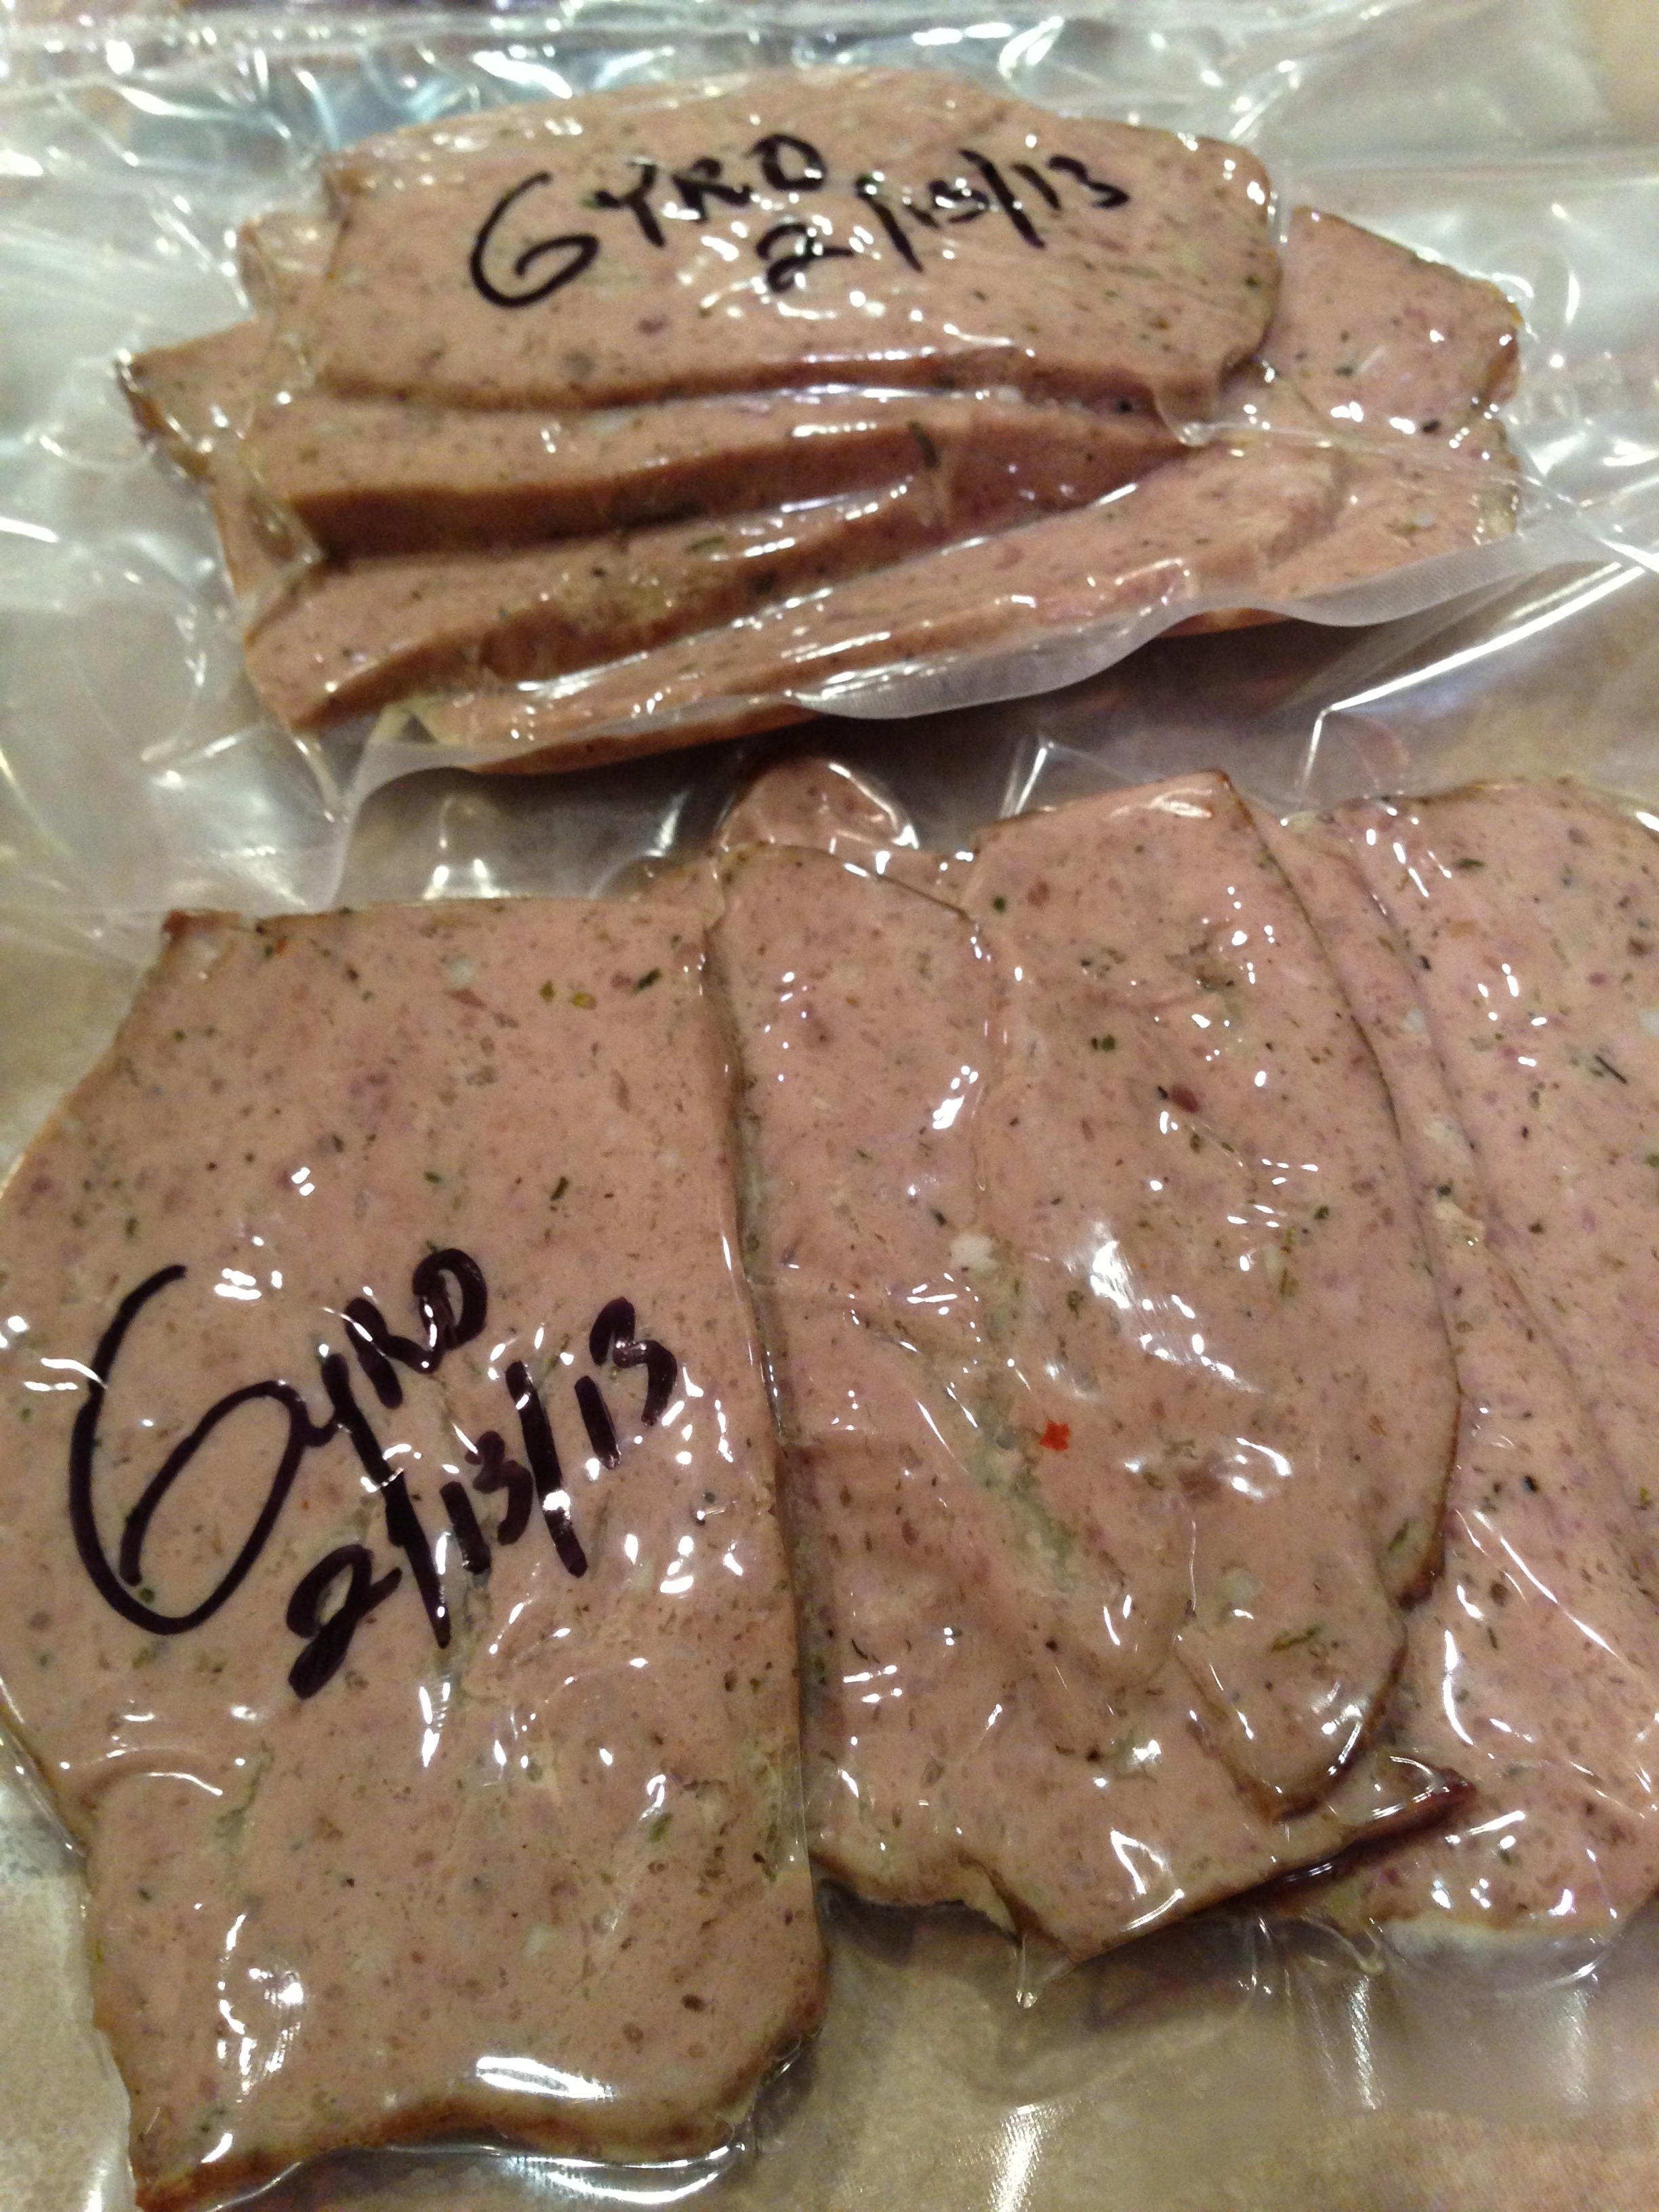
Add all the recipes into a food processor, or a mixer. I used a food processor because I wanted a dense smooth texture. Blend all ingredients really well. Spray your loaf pan with Pam, and put your mixture into it. Place in pre-heated oven at 325 degrees for 1.5 hours. Remove and let cool on the counter top.

Once cooled, put in refrigerator and cover with clean plastic wrap.
Gyro Topping
- Chopped Red Onion
- Chopped Tomato
- 12 chopped lengthwise Kalamato Greek olives
- Chopped and seeded cucumber
Mix all the ingredients together in a bowl, season with a pinch of salt and pepper.

Greek Tzatisiki Sauce
- 1/2 cup Greek plain yogurt, drained
- 1/2 cup chopped cucumber, peeled, seeded and chopped.
- 2 garlic cloves minced
- 1 tablespoon of fresh chopped dill
- 1 tablespoon of lemon juice
- salt and pepper to taste.
Mix all the ingredients together and set aside.
Remove your Gyro meat from the fridge and begin slicing 1/8th thick.

Get a pan medium warm and add a few slices, take one pita bread round and microwave for 20 seconds.

Once the pita bread is warm, take out and plate and put a little T-Sauce on it.

Add your warm meat, then top with the Greek Vegetables, and then a little Feta.

Then add another little dollop of the T-Sauce, and a dash of paprika.

Add some chopped Salad, roll it into a big taco and stand back and enjoy the ride.

You are going to have left over meat, and that is okay. I van-pac my Gyro meat for another battle in the kitchen. It is fast this way and will impress your friends.
Thank you Ryan for the Christmas Gift. This one is one for the “Best of” Hunting Chef.
Bon Apetite Folks.
The Hunting Chef
Healthy Tuna Loin Appetizers with FLAVOR

As you all know, the Hunting Chef is on a diet and exercising. I entered a cleanse regiment about 4 days ago, this means NO salt, sugar, processed fats (butter, mayo, etc.) caffeine, or any booze, carbs, or milk products.
Lets review what I love the most about living.
- My family
- Outdoors
- Eating salt, carbs, cheese, booze, butter, olive oil, red meats, and more cheese.
So after eating bland food for four days I decided to do something about it. This one has a lot of flavor and is incredible considering it is healthy.
- Tuna Loin (you can have the butcher cut you some in 1/4 cuts)
- 4 garlic cloves
- Wasabi
- 1/2 chopped avocado
- 1/2 chopped tomato
- olive oil spray
- Fake salt of your choice if you choose, but not really needed.

Basically I just cut 1/4 medallions. Then I take the best fake ingredients that I could find that sort of taste like salt.

I spray and dash the spicy pepper on one side, then repeat the same with the lemon pepper. I am just trying to make some flavor. It is hard to season with out salt….trust me. But the biggest trick is right here.
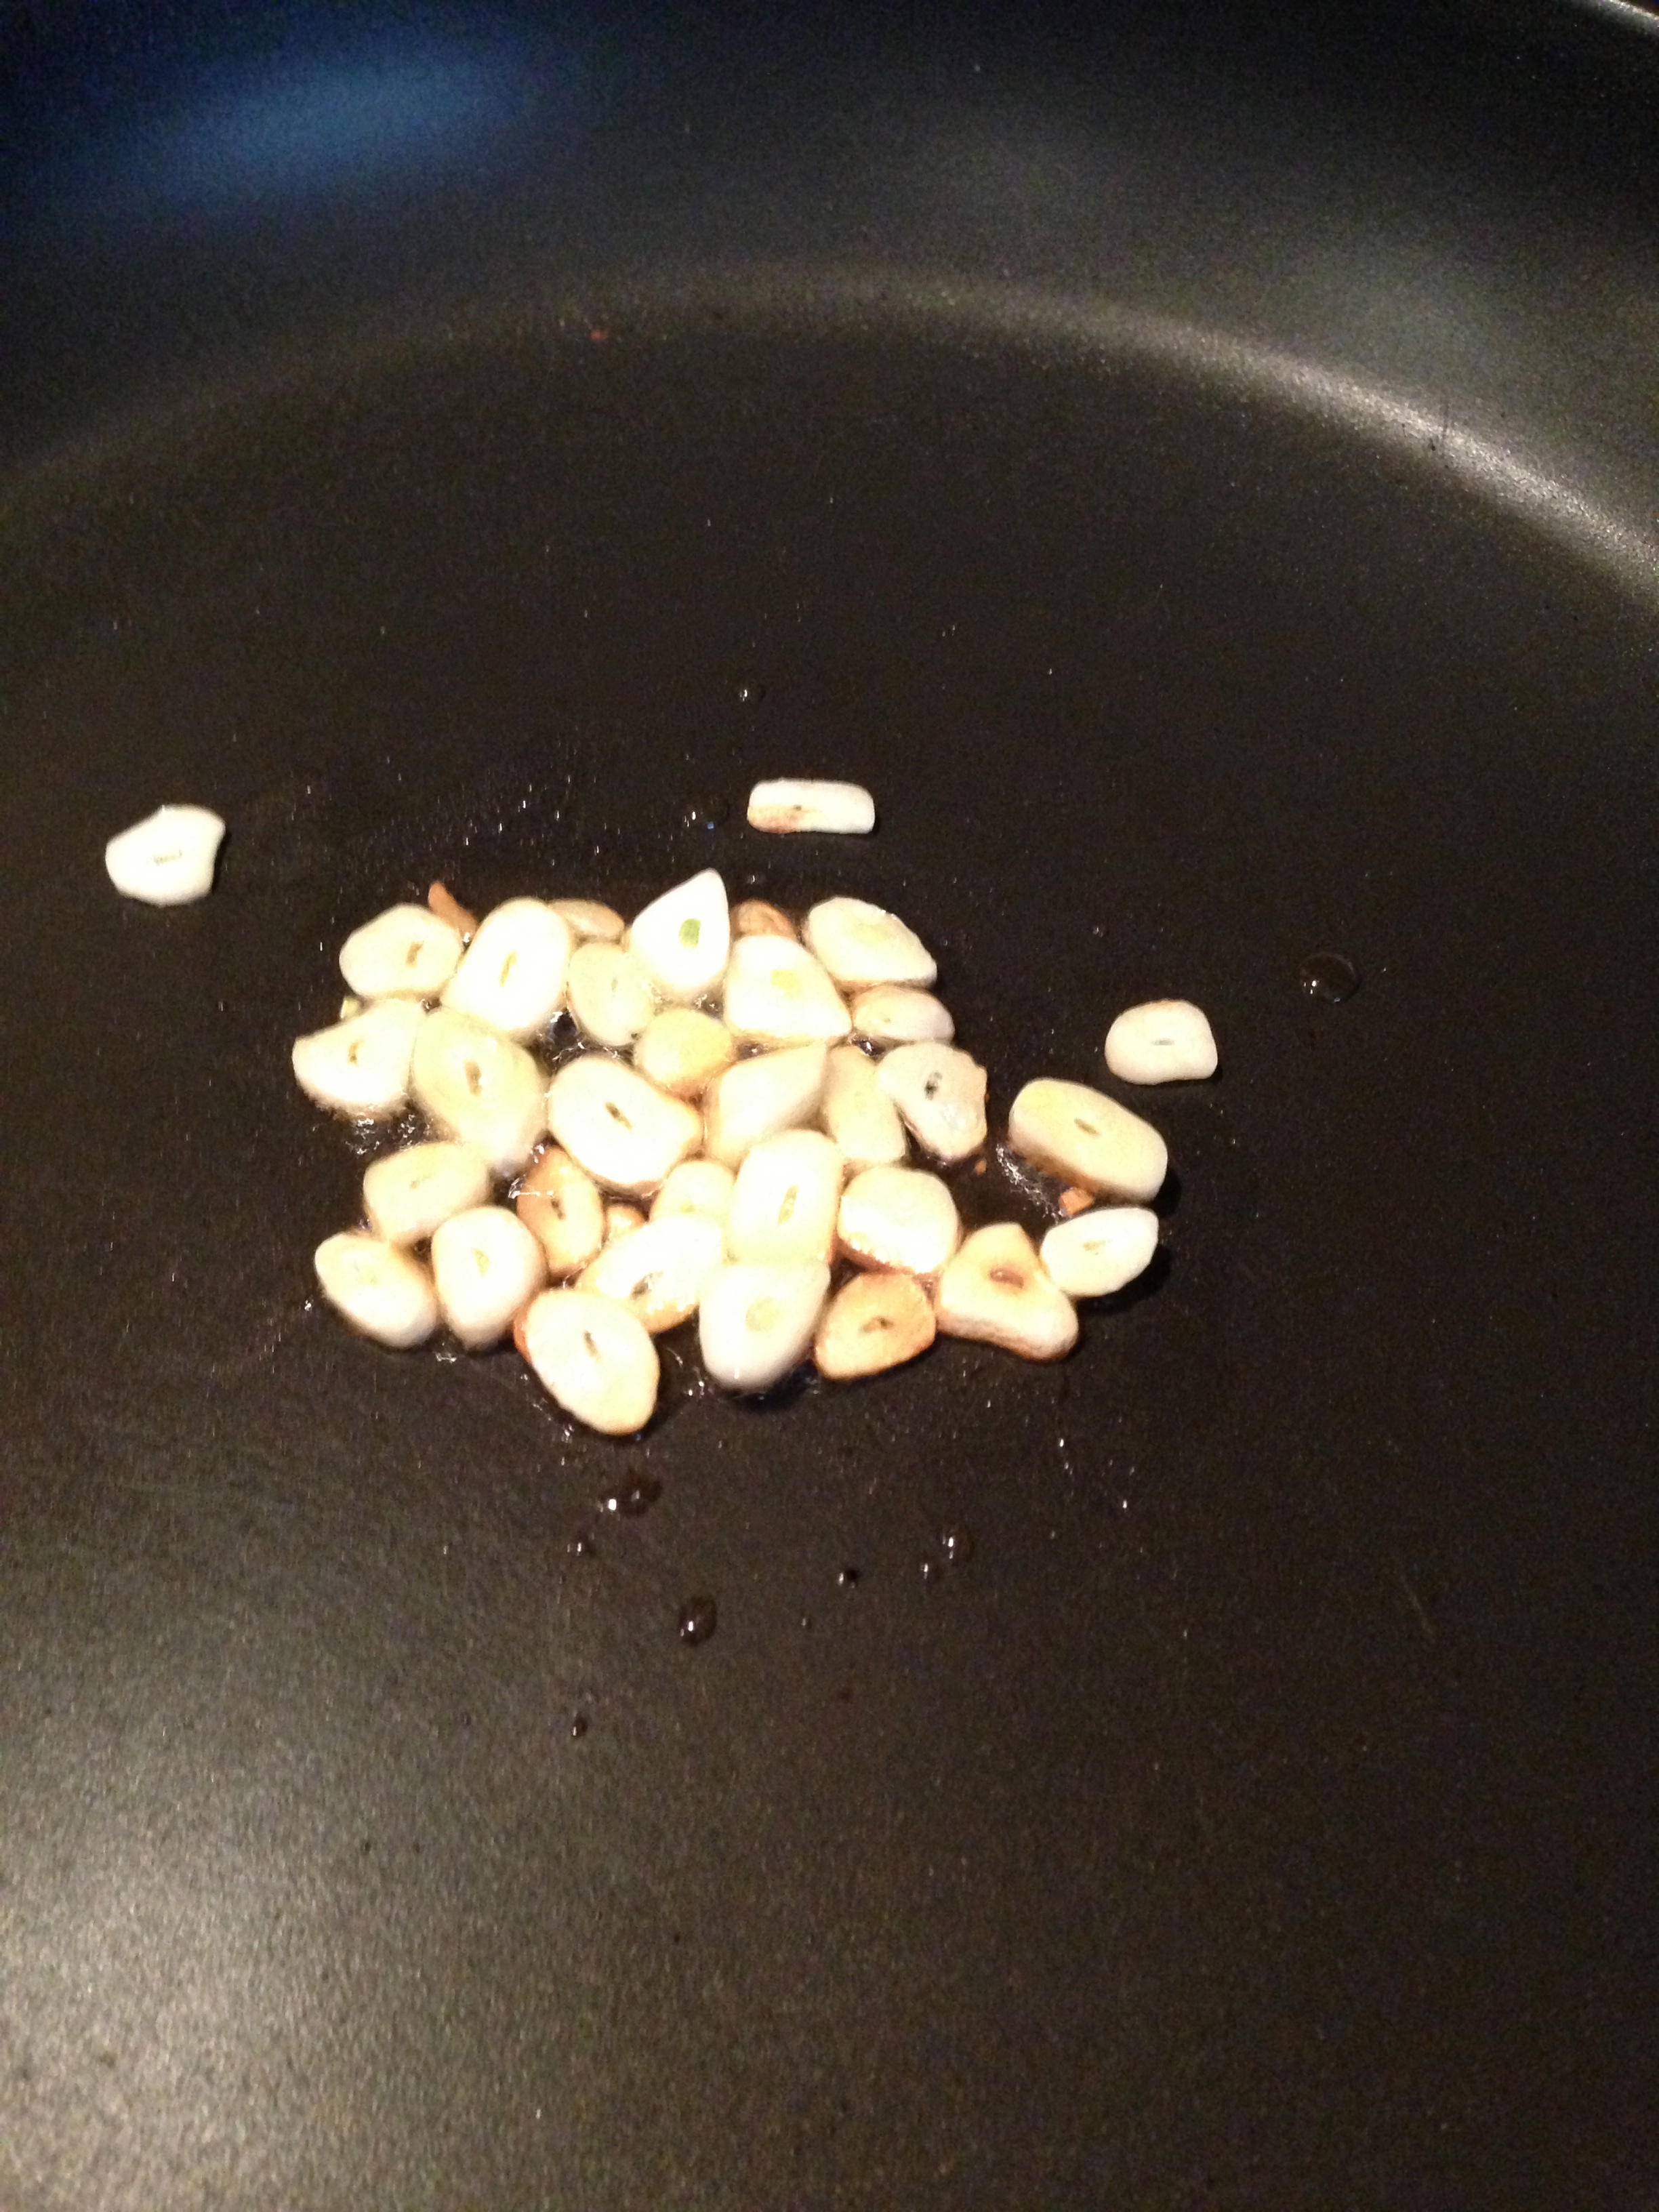
Take your sliced garlic, add a little real olive oil, and cook on high heat until brown then remove. Add the Tuna to the same pan.

Remove the Tuna and plate.

You should already have cut avocado and tomato and now your carmelized garlic, because it goes pretty quick.
Add a squirt of Wasabi to the Tuna medallions.

Then you want to take the major flavor factor, and put layer the medallion.
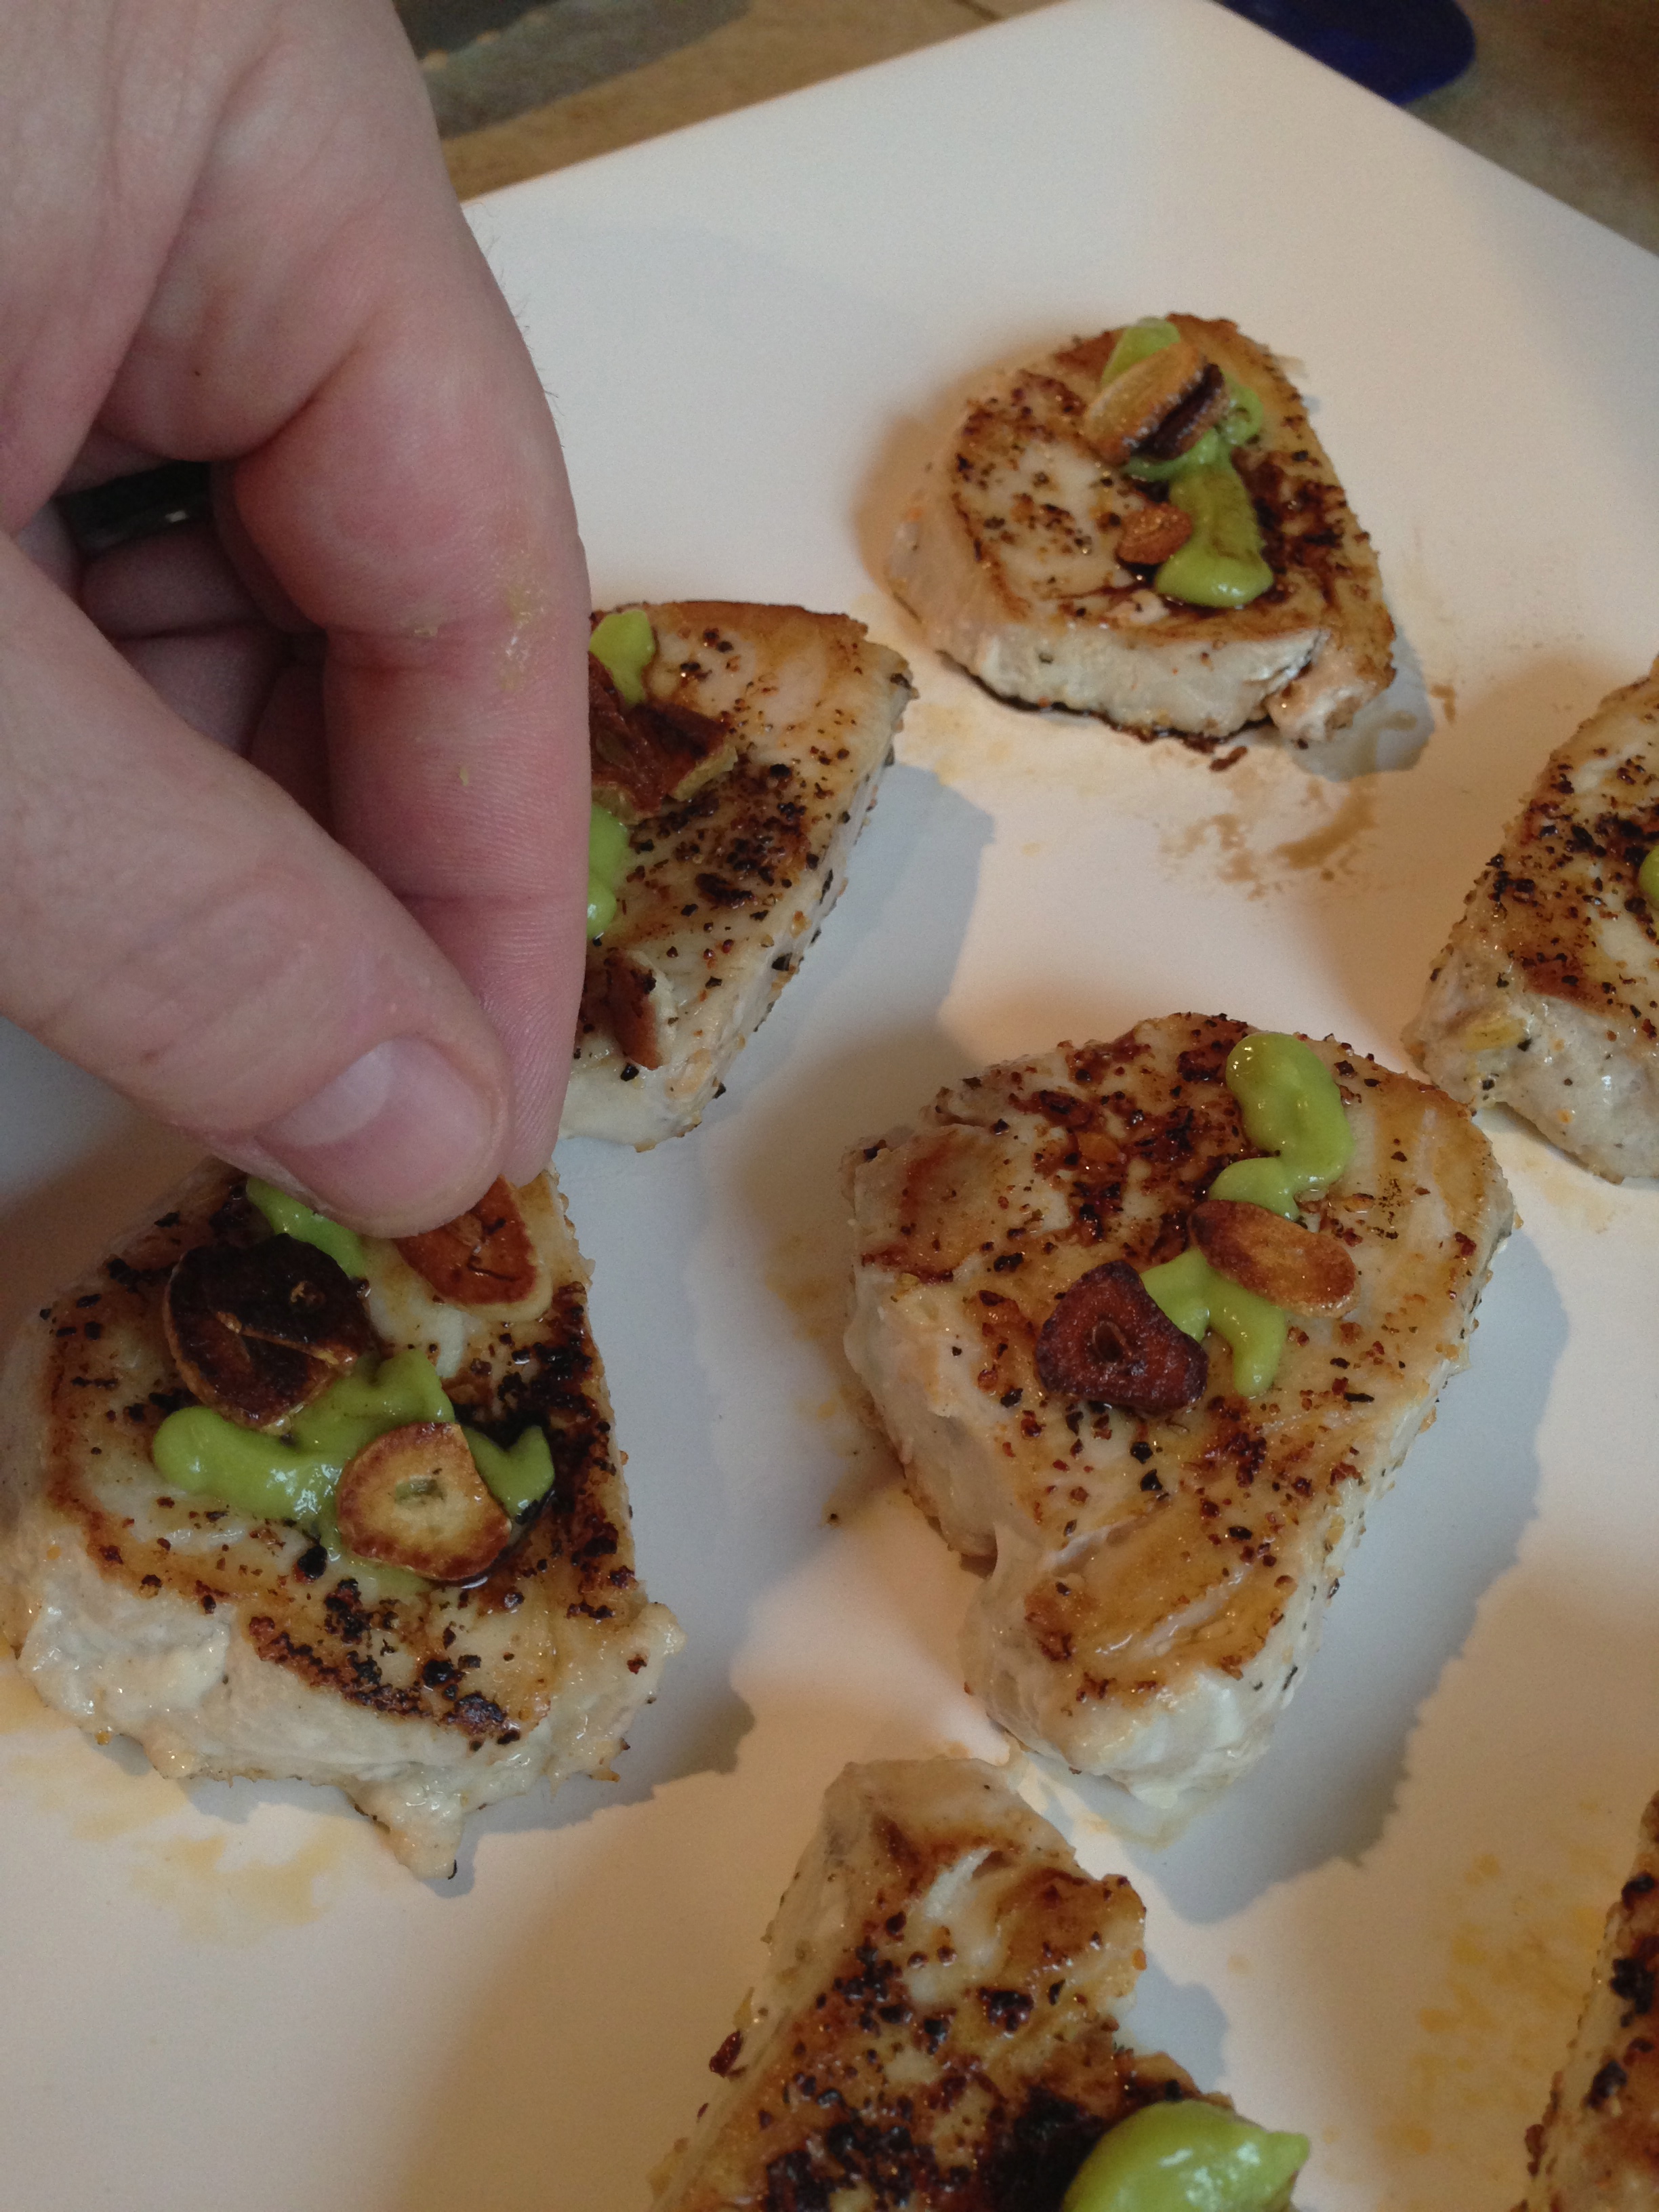
At this point you could add a little low sodium soy sauce. Just a drop on each piece. This is an option.
Layer the tomato and the avocado and serve.
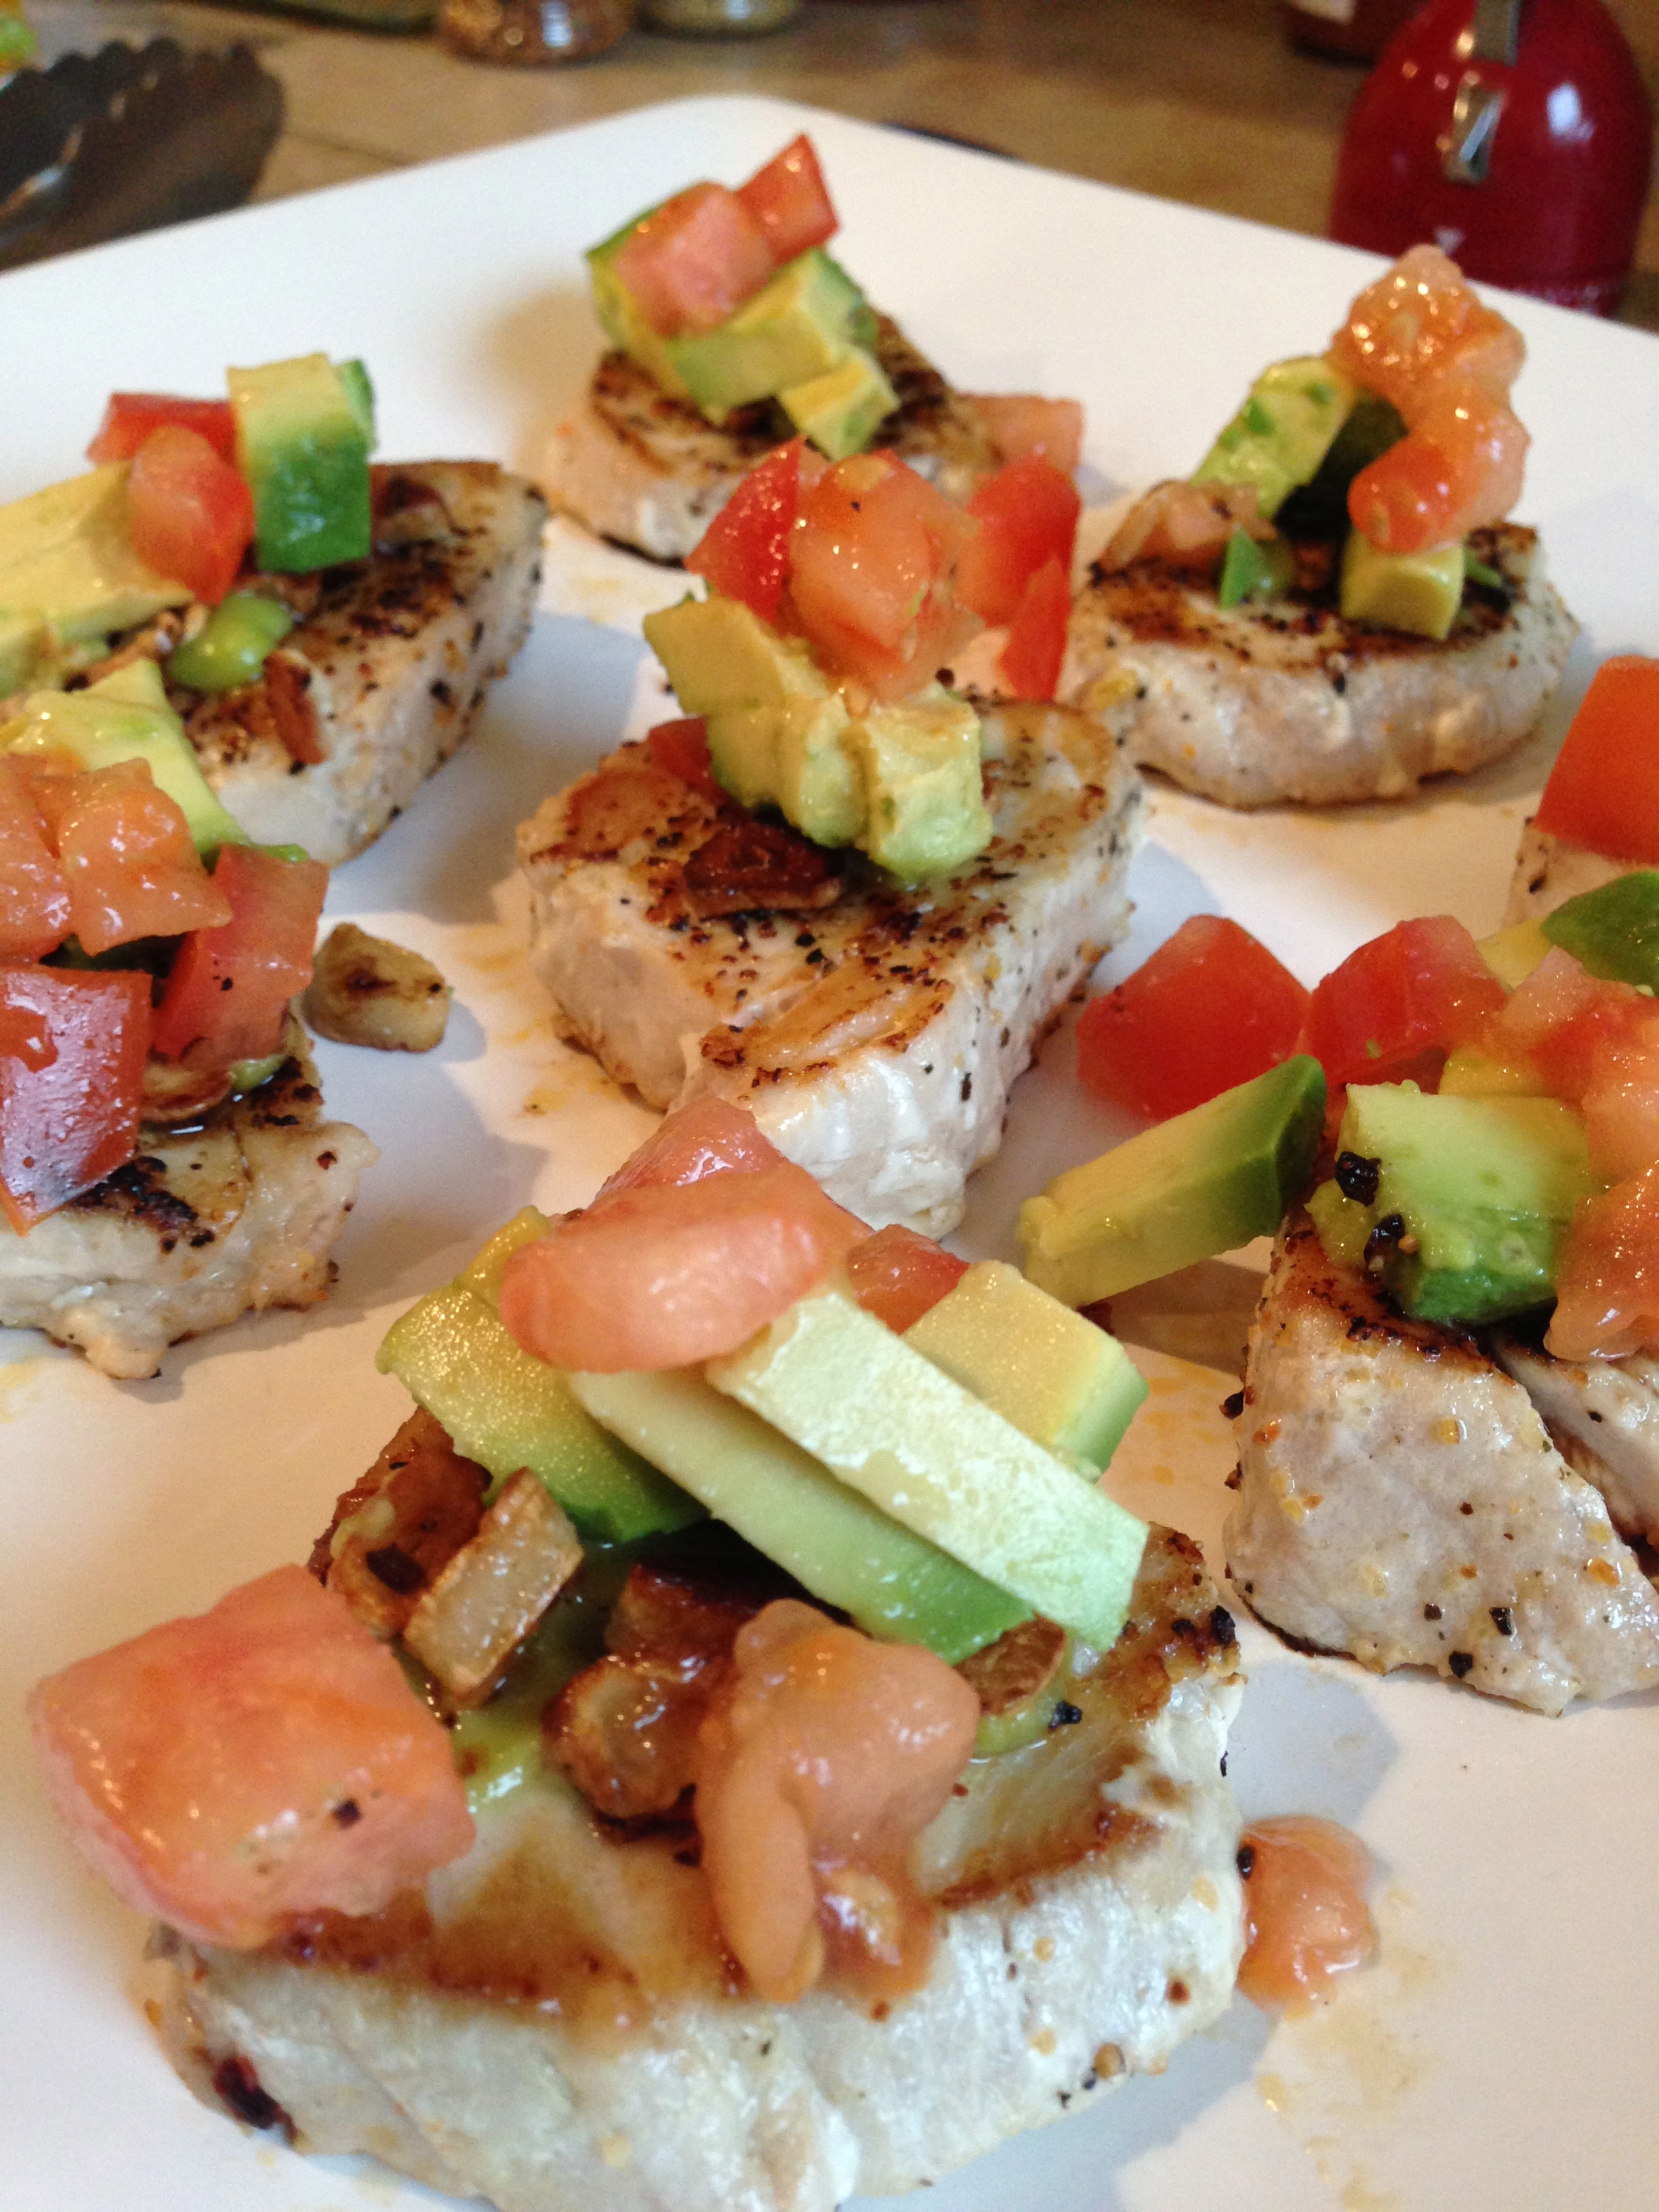
This is a refreshing light dish, that packs a punch of flavor. Do not worry folks, I will get back to blogging about the good stuff soon enough.
I am burning that dish up and already hungry.
The Dieting Hunting Chef.
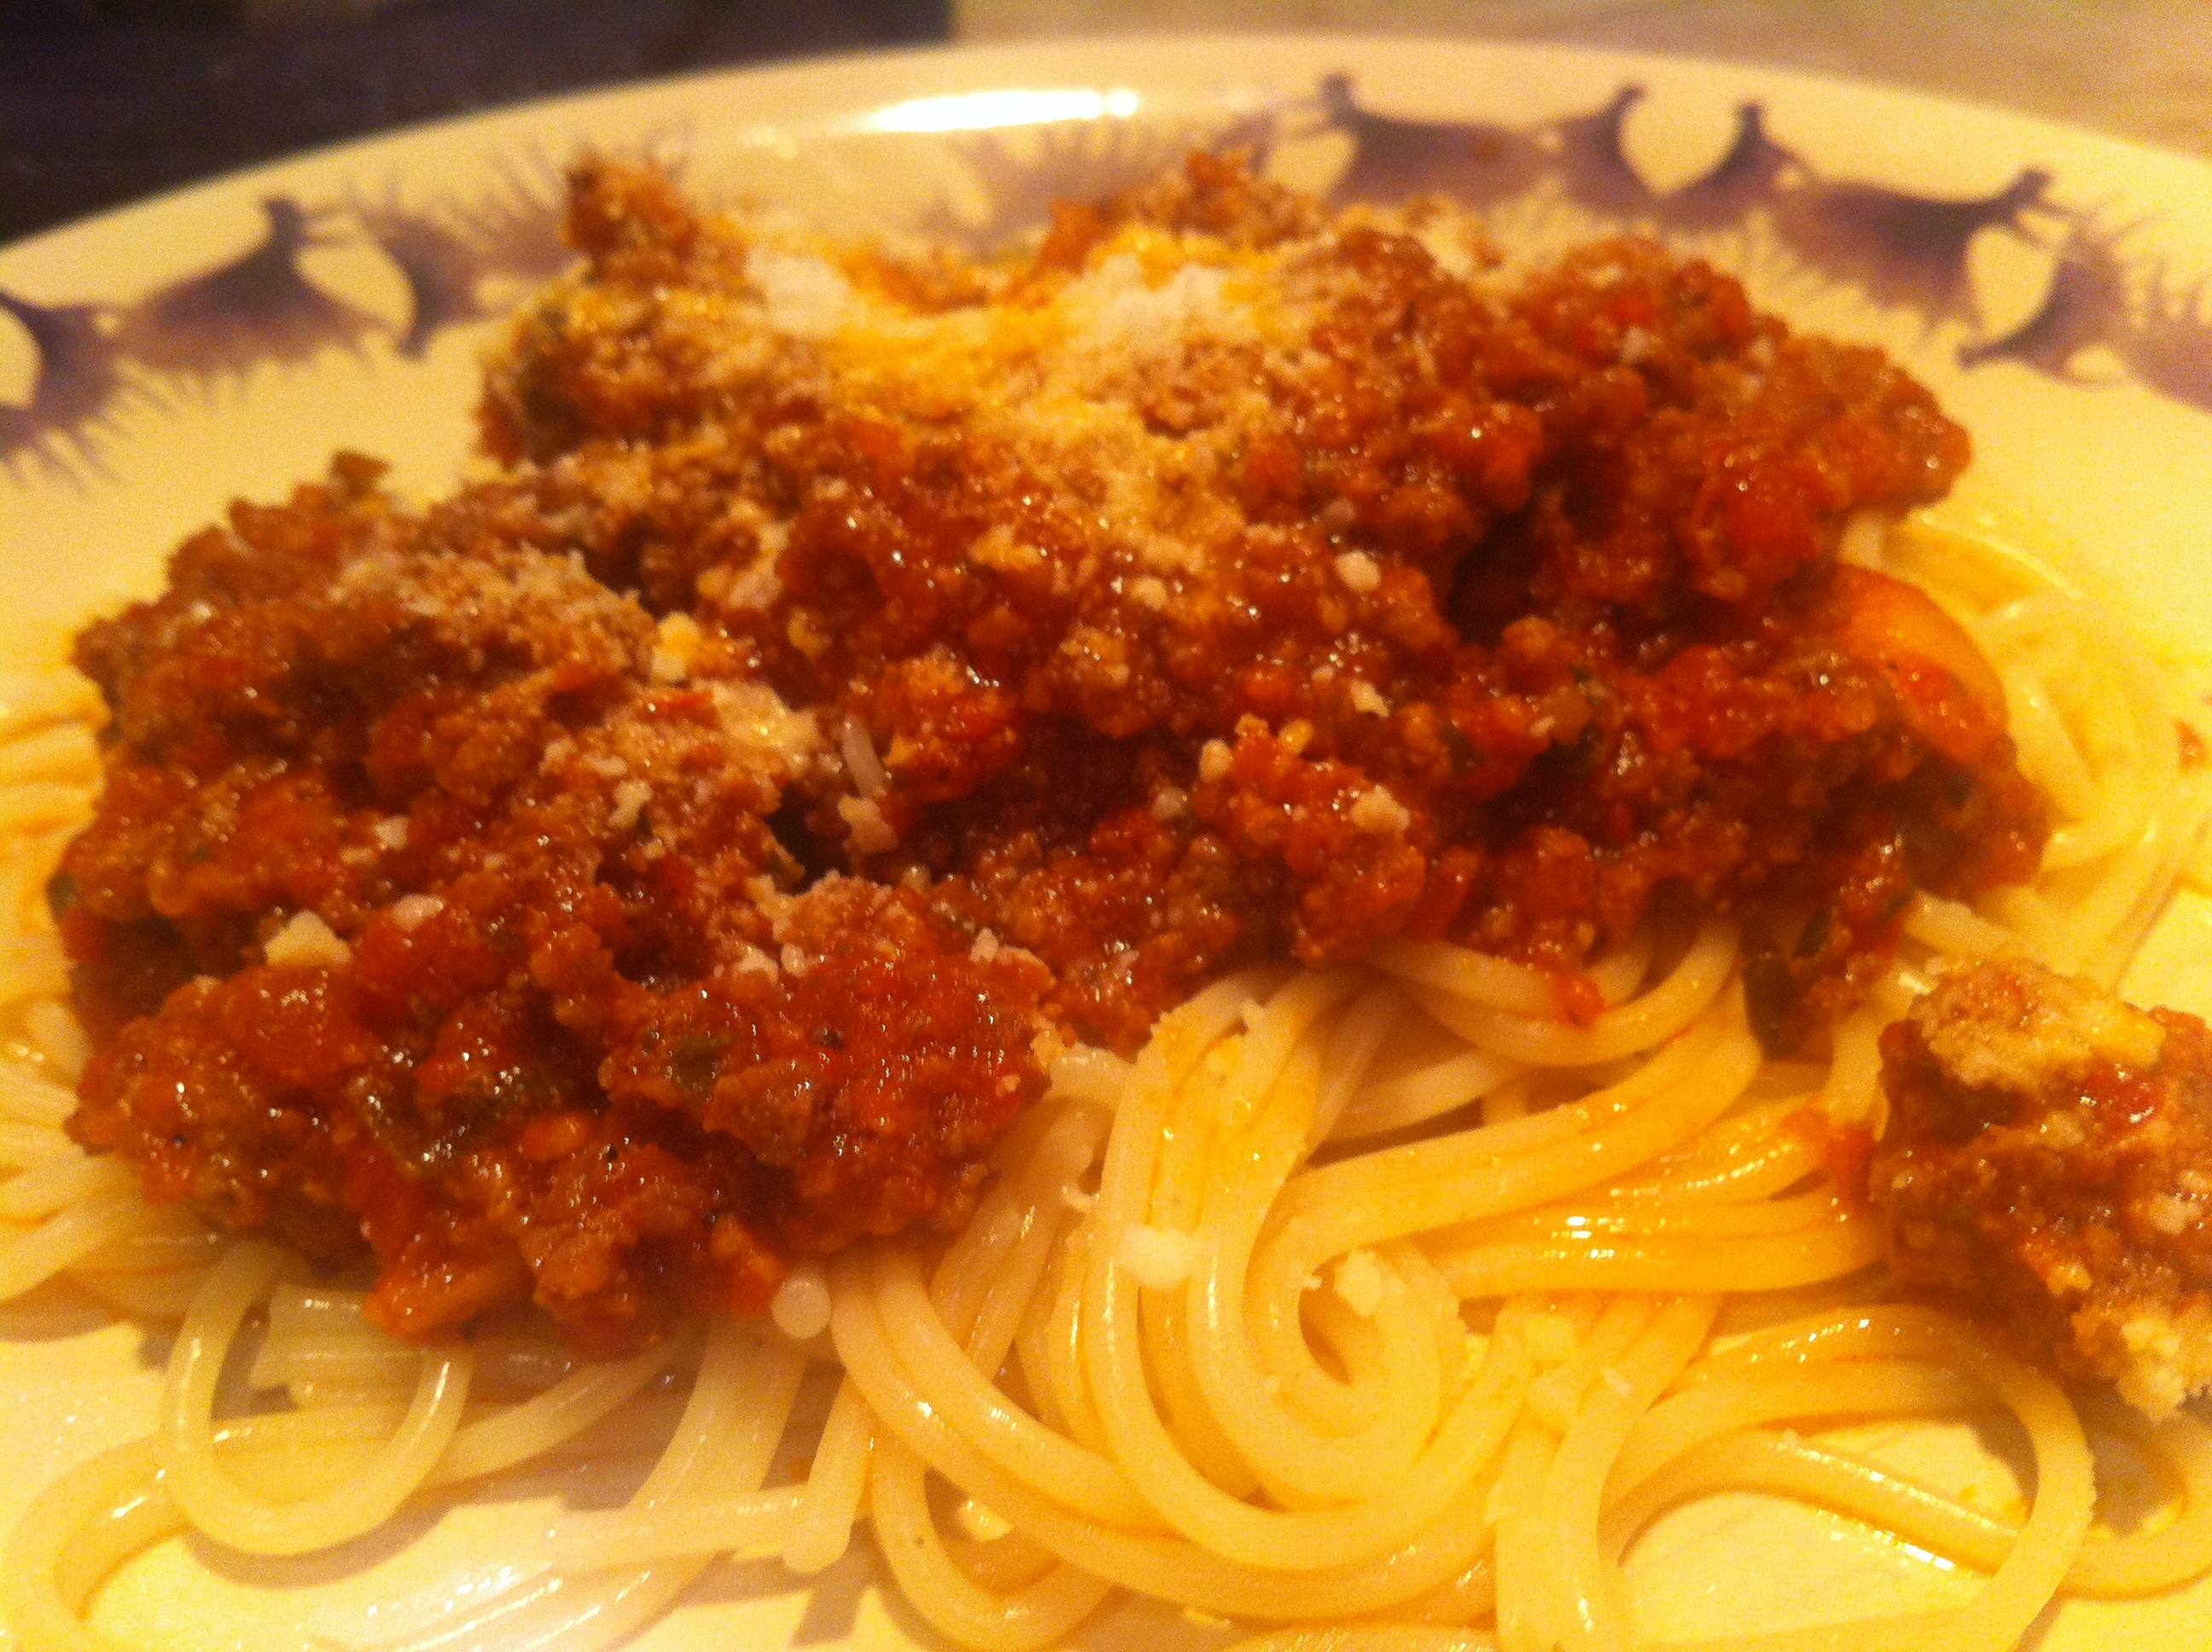
The Silver Fox Italian Red Sauce

I think all of us have had a red sauce either on pasta or lasagna that people who either made it for you or took you the resteraunt says it’s the best sauce or gravy ever. Trust me, my last name is Nanna and it is Italian and I, myself have said it about my own sauce. Ken Silva told me about this lady, of a friend of a lady that had this grandma, that had this great grandma from Sicily that birthed this recipe. I call Ken, the Silver Fox. He is Portuguese, so I really did not take him serious. He bugged me for months, until I finally got his recipe out and put it to work. Let me tell you something folks, this will not disappoint and I think that it may be the best red sauce I have ever tasted.
This one is for the Silver Fox.

Silver Fox Red Sauce Ingredients:
- 4 green onions chopped
- 4 garlic cloves chopped
- 6 Italian Sausage (mild)
- 1 can (28 oz) of can plum tomatoes
- 3 cans (14.5 oz) stewed tomatoes
- 1 can (8 oz) of tomato paste
- 1 lb of ground elk or beef
- 1 tablespoon of sugar
- 1/2 lb. of mushrooms sliced
- 1/4 cup of basil.
The first thing you are going to do is brown the Italian sausage in the pot, then remove and set aside. Keep the drippings in the pot for flavor. Add a little olive oil then add the green onions and garlic and saute for three to four minutes over medium heat.
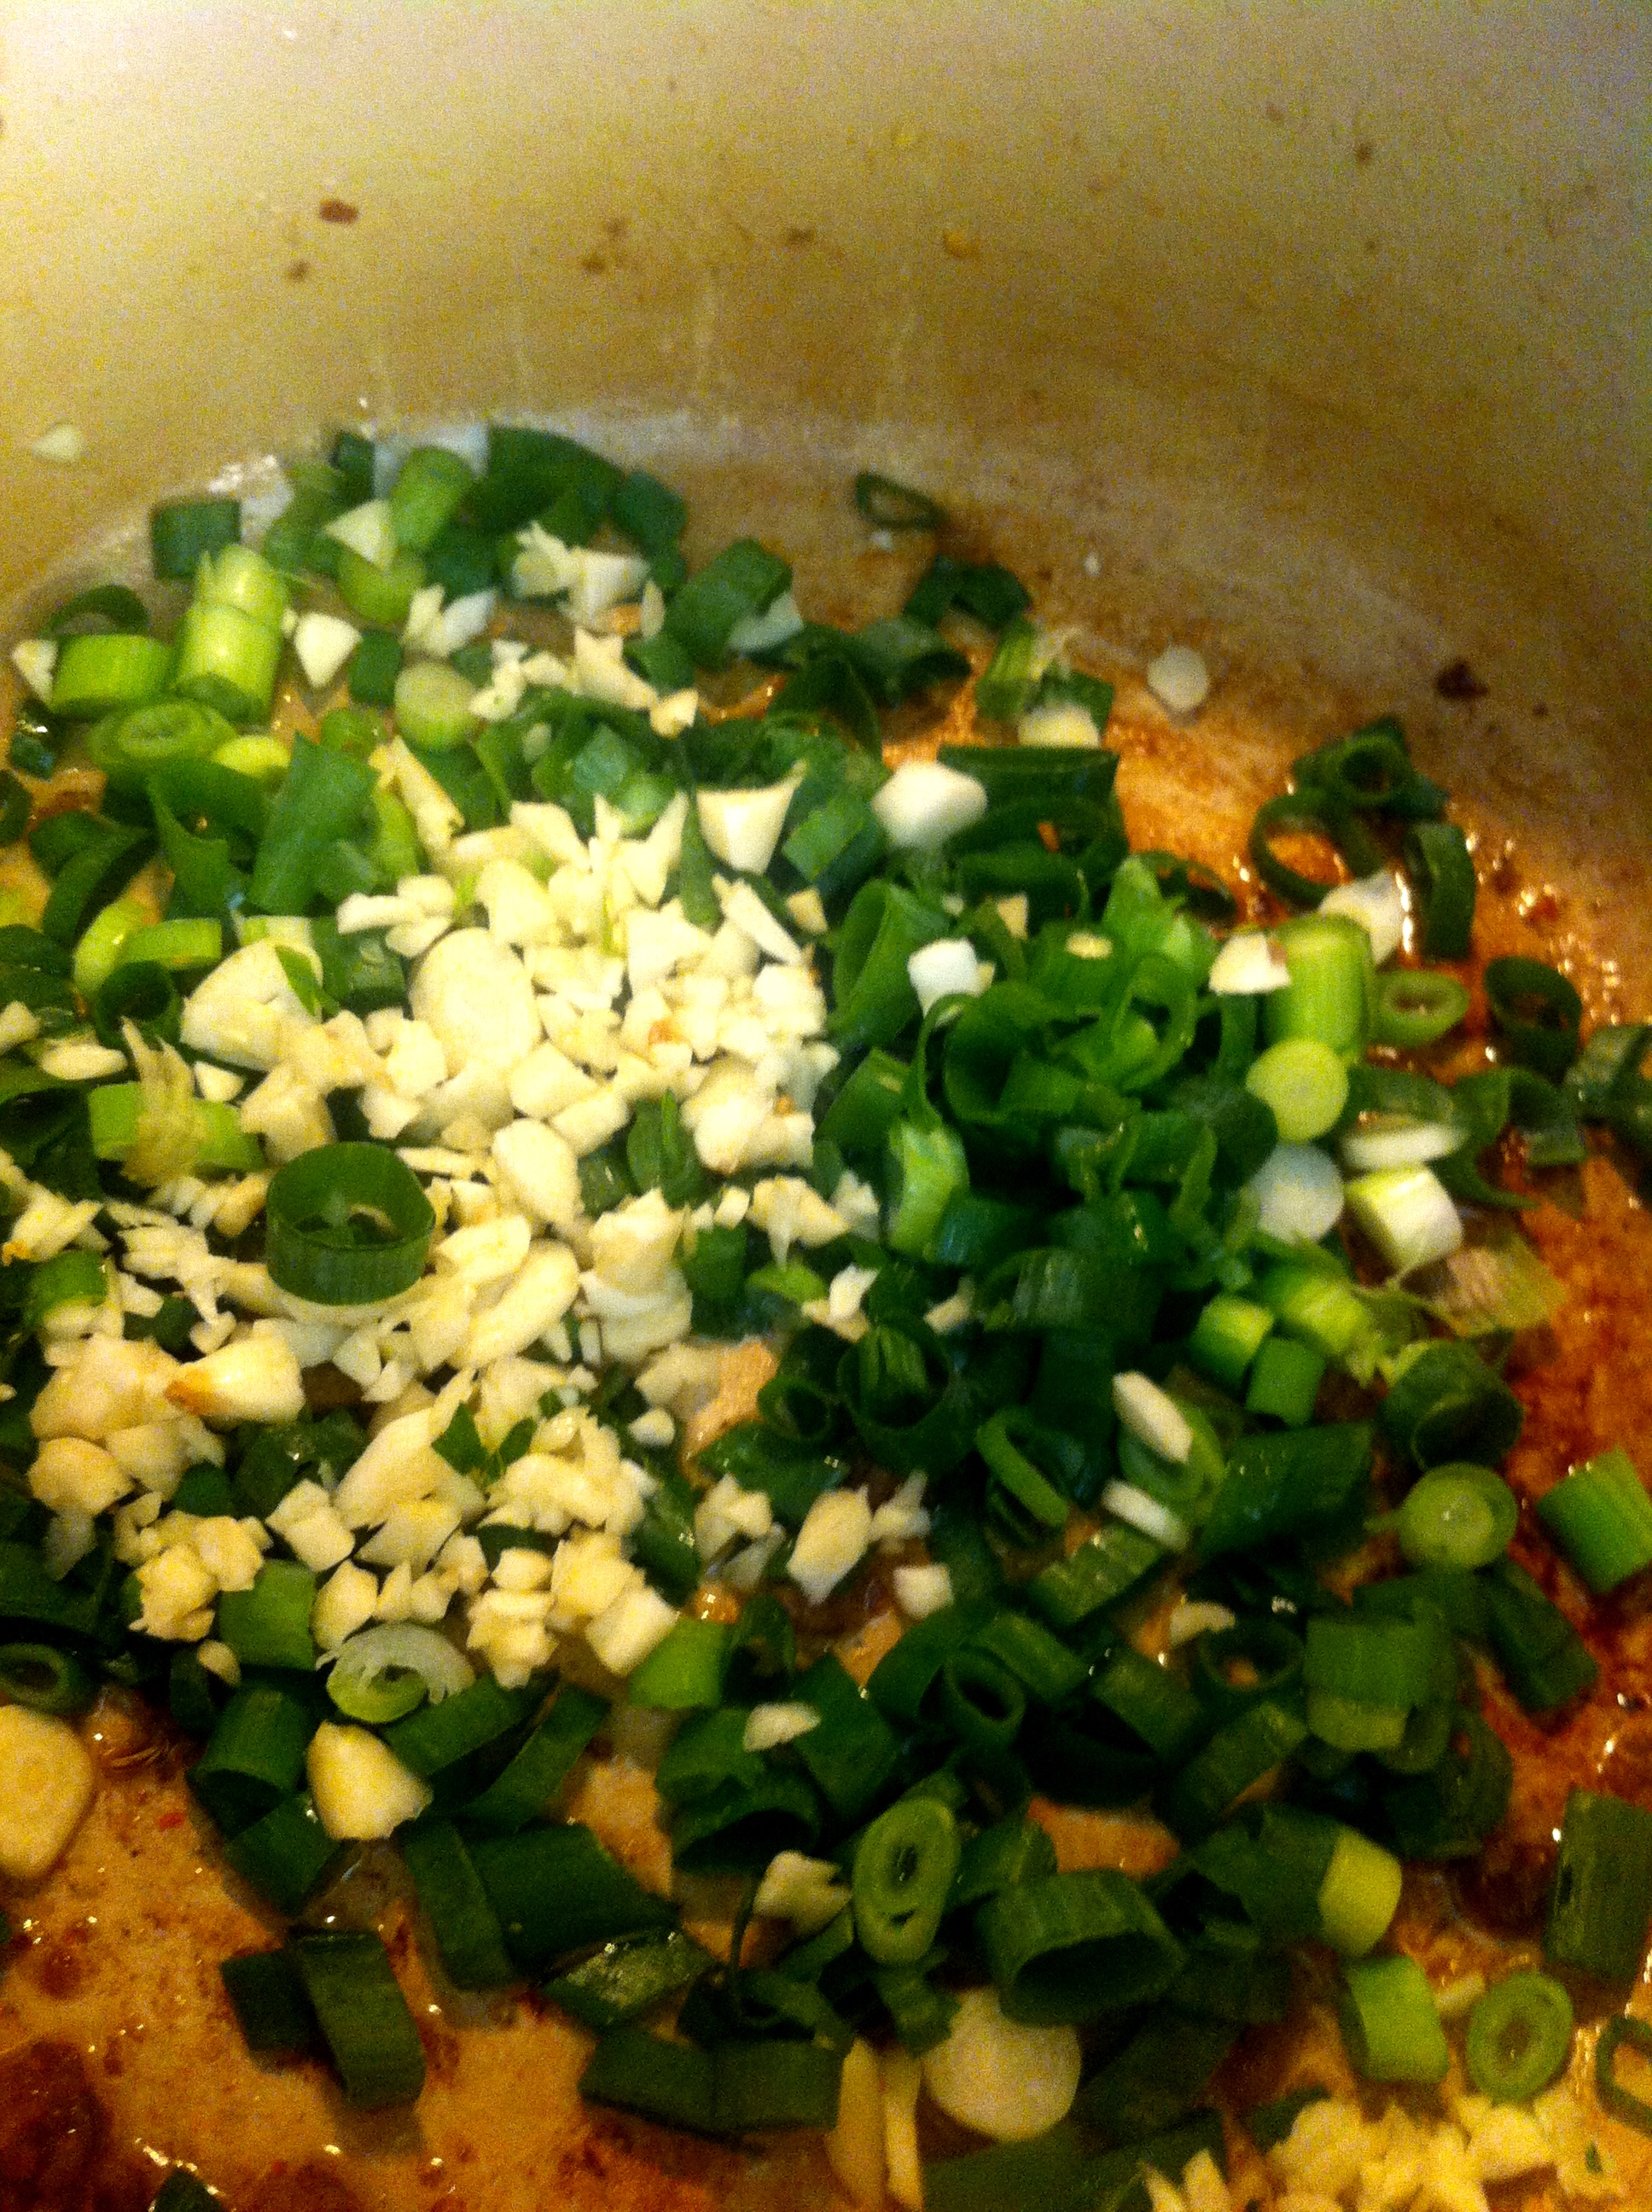
Then add the ground elk or burger, and the mushrooms to the pot and cook approximately 8-10 minutes breaking up any large chunks with the spatula.
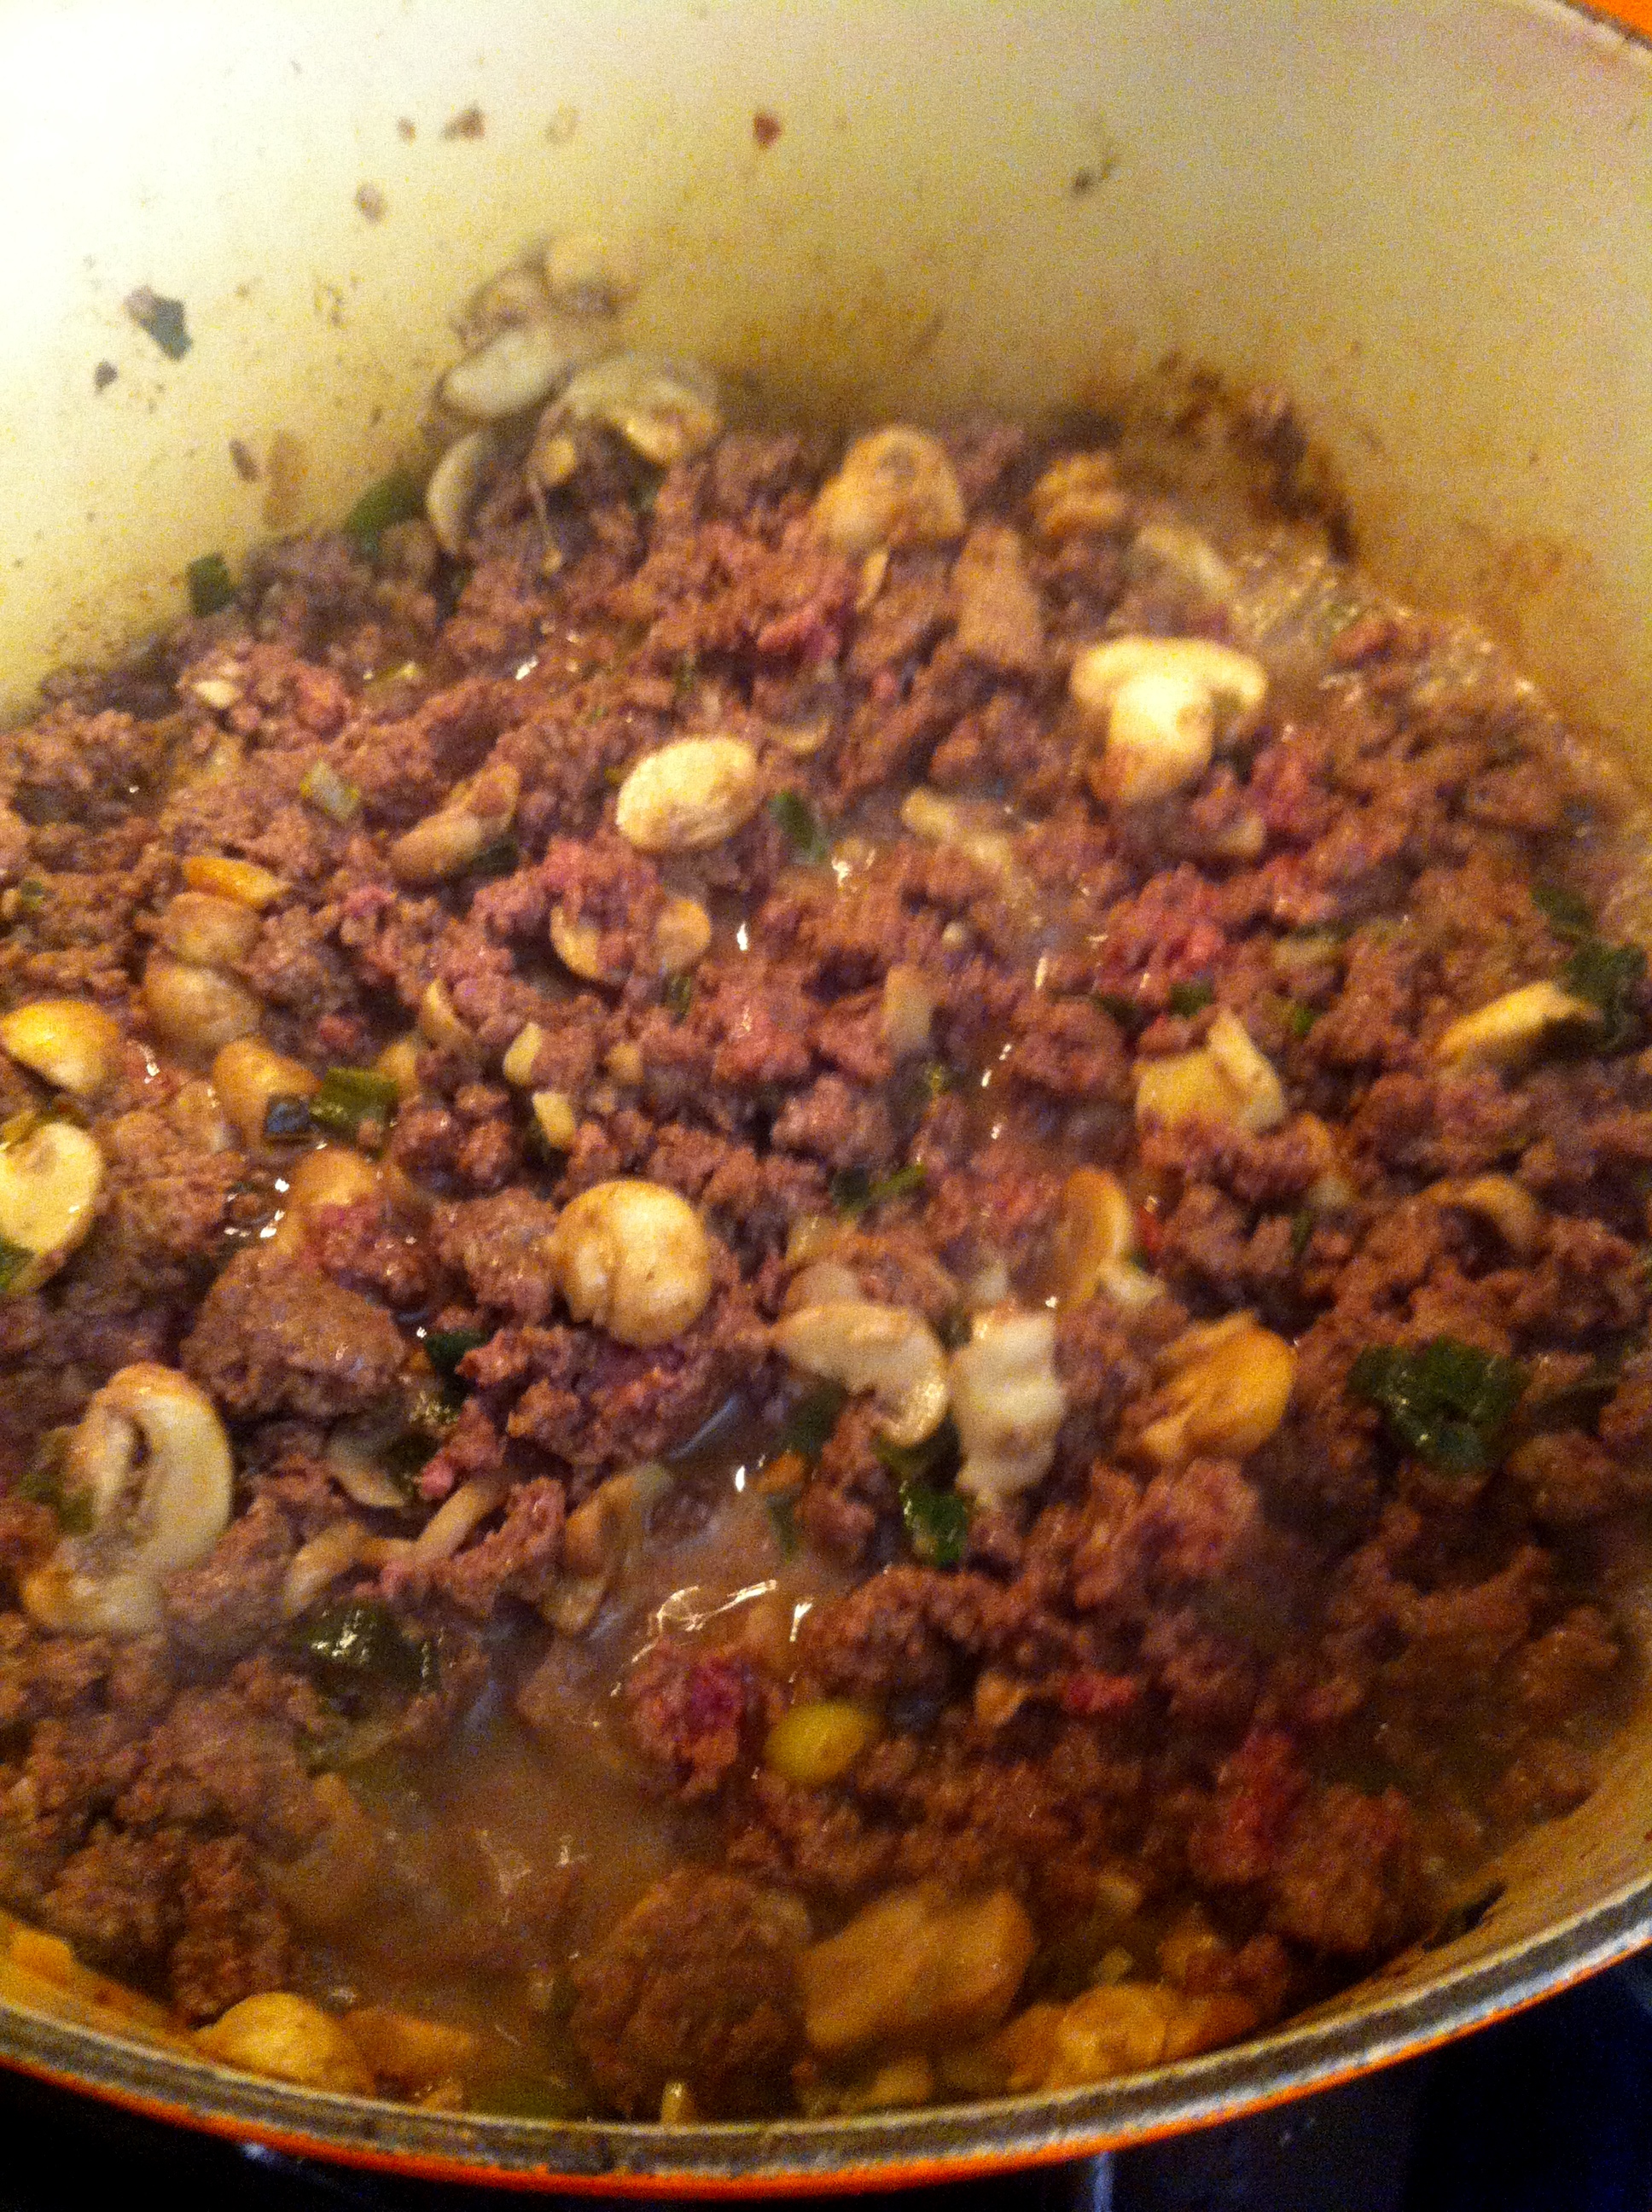
While that is browning I take the Italian sausage and I put it into my mini-food processor to smooth out the grinds of pork.
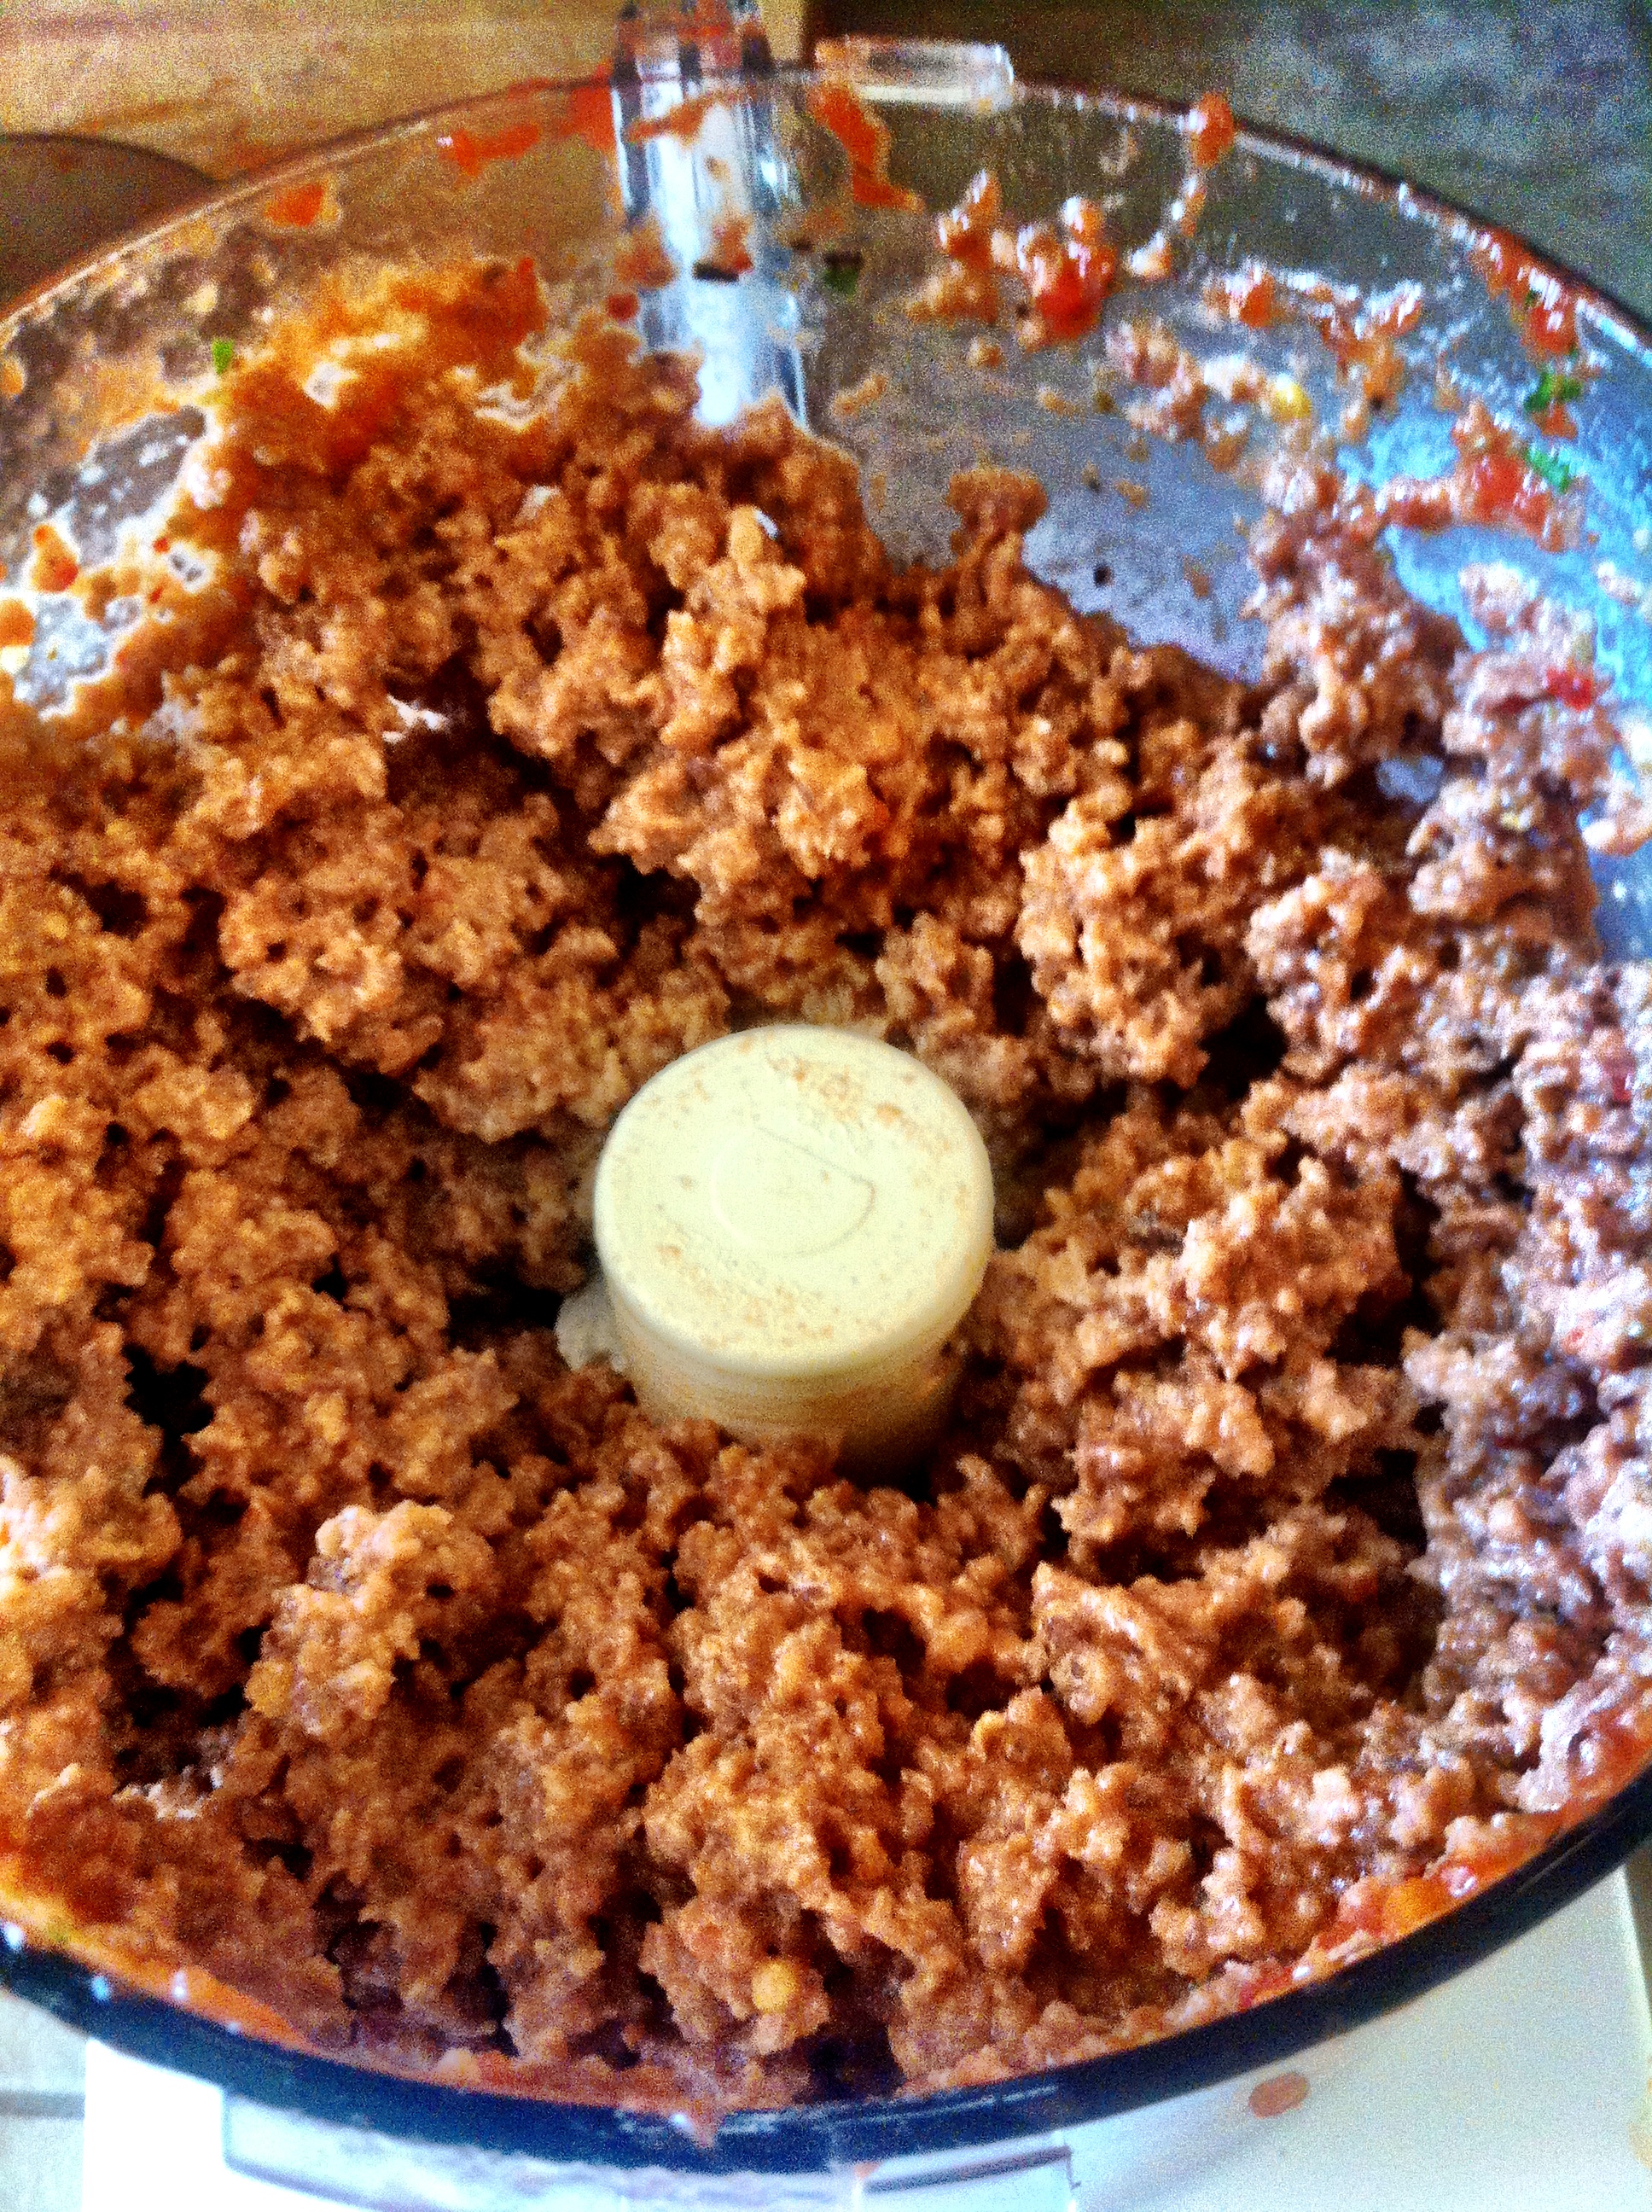
Remove the sausage and set aside. Add the can of plum tomatoes to the processor and pulse for 10-12 seconds and add to the pot on the stove. Then take the 3 cans of stewed tomatoes, the paste, and the basil into the processor, along with the sugar and some salt and pepper to taste.
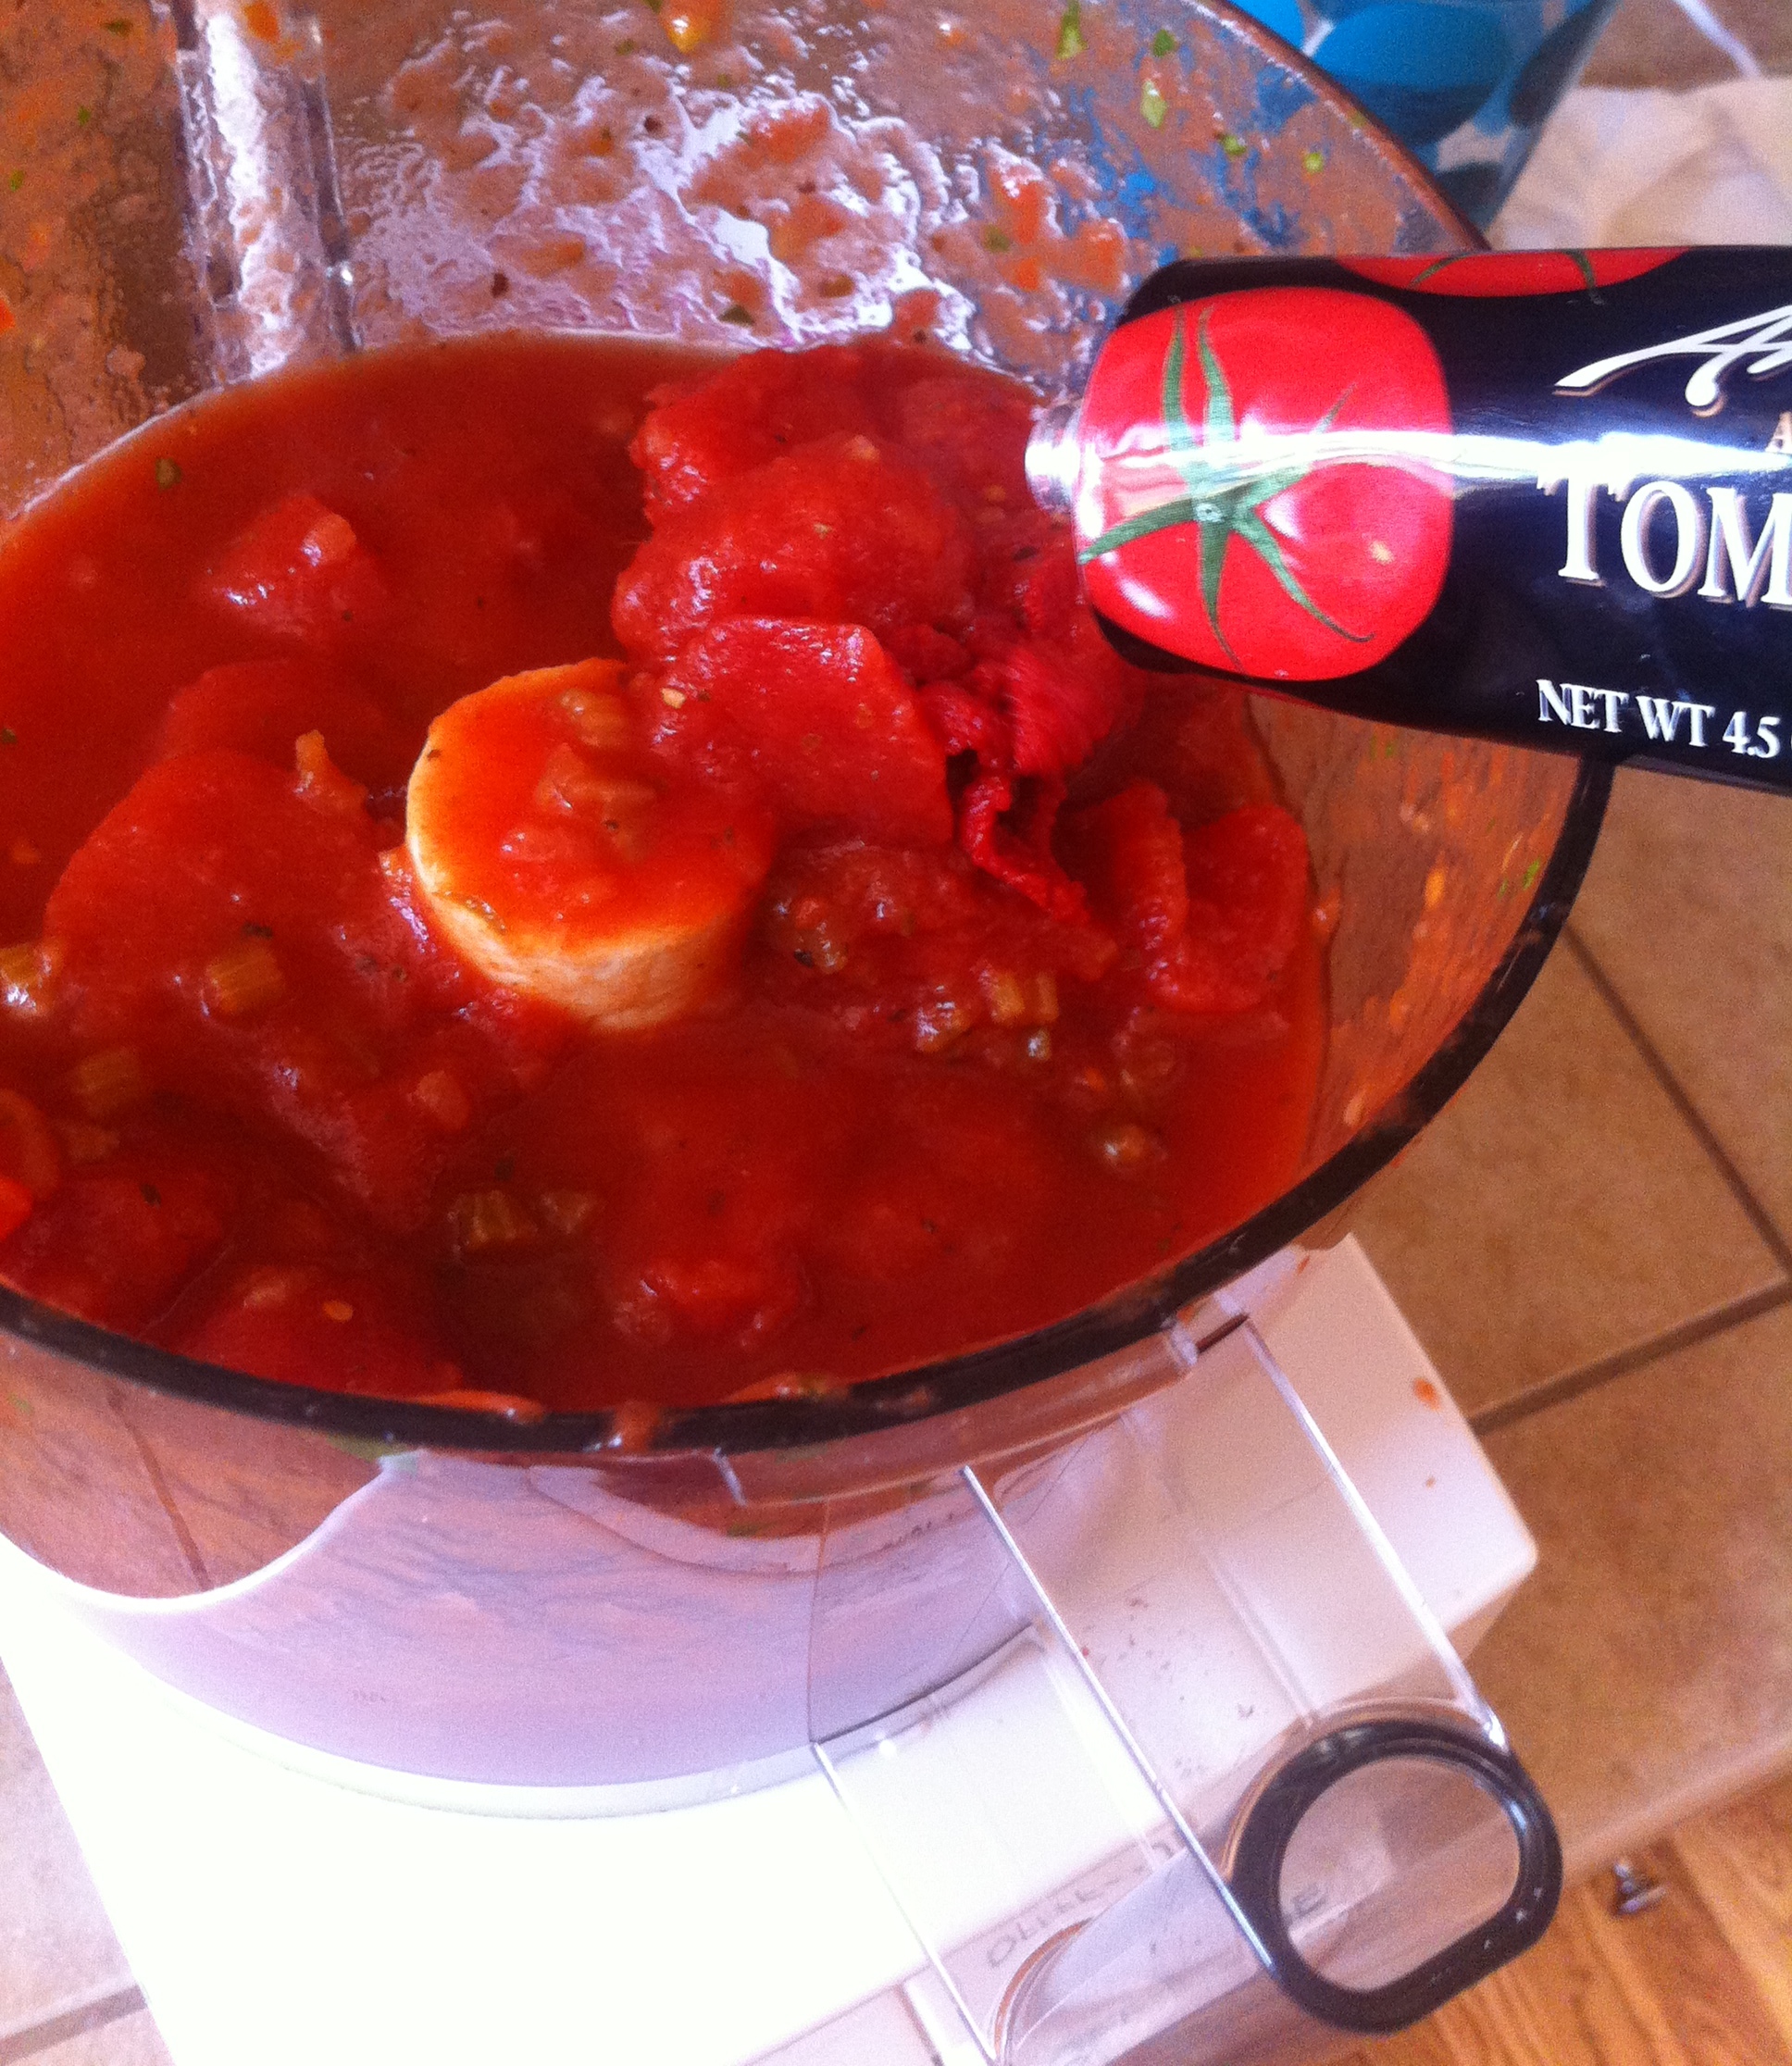
It should have this perfect consistency before adding this into the sauce pot as well.
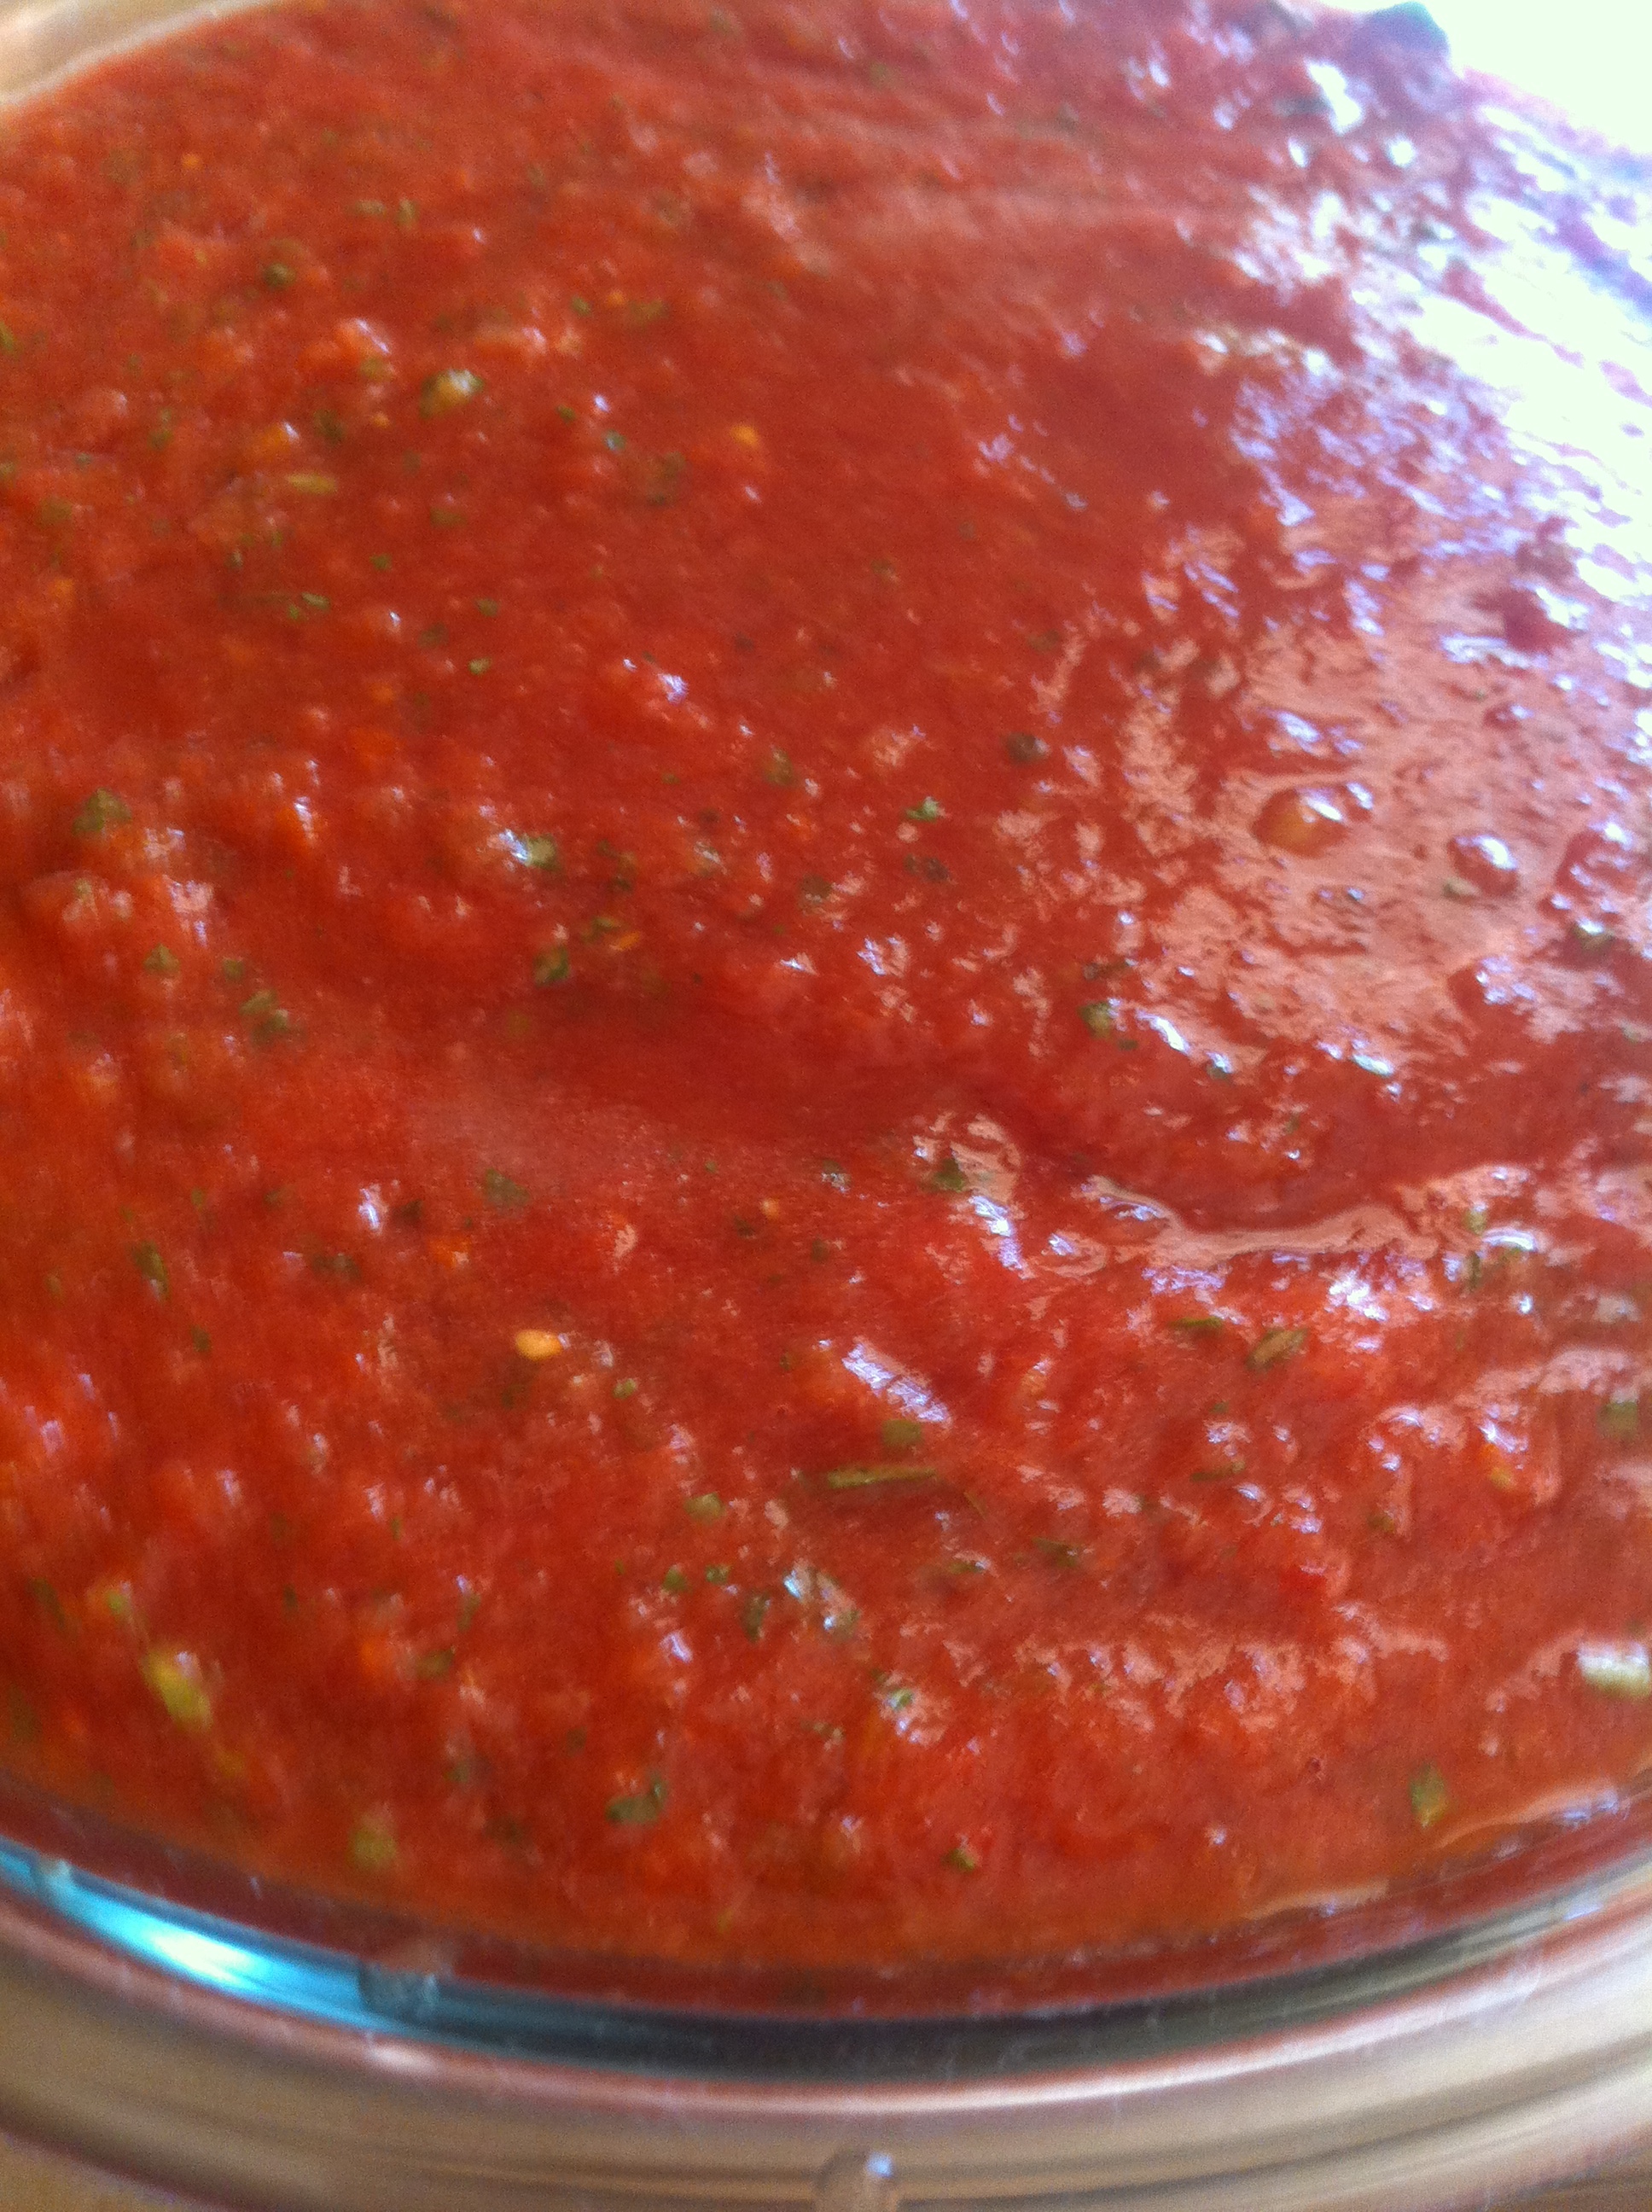
Add the sauce and the ground Italian sausage to the pot, and cook on simmer for 2 hours. Add salt if you think it needs it.

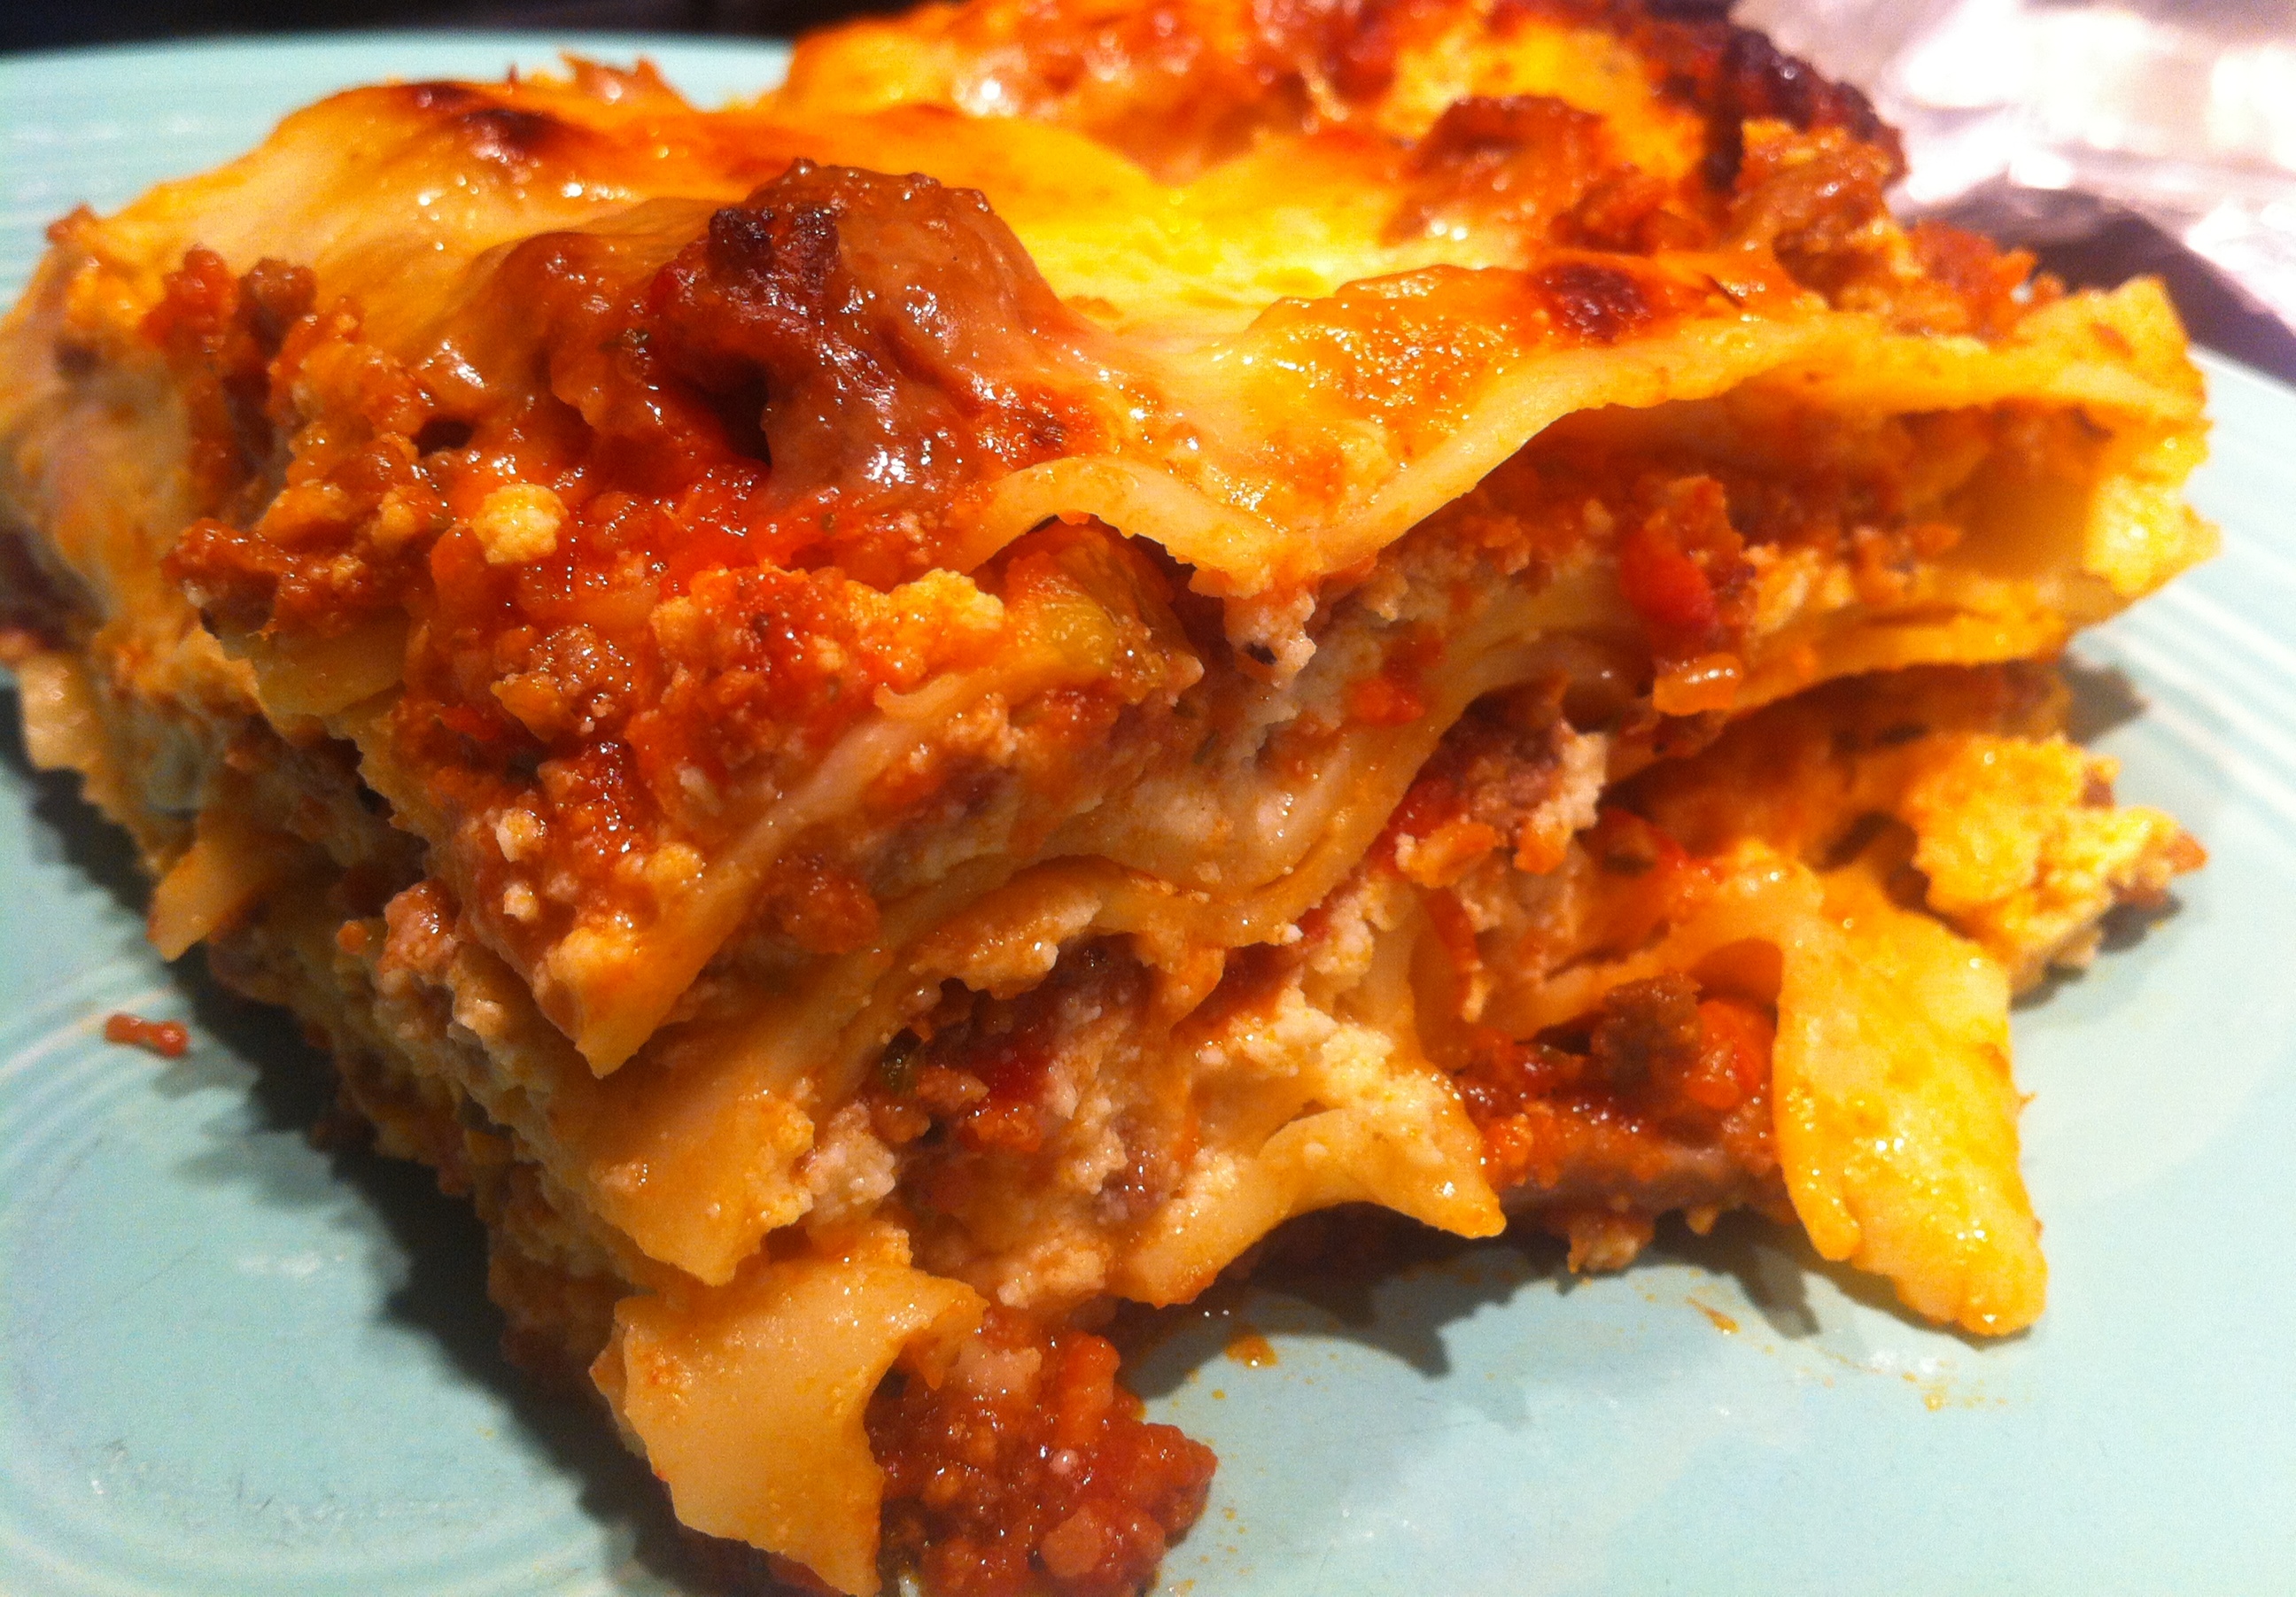
There is many things you can do with this sauce. I have used it for Lasagna, cannelloni, and spaghetti. This oldy but goldy is a weapon of love.
My daughter Mady liked it so much she had to take a small nap with Tanner.

The next day we had spaghetti with it, and I do not even like spaghetti. Probably because I am a 70’s kid and from a big family so my mother made it every week. My rule used to be, never without meatballs…until this recipe came along.
There was enough sauce left over that I even froze it and saved it for later, and it was perfect when I used it again. I highly recommend saving the sauce….if you can resist.

These are recipes that I am glad gets passed on generation to generation, and I am thankful to my friend Kenny who brought this to me so I could share it with you. It is called passing it on.
P.S. If the Silver Fox decides to give me the name of the founder of this recipe, I will add it. However, I do not want my old buddy to find himself next to Hoffa.
The Hunting Chef
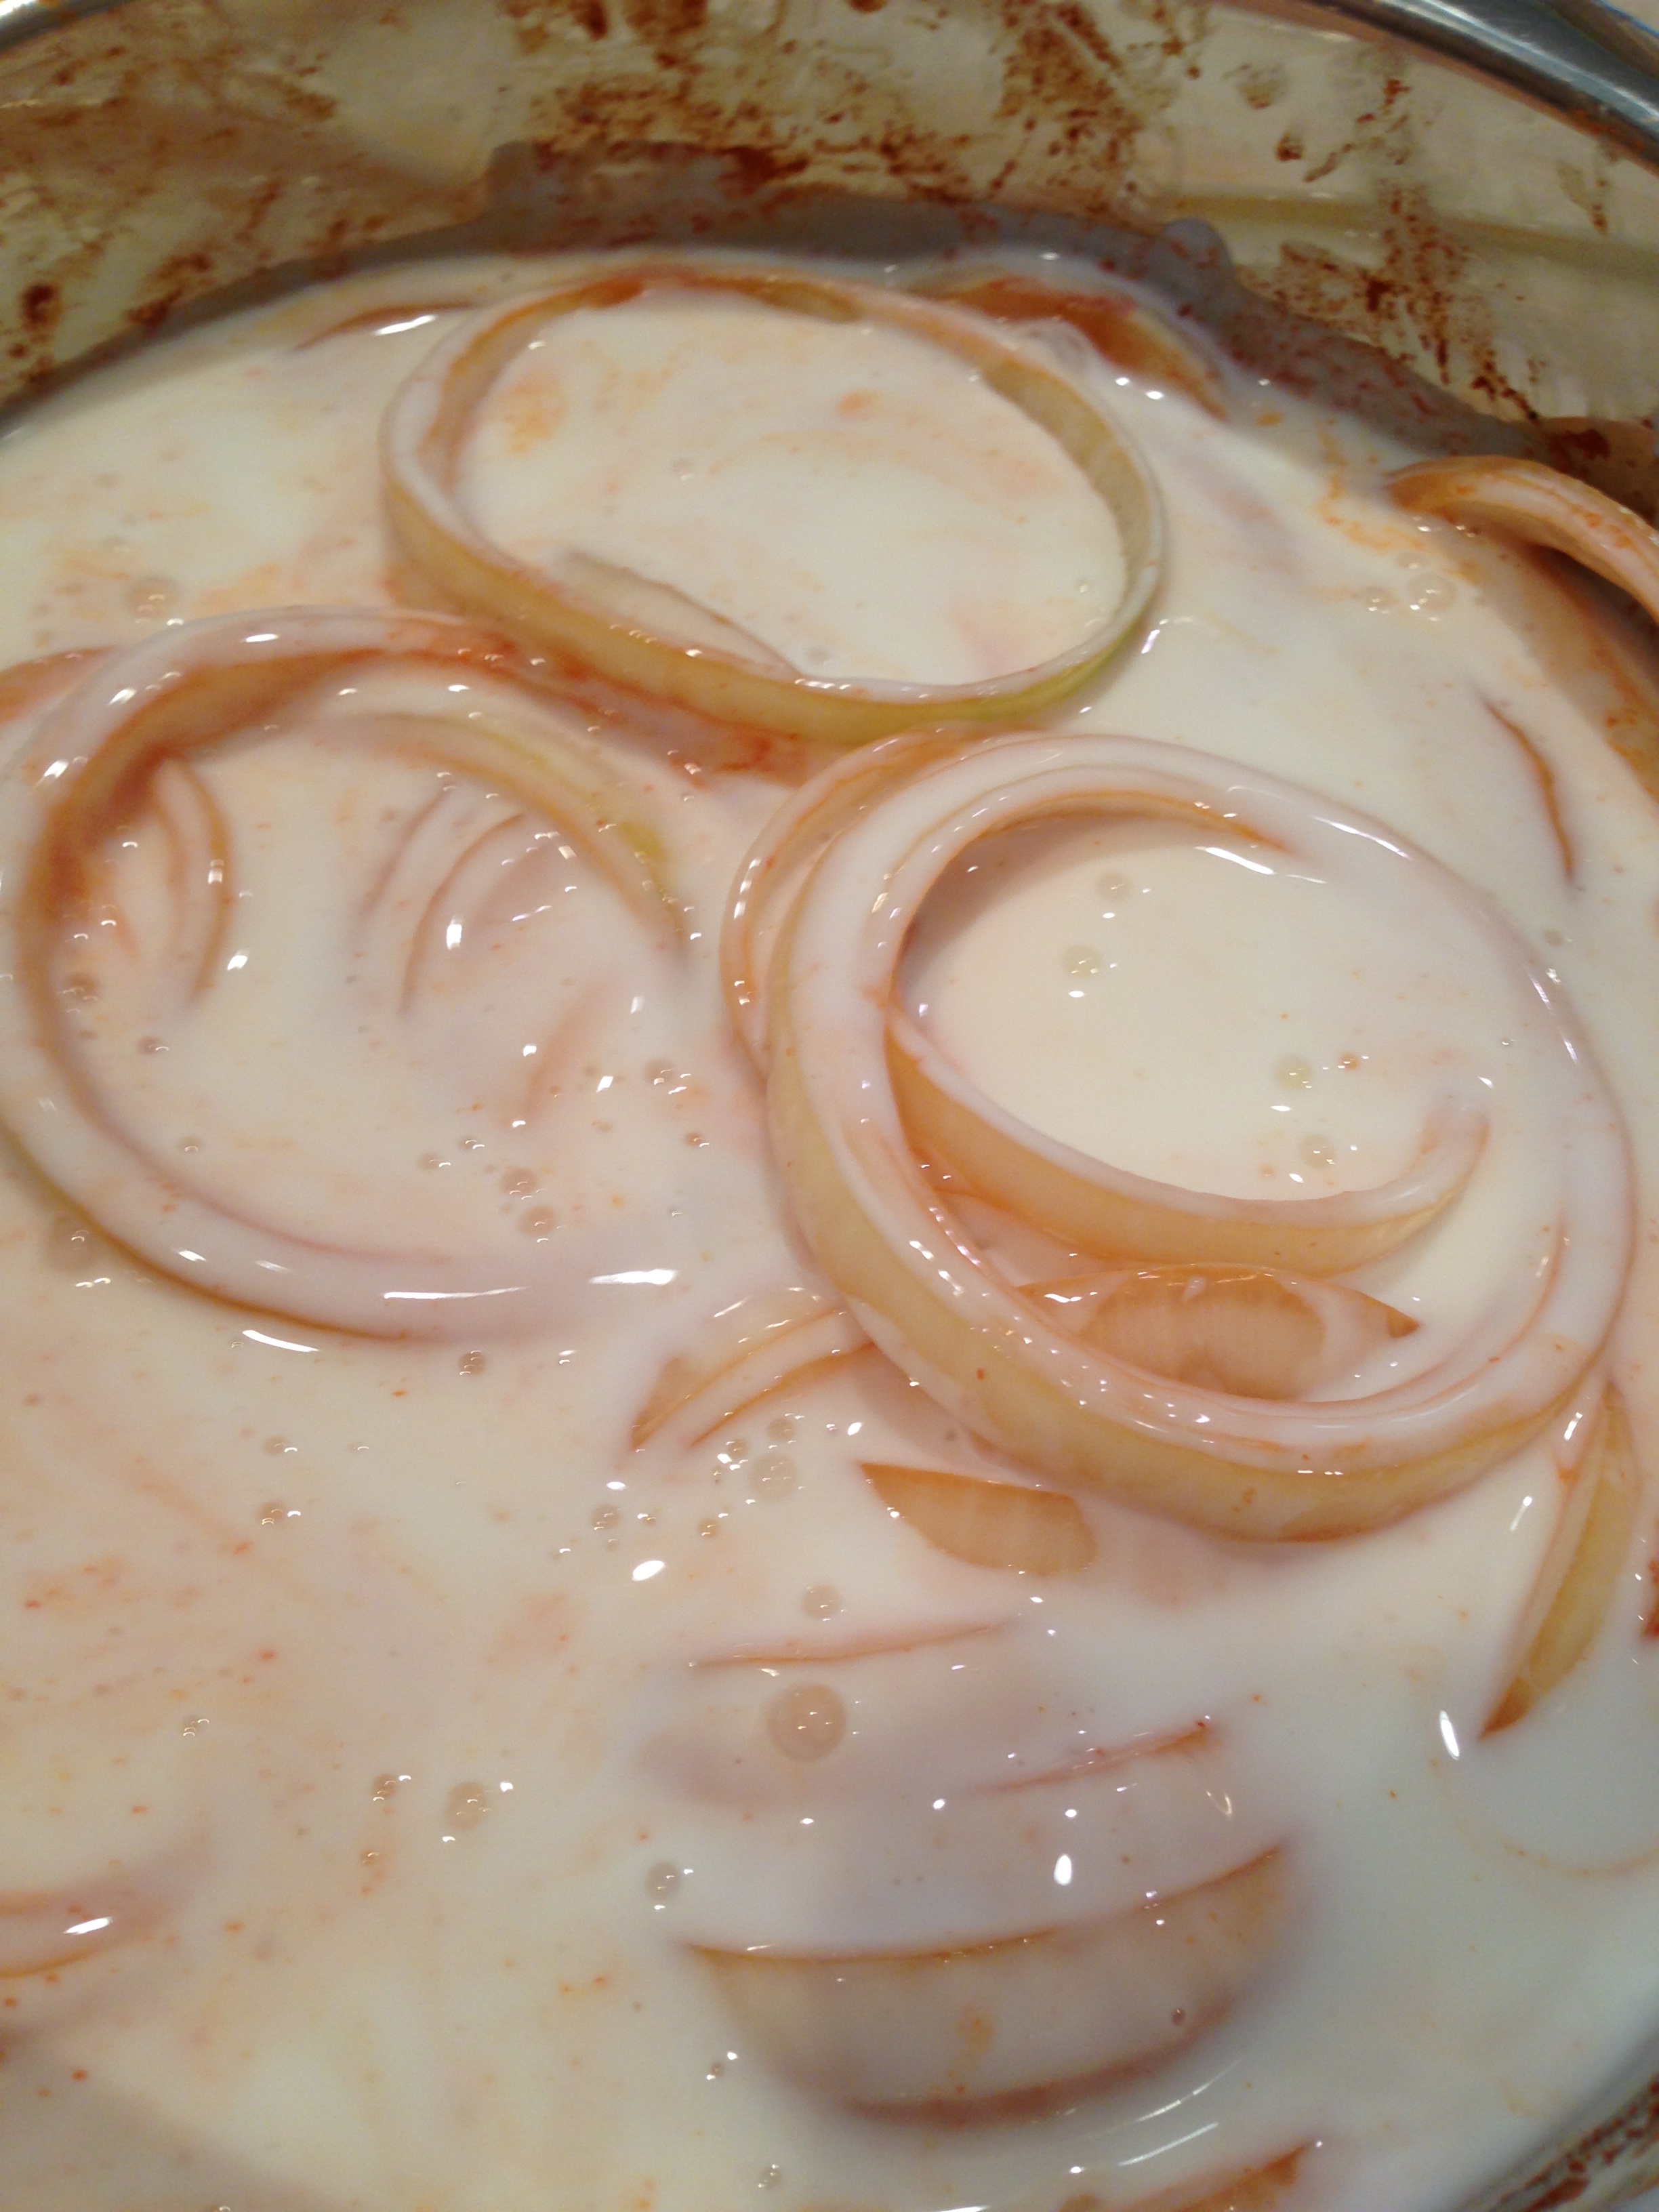
Buttermilk Onion Rings with a little Kick

Every once in a while I get a craving for Onion Rings. I do not get this craving a lot, but like Fried Chicken, when the fever hits I just gots to get me some. I love them with a good bison steak, or even a good New York beef steak. I made them for my family over Christmas break and they just loved them so I decided to share the recipe I cut out or copied over the years.
Onion Rings:
- 3 medium sweet onions, cut into 1/4 inch rings
- 2 cups of buttermilk
- 1 teaspoon of salt
- half of bottle of hot sauce (Tapatio is what I prefer)
- 2 cups of all-purpose flour
- 1 teaspoon of sea salt
- 1 teaspoon of garlic powder
- 1 teaspoon of pepper
- Vegetable oil for frying.
Cut your onion rings, then in a medium bowl toss with hot sauce and a teaspoon of salt.

Do not be afraid of using the hot sauce. Surprisingly the hot flavor is dissolved by the oil frying process. I let sit, for 3o minutes to try to capture more flavor. Trust me, it is only a little hint. We did this by accident when I was letting my brother-in-law pour the sauce into the bowl and he poured the entire bottle in. It turned out great! Add the buttermilk in with the onions and Tapatio and let sit another 15 minutes.
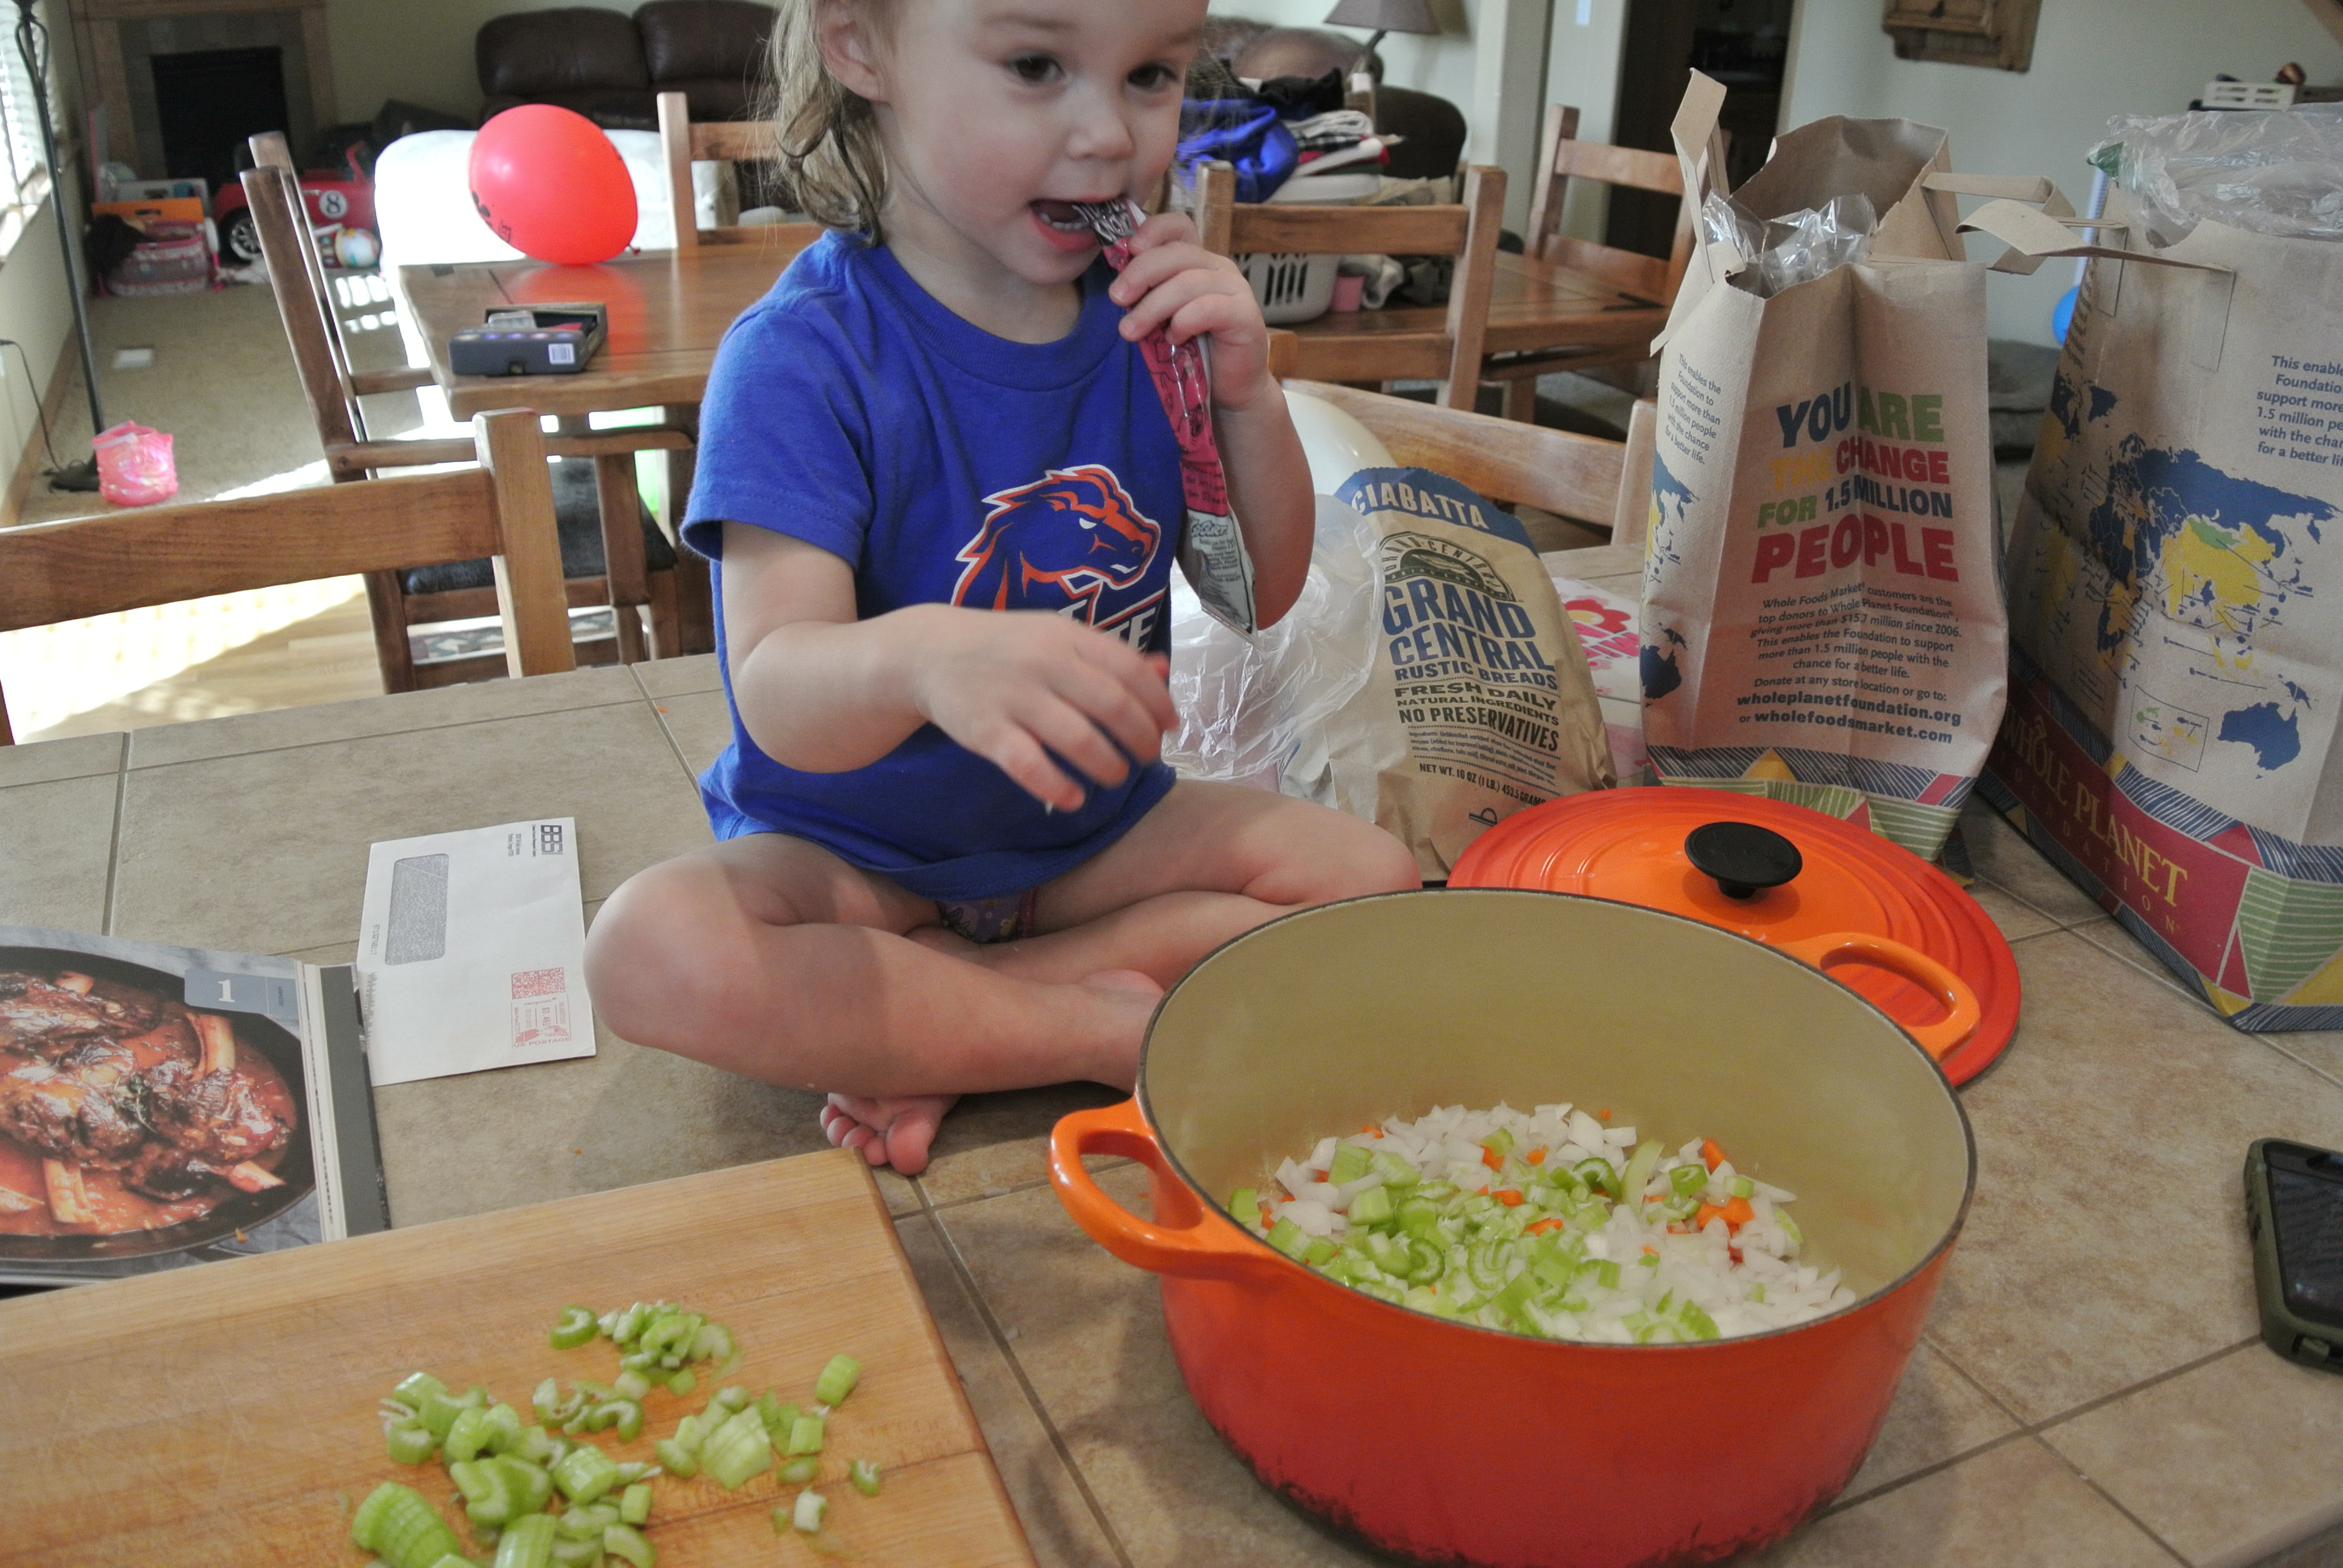
In another medium bowl mix the flour, salt garlic powder, and pepper. I take a baking sheet put down a layer of wax paper, dip the onion ring into the flour and set aside. I use a good deep-frying la Creuset pot to keep the oil from going every where, some people just use a cast iron skillet. Put enough oil to have at least 3-4 inches deep, bring oil to 360 degrees. This is a great time to make your Ranch Dressing, yes I said MAKE. It is easy. You can make it the day before if you like.
Ranch Dressing
- 1/4 cup Greek Yogurt-Strain the fluid out of it the best you can.
- 1/4 cup Mayonnaise
- 2 garlic cloves minced
- 1/4 teaspoon of salt
- 1/4 teaspoon of pepper
- 1 teaspoon of lemon juice
- 1 teaspoon of dill minced
- 1 teaspoon of Italian parsley minced
- 3 tablespoon of buttermilk.
In a small bowl add the yogurt, mayonnaise, salt, pepper, lemon juice, and herbs. Mix well. Add the buttermilk and stir some more. Set aside.
This is a good time to look around and see what your two year old is doing because she has not made a sound in 30 seconds.

When the oil reaches 360 degrees, add the onions that have been coated one at a time. Do not over crowd the pot, and fry them for about 3 minutes, turn them over once in those 3 minutes. When they appear golden brown remove them and set on paper towels and repeat process. This process takes some time. So what I do is heat the oven to warm, and add them to the plate with paper towels that is in the oven to keep warm.
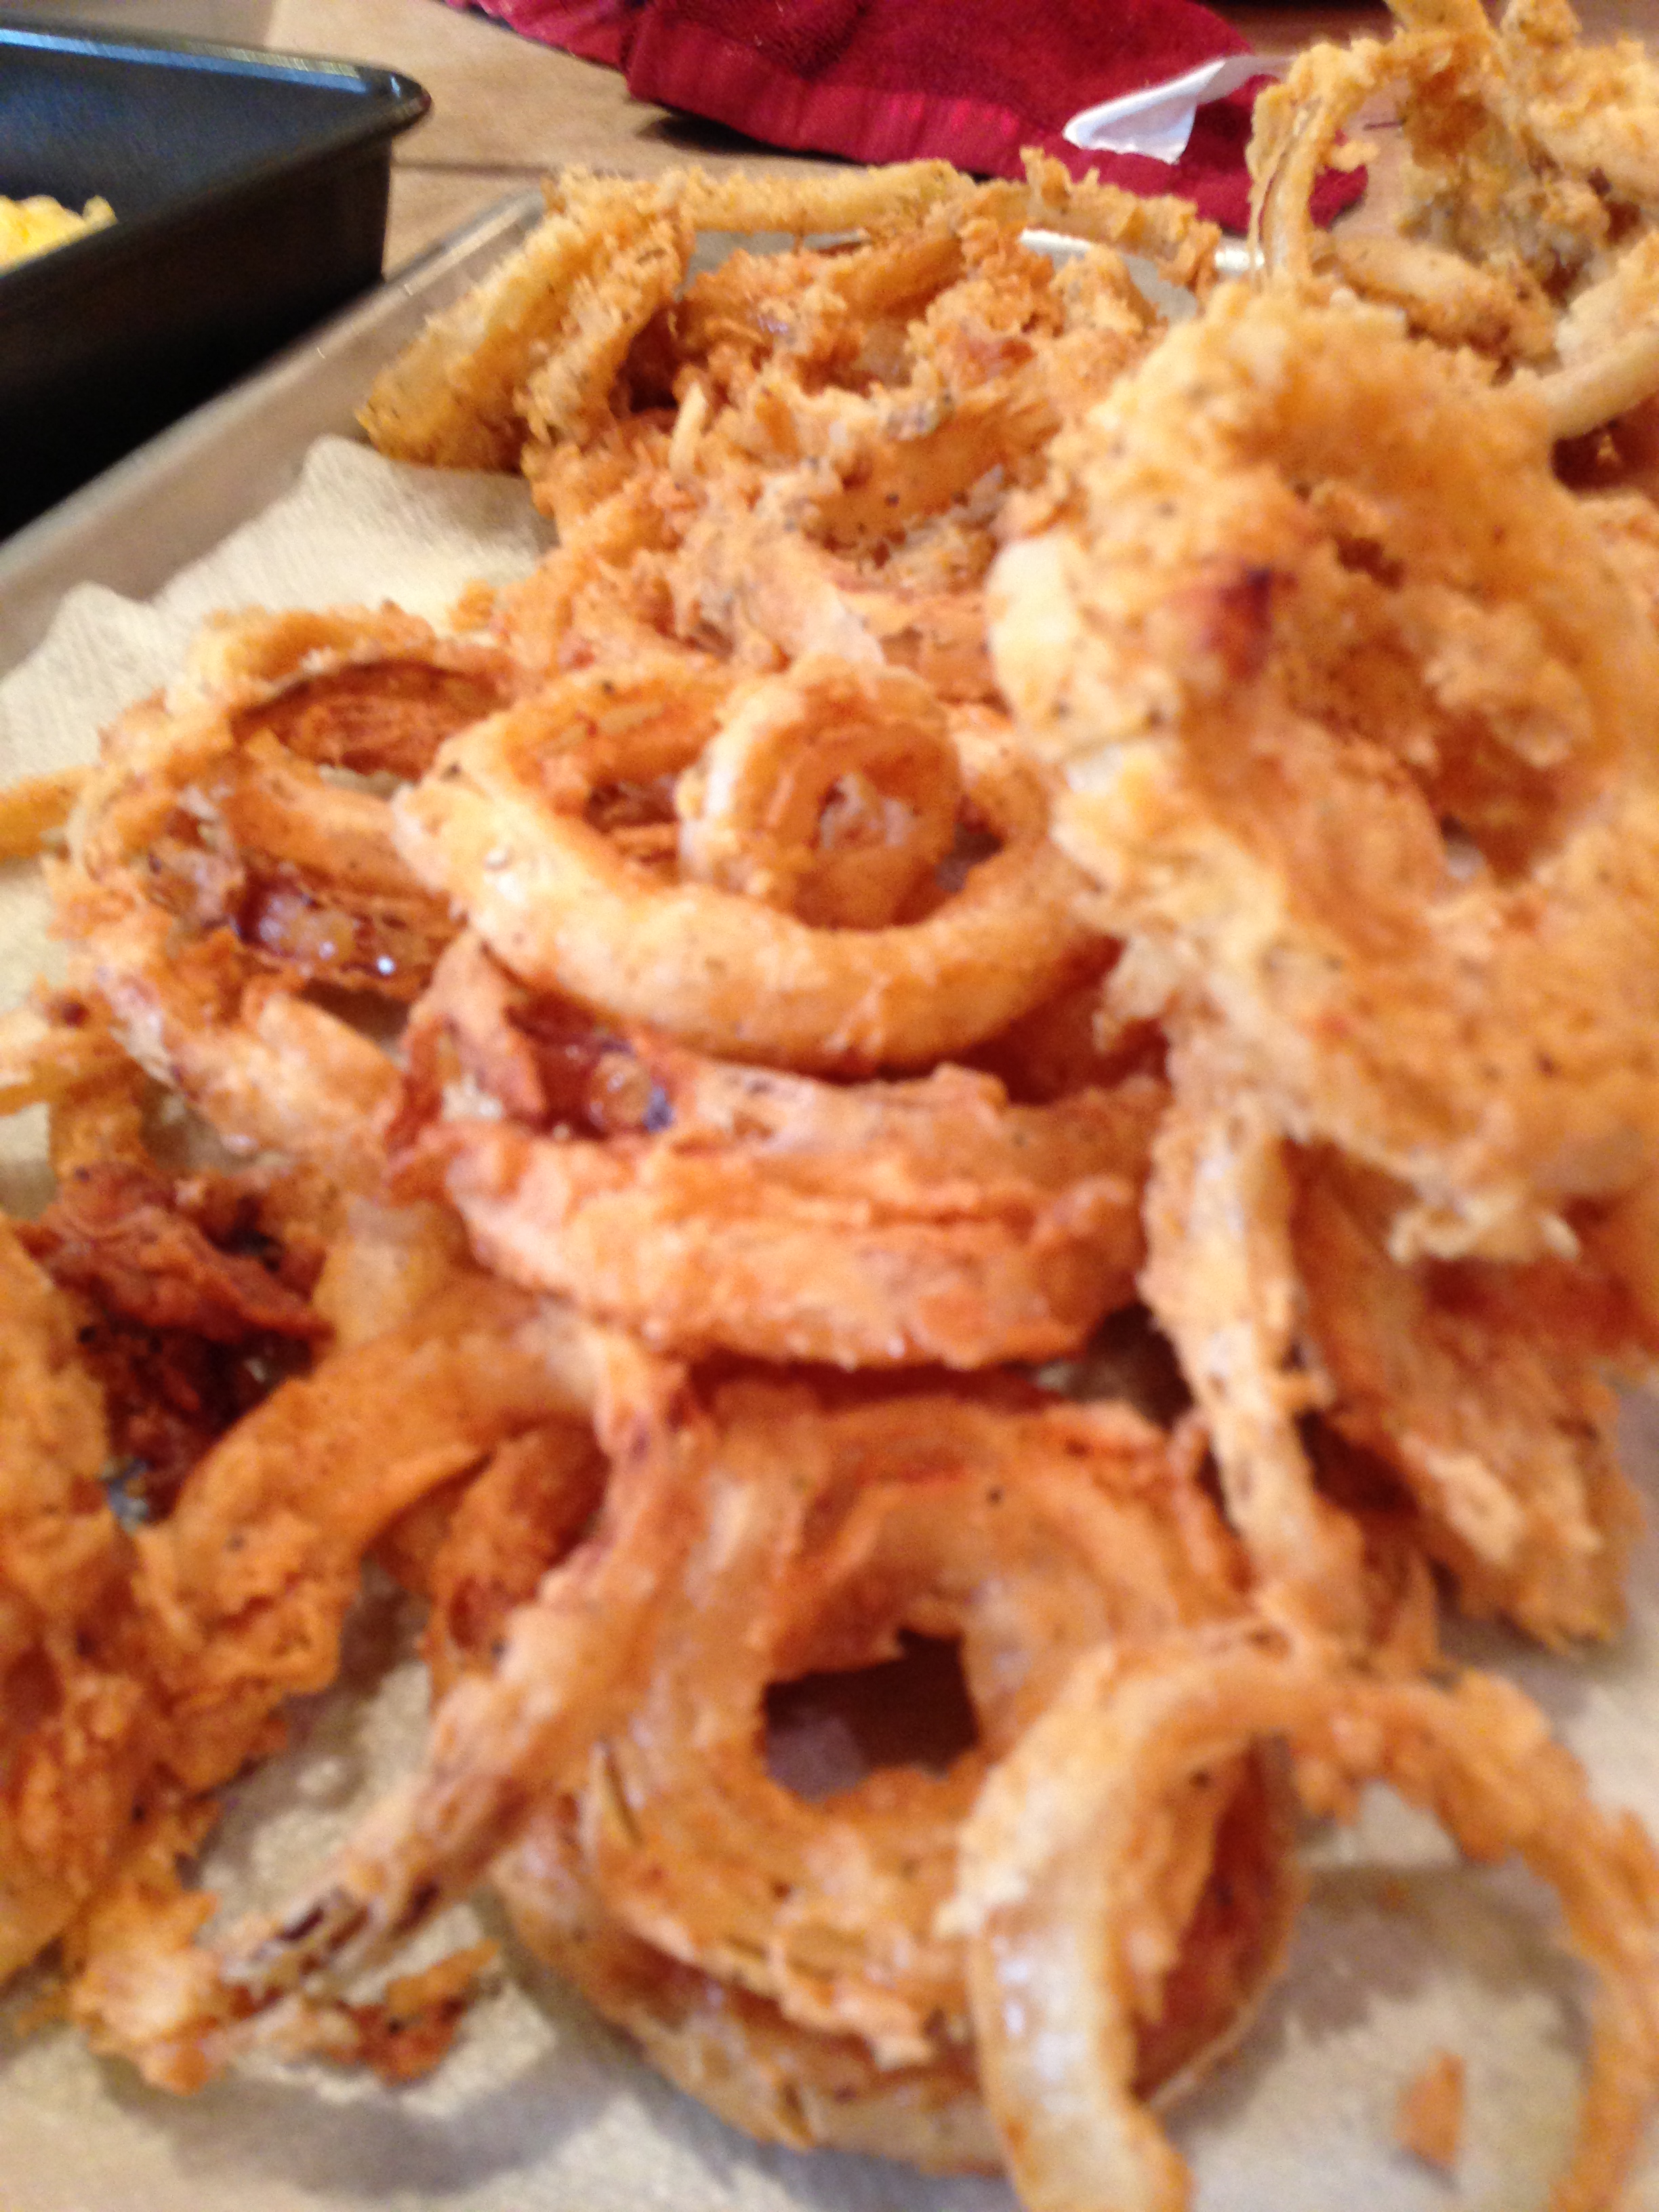
You can plate them as an appetizer, or add them on top of a steak.
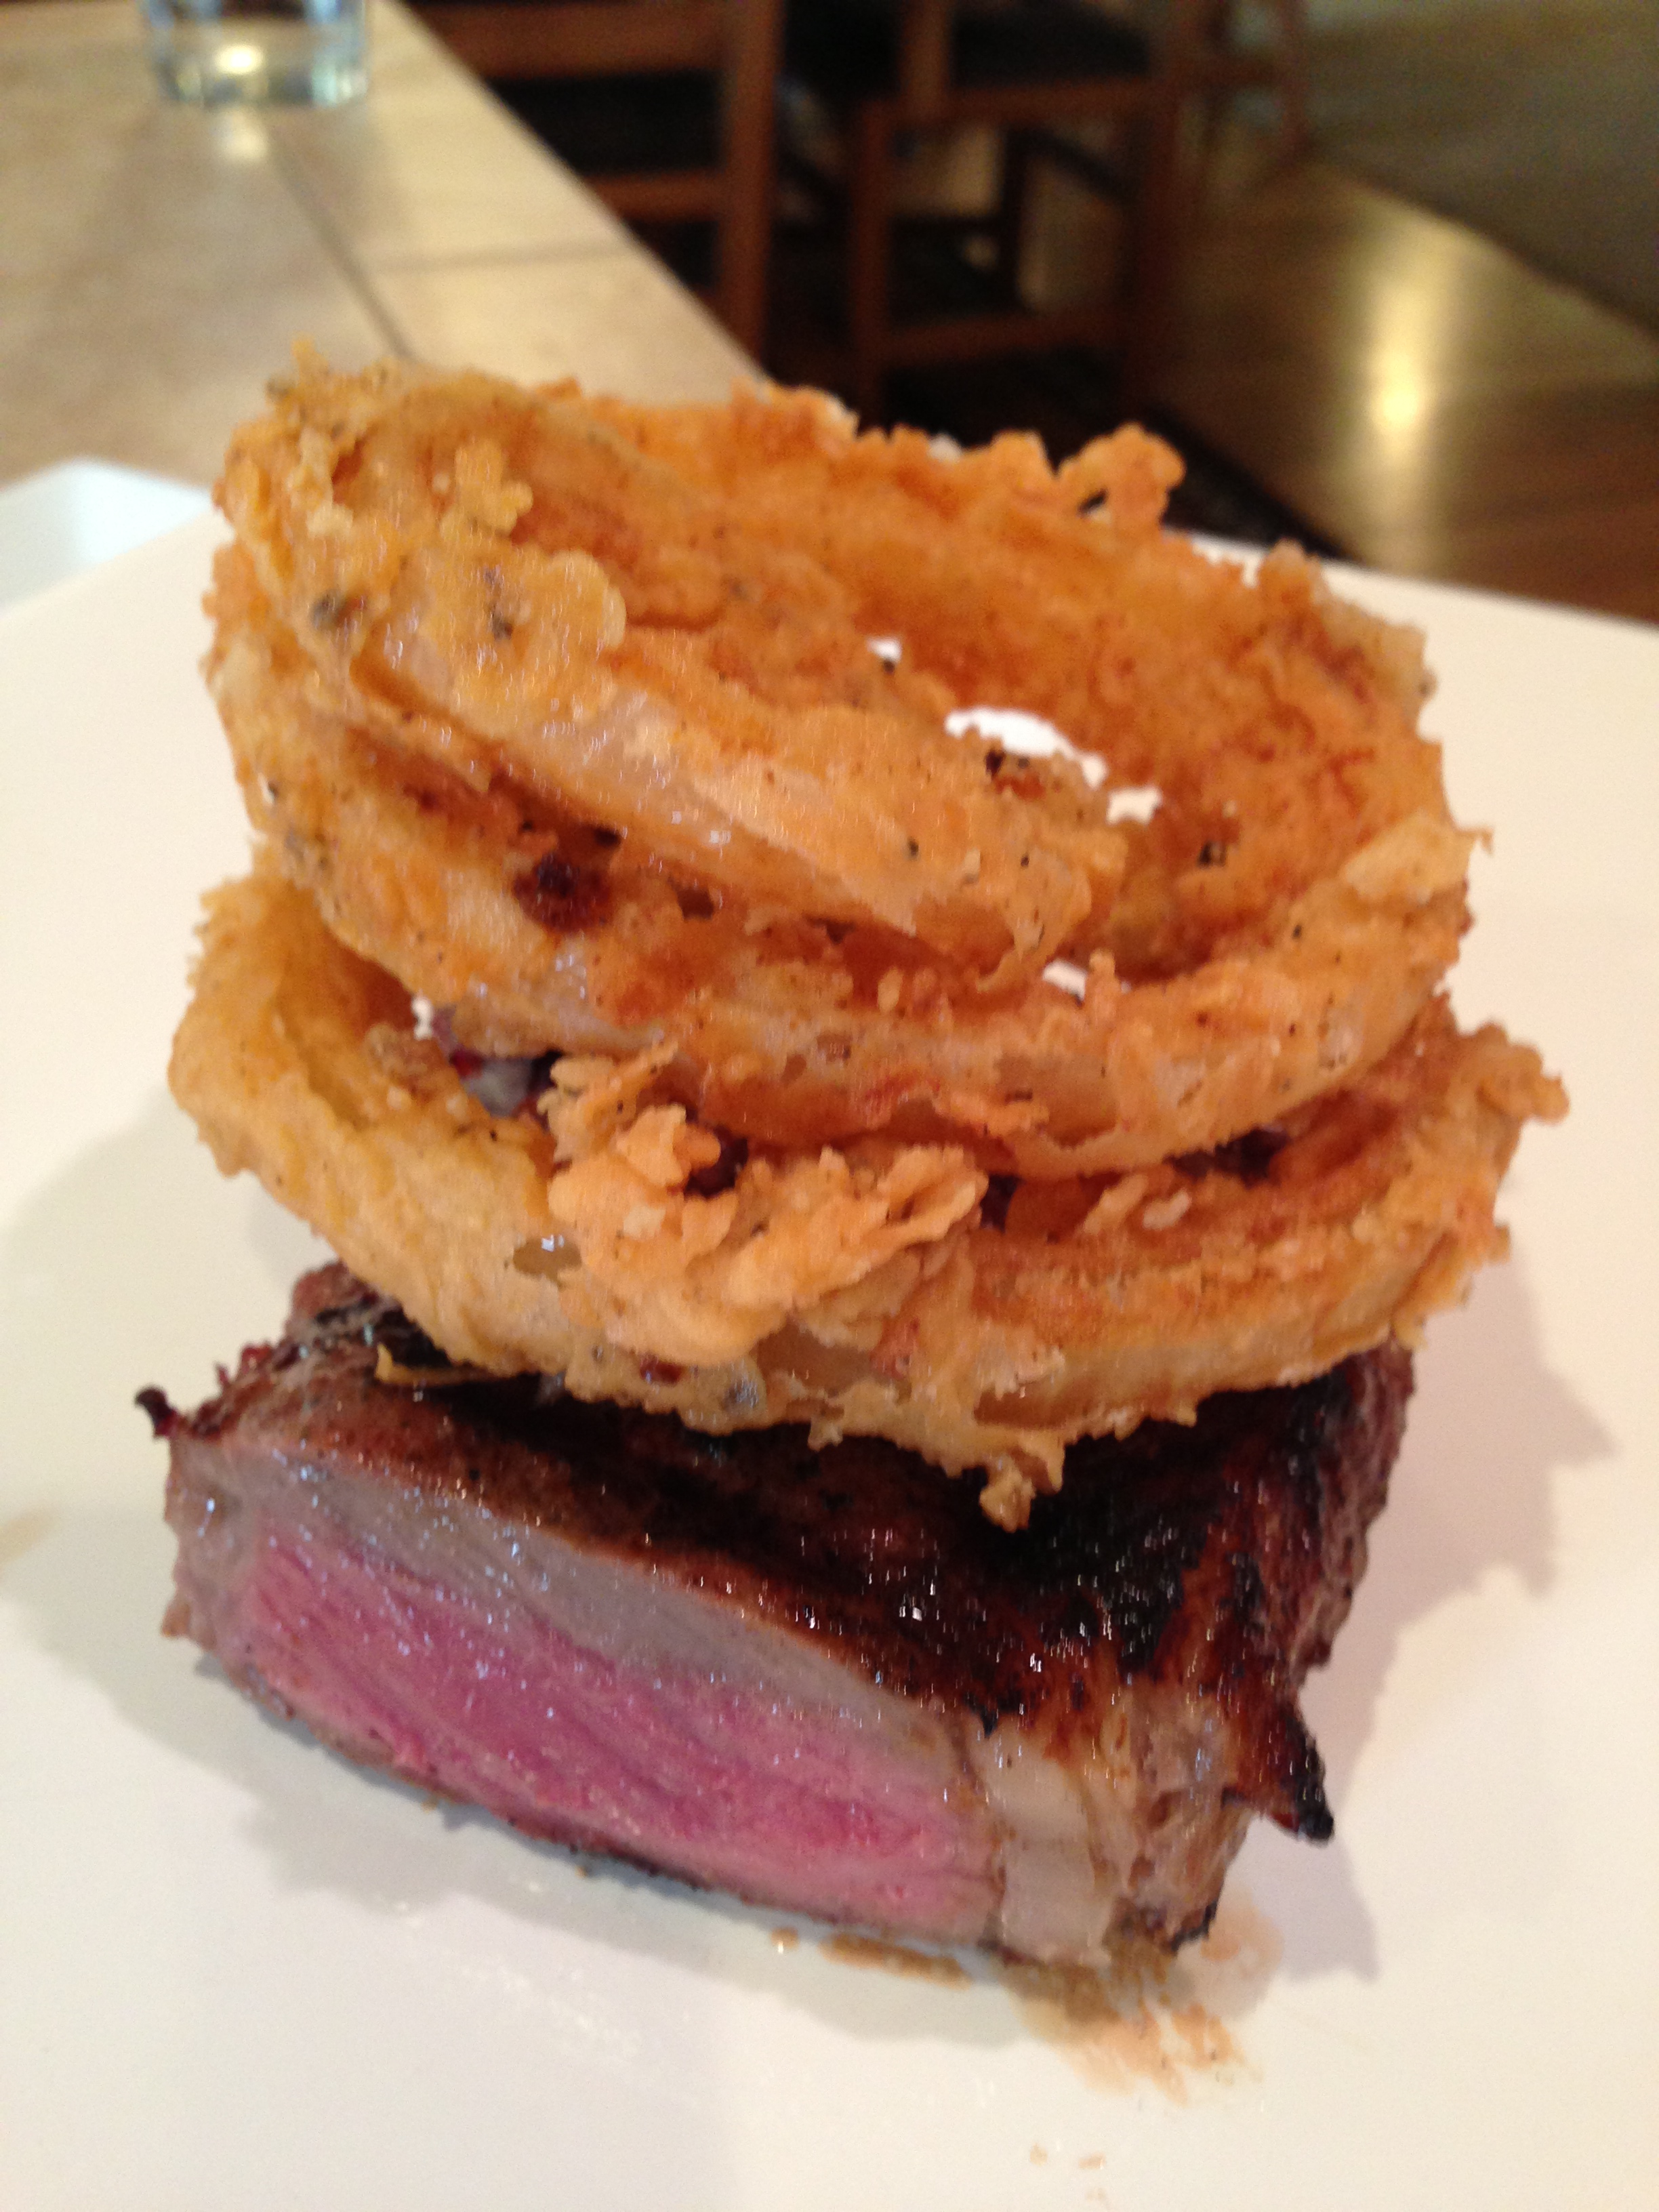
I am going to tell you, these might be the best I ever made. This is a great side dish to hamburgers, grilled meats, or just an appetizer. Winner, Winner Chicken Dinner!

Get after it.
Hunting Chef
Hunting the Oregon Chanterelle Mushroom
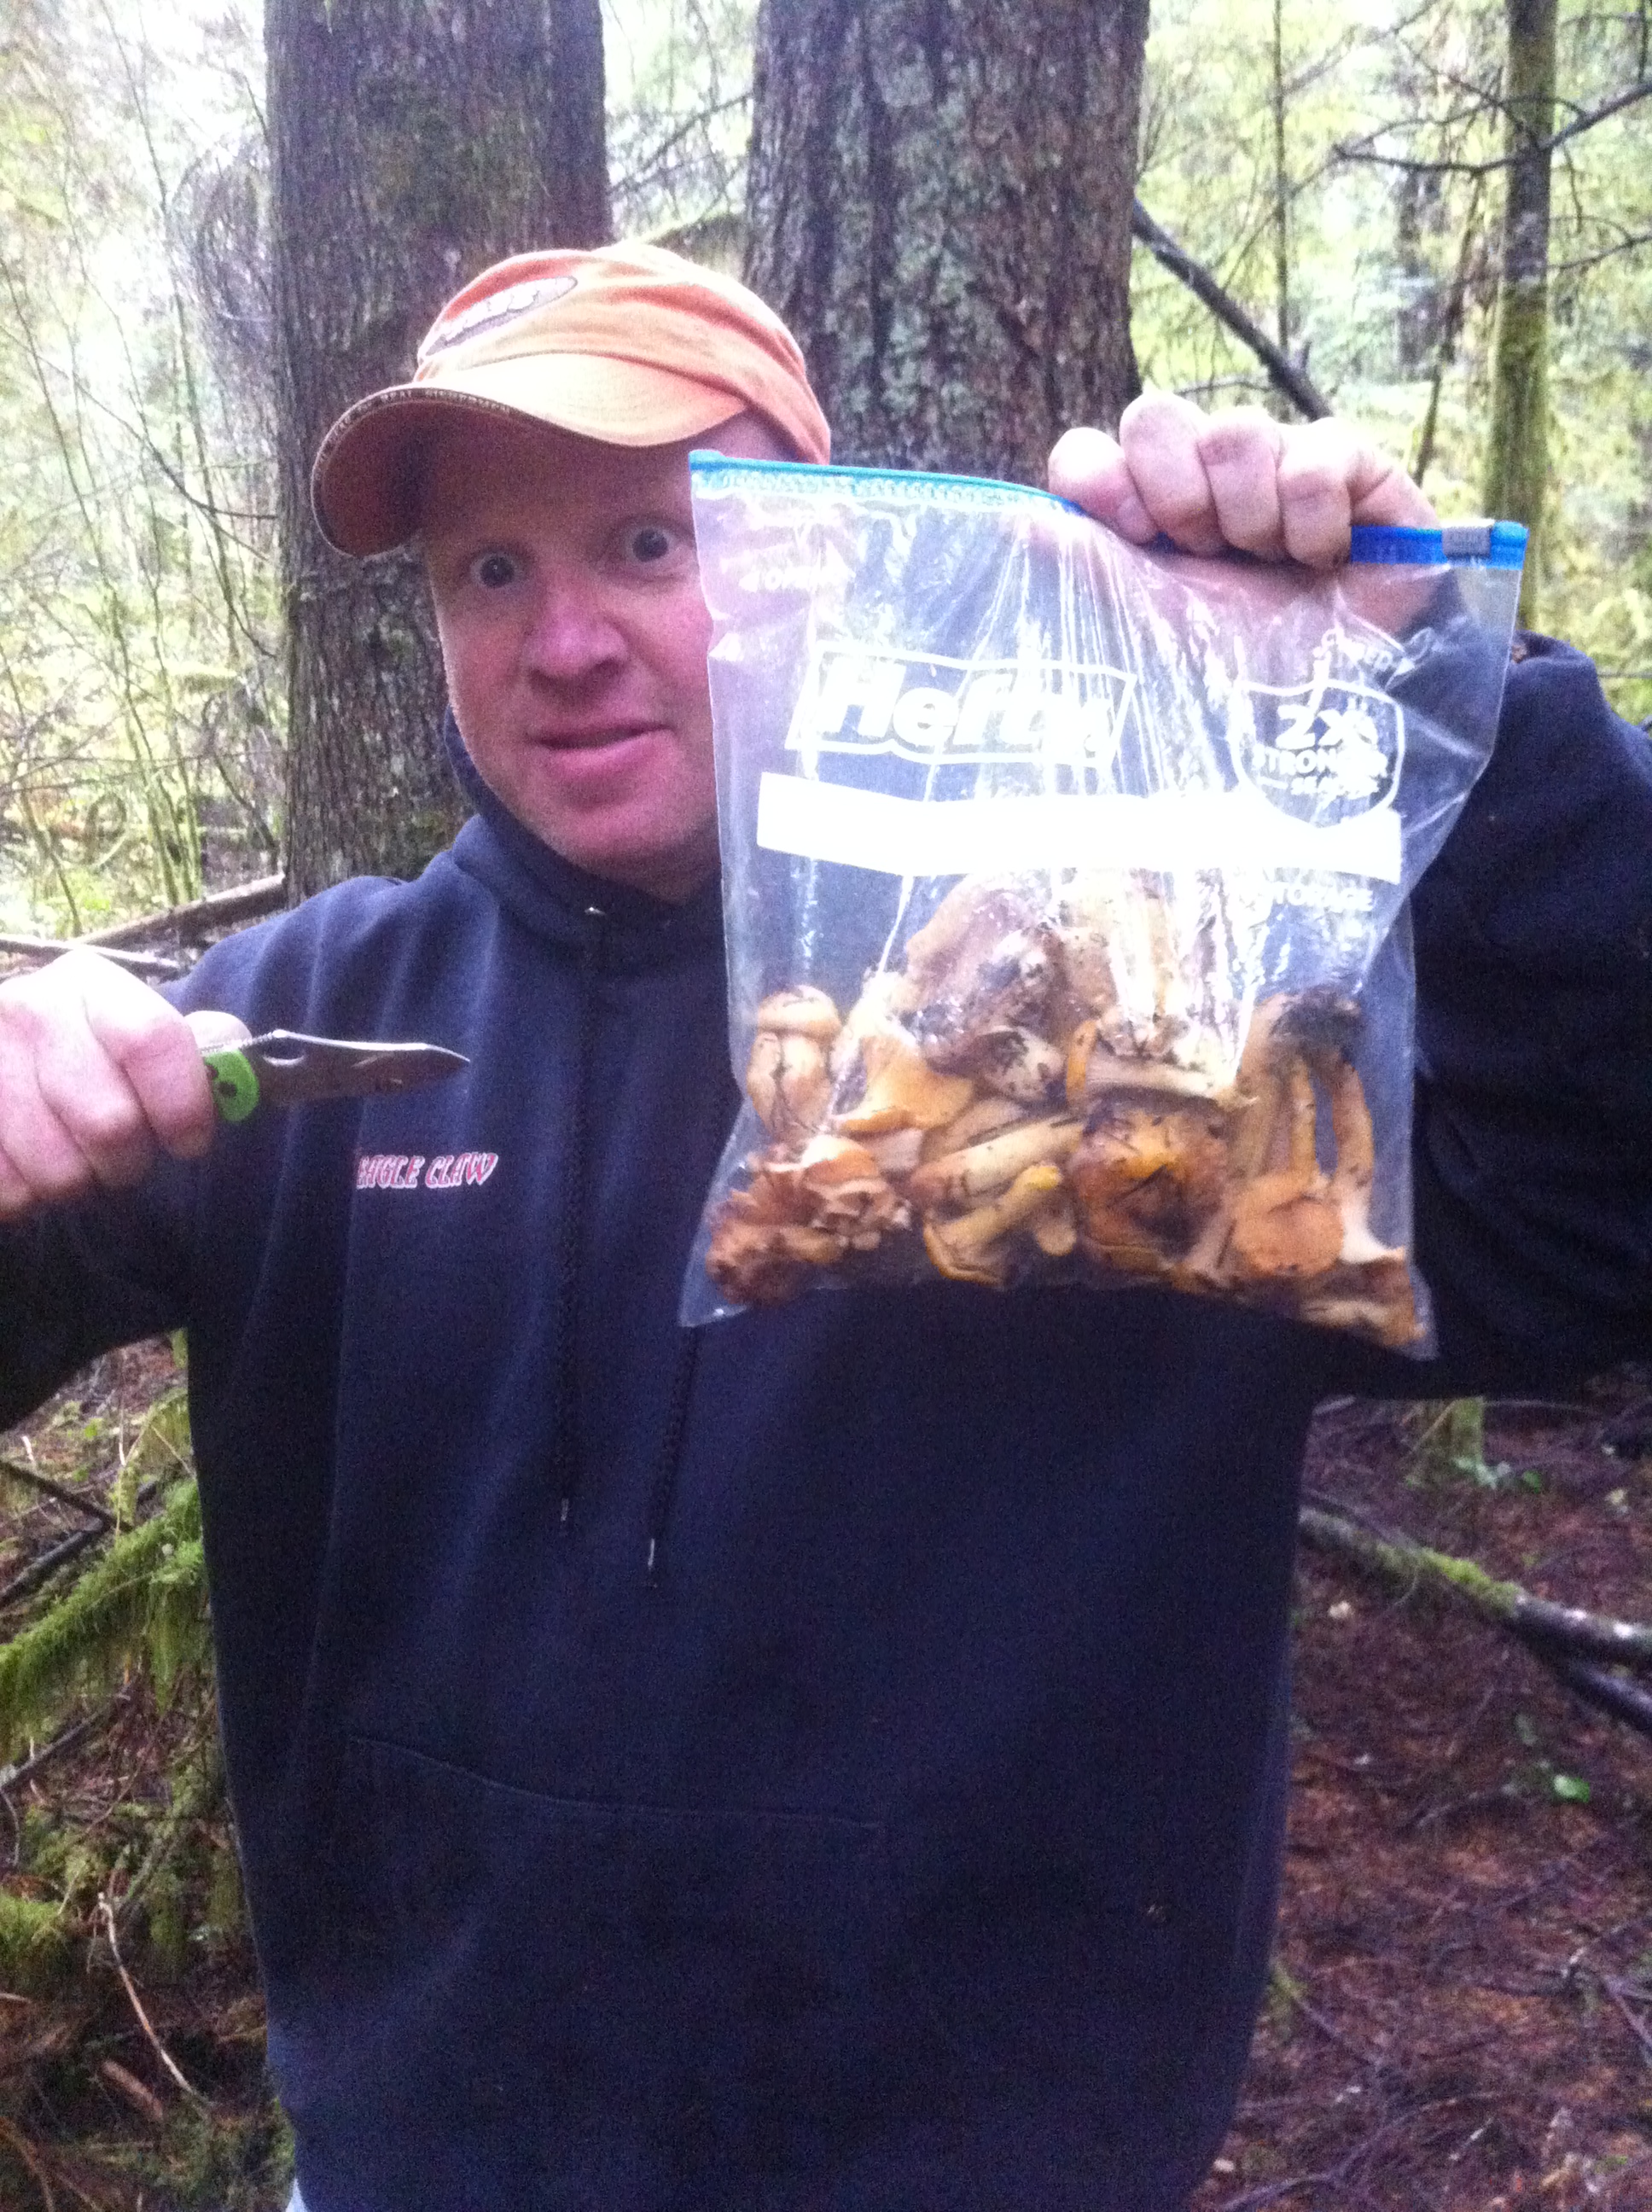
I am sorry I have been away, and unable to blog as of late. I went on a diet and workout regiment. Yes, the Hunting Chef has to watch his waist band from time to time just to keep in hunting shape. This blog is about hunting the illusive Oregon chanterelle mushroom with my ole pal Trevor Storlie and one of my favorite characters that I feature on the Hunting Chef site. His wife always calls jump me about harassing him on the internet, then she calls and complains that I have not blogged in a while. Sometimes it is just plain hard to make everyone happy. Plus I had to wait a long time to post this one because the Saturday we went picking, Trevor told her we were looking at fishing rods or something for his work, he is a fishing guide and uses the fishing rod excuse every month because he forgets he used it the previous month.
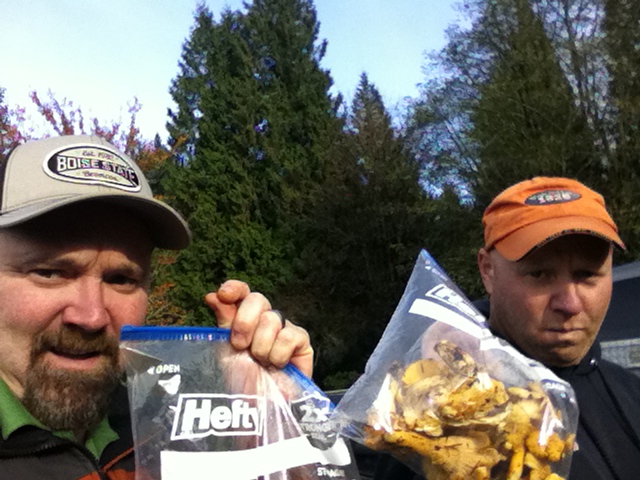
Trevor took me up near his house where he knew of some “Honey Holes” and we spent a few hours rummaging thru the forest floors looking for a glitter of Orange barely coming up thru the fallen leaves on the ground. Immediately it goes into a competition and the “Ring” is already back on line. The ring is worn by man who brings in the most mushrooms. We call thy ring….Precious.

Trevor likes the Chanterelle better than the Morel, but I like them both. However, if I was forced to choose I think I would take the meatier Morell over the Chanterelle. I do like the fact that the Morel comes in the Spring, where the Chanterelle grows in the fall.

Trevor wins the Precious Ring this day, and because we only got to go for a couple of hours one day and he and his wife decided to buy a house with a 50 acre yard he has his mowing responsibilities every weekend. I miss my buddy, and sometimes I contemplate back burning his entire yard.
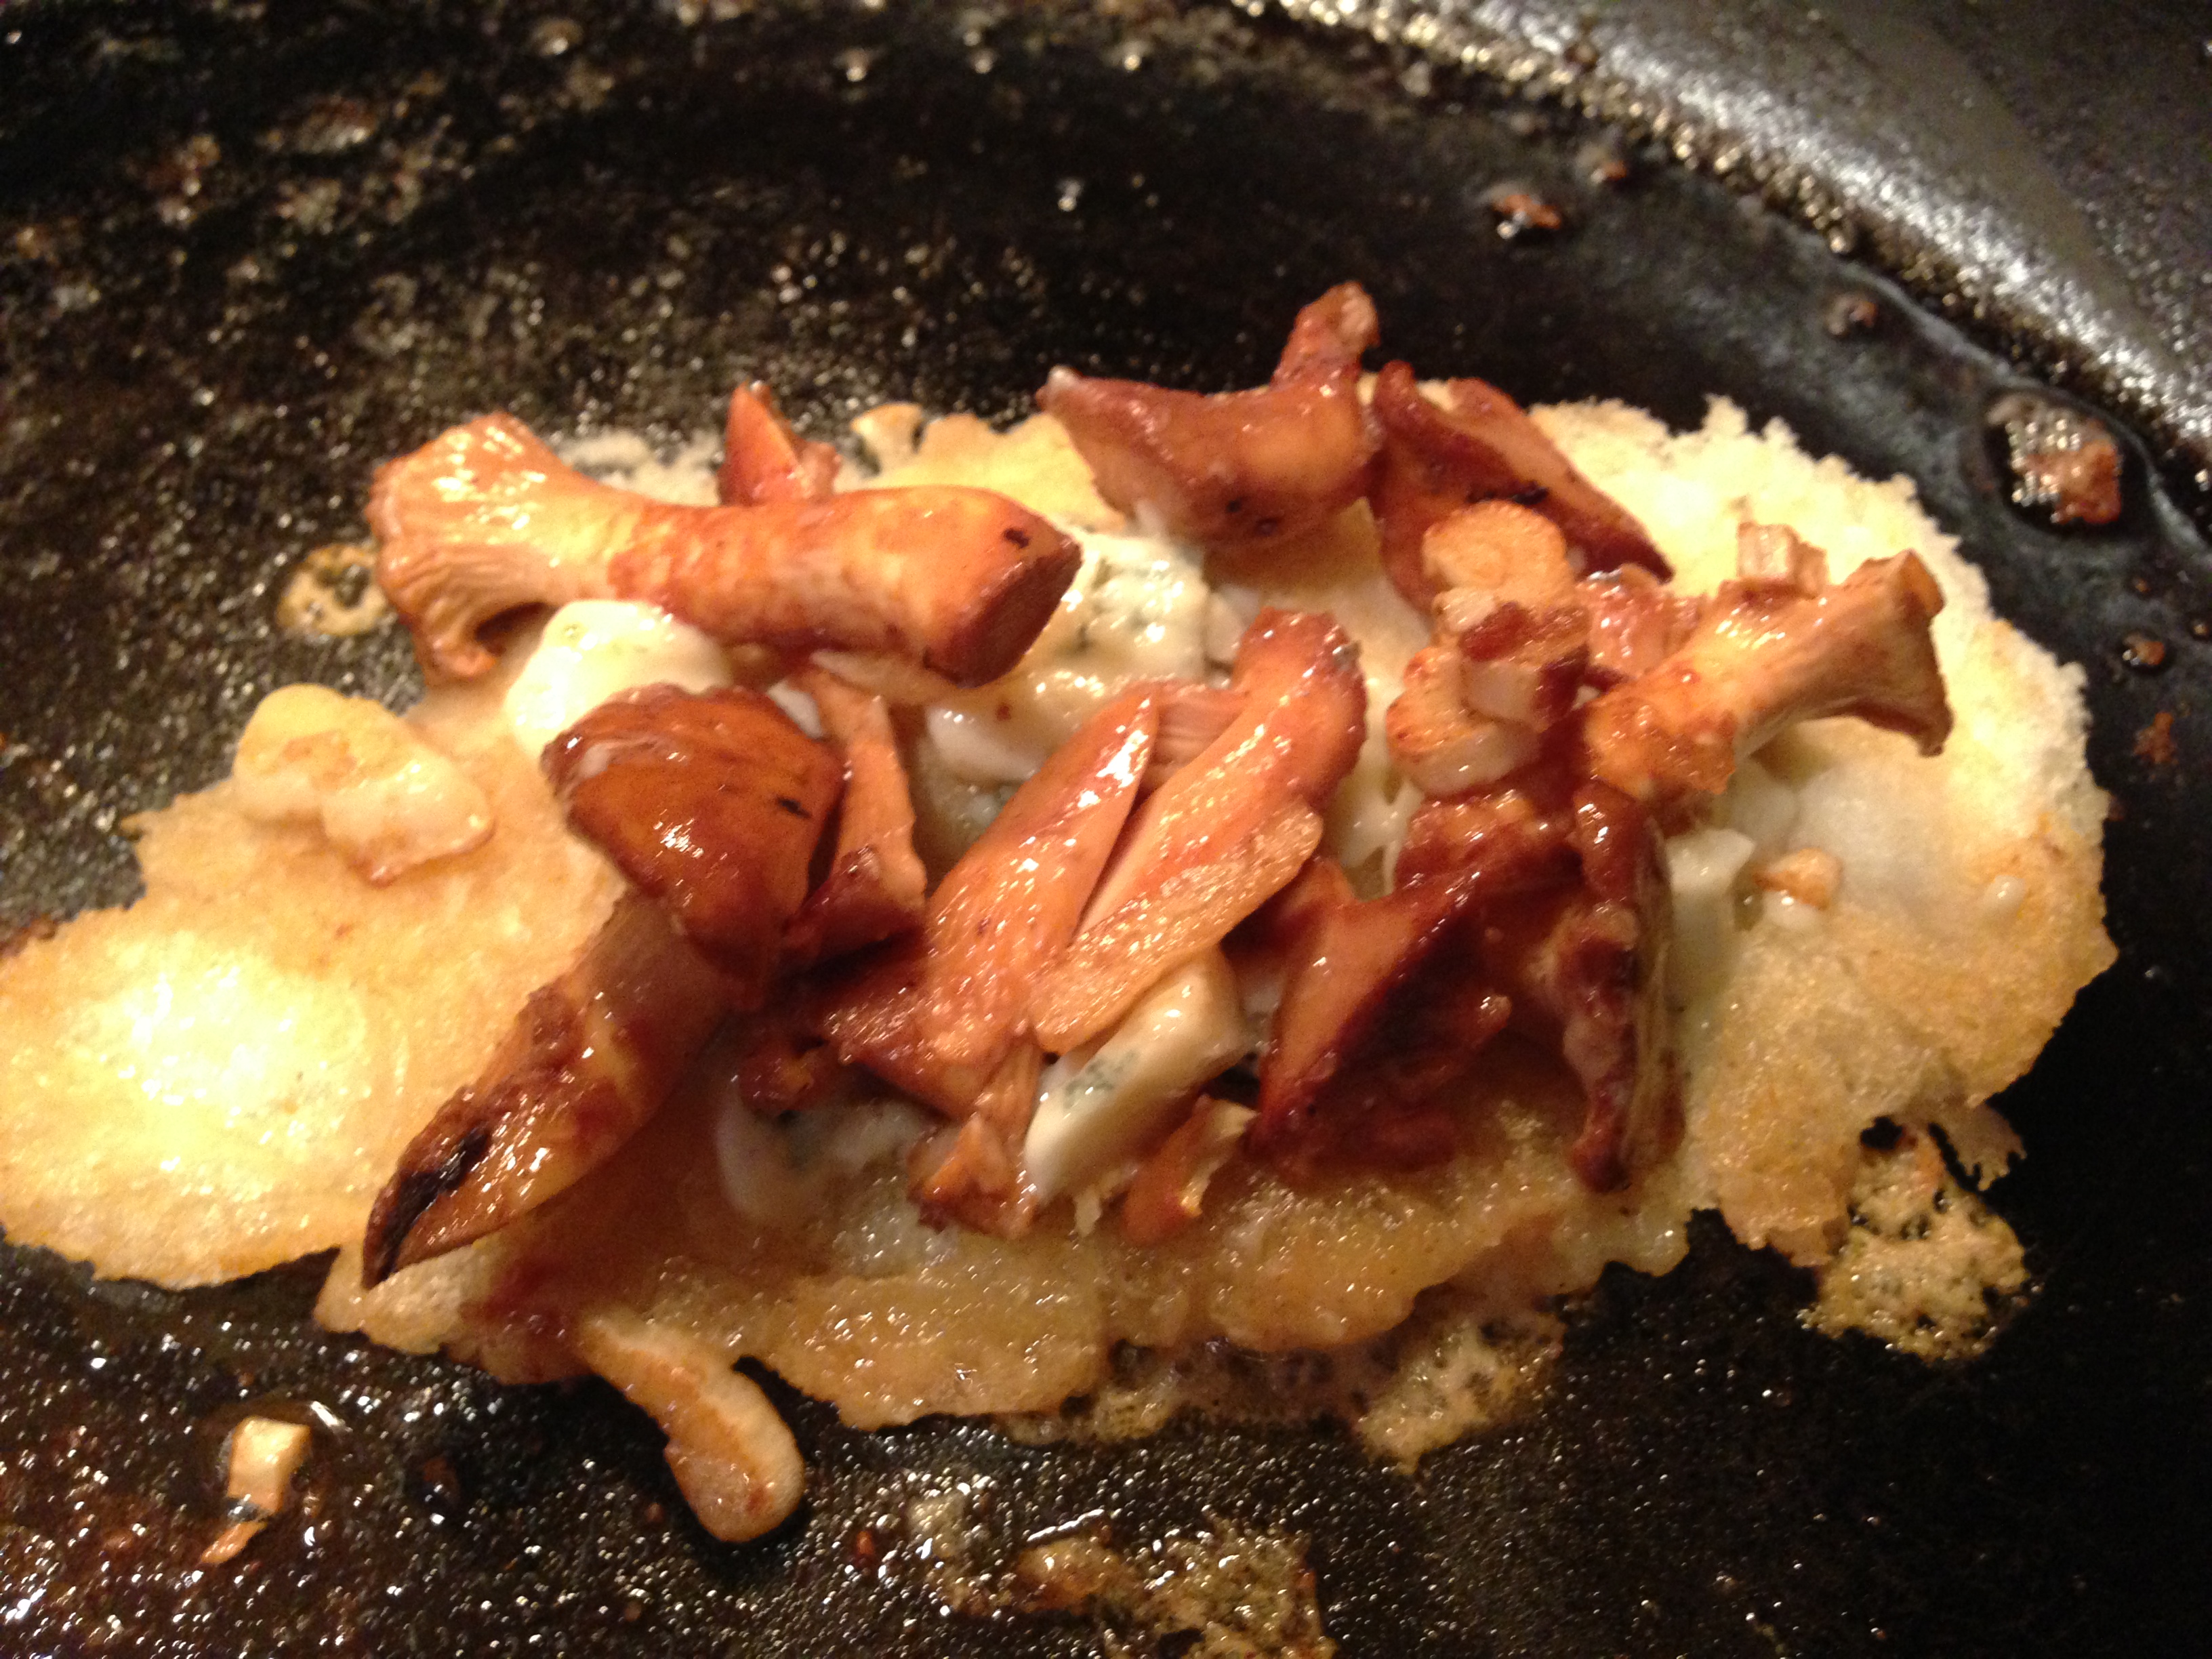
I like to take a little butter, and some white wine and cook the mushrooms with some garlic on medium heat. Then toast some bread with some blue cheese, and top with the cooked mushrooms. That there is Redneck Money.

Take the fresh bread and slice it. Do not use Franz white bread people. I was kidding about the Redneck thing.

Add your blue cheese and top with your mushrooms and garlic. This is gonna make you very, very happy.
I am not sure what Trevor does with his mushrooms. He never really talks about it. This is great on pizza, pasta, and steak.

Man, I am hungry just writing about this. This blog goes out to all those men that has a “Honey Do” list so long they can no longer find the time to hunt with their pals. This one is for you Trevor Storlie, the “Ghost of the Woods”. I call him that not because he is cool and quiet in the woods, because he is busy at home and is a Ghost to the woods.
Get out their and enjoy the wild people. Oregon is amazing for this, and I am grateful I live everyday here.
Hunting Chef

Recent Comments